
Another Dezod Kit! **UPDATES**


Thread Starter
Senior Member

SL Member
Team ScioNRG
Joined: Apr 2005
Posts: 4,113
From: Goldsboro, NC
Dezod Motorsports Stage I


Only thing holding me up is that i'm at the mercy of Jet-Hot. Manifold is off getting ceramic coated.
**UPDATE 12/3/06**
More eye-candy:

**UPDATE 12/5/06**
Clutch and plugs came in today. Clutch is going on thursday Dec. 14th. Plugs are in.

**UPDATE 12/8/06**
Intercooler is mounted!!! Alot easier than i projected which is GREAT! I was stressing this part the most due to having to drill the crash bar. That's some pretty tough metal i must say but even so, the install was perfect and it was dead center and even every which way the very first time! Props to Paul and the gang!
Pics:


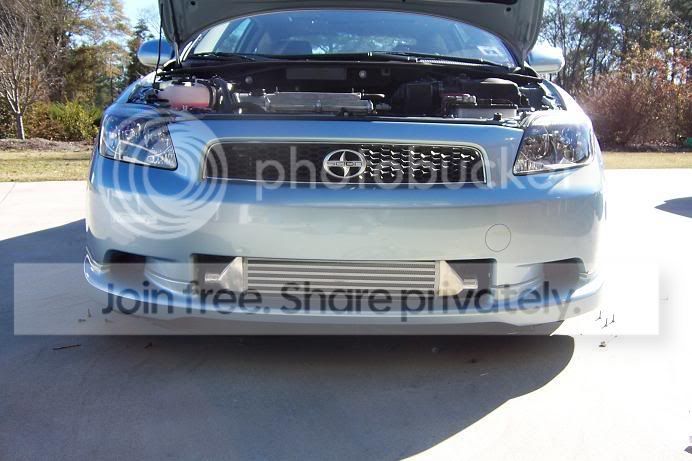


I even trimmed up the plastic crash absorber just so i wouldn't have to compromise my saftey

The only thing you must get rid of when the intercooler goes in is the 2 plastic shrouds under the front bumper. Wouldn't fit around the intercooler and they come off with 3-4 bolts bolts and a few clips. Again, simple.

Got an extra bung welded into the s-pipe for wideband but i think there may be a problem with clearance from feedback from other people running the kit. I eyed the position of the bung in relation to the stock secondary bung on the stock s-pipe but i'm not all too sure that the're in the exact same location. My hopes are high however.

Even mounted the emanage in the glove box. you see the PnP harness in there with it but only because i have no need to plug it in yet.

Well, now i've basically done everything i think i can do for now. Just waiting.........

**UPDATE 12/11/06**
Still no word on the manifold. Still waiting. While waiting i added 2 more "toys" to my collection:


**UPDATE** 12/13/06
The manifold will be arriving FRIDAY! Car is also going into the shop Friday morning 7:30am to have the clutch installed. The shop says it can have the car out by the end of the day, so i will be doing the final install friday evening or saturday morning depending on how beat i am. Either way, saturday is going to be a fun day trying to put 500 miles on the clutch before i can beat on it
**UPDATE** 12/14/06
Since having paul call me and telling me that the manifold was in, i decided to go ahead and do all of the actual install that i could possibly do w/o the manifold. Install is about 80% done. Only thing left doing is dropping in the turbo assembly, feed line, and bolting up the S-pipe to the downpipe. All that has been done:
-Injectors are in
-Emanage is in
-Pressure sensor and harness are in
-Vaccum plumbing is done minus plugging into the wastegate
-Intercooler is on
-All charge plumbing is in minus the charge pipe coming off the turbo
-Oil pan has been dropped, tapped, and reinstalled.\
Pics:


The only bad experience with the install thus far was the dang primary oxygen sensor. What happened to me has happened to lots of other peeps here on scionlife. When removing the primary oxygen sensor, the threads were eatten up, due to incorrect install when the parts were initially assembled. Assembler cross-threaded the sensor. So joy, due to someone else mistake it cost me $276 :
:


Manifold WILL be here tomorrow and the install will be complete, stay tuned!!! No pun intened
**UPDATE*** 12/17/06
Alright guys! The kit is 100% in and running!! I had a bit of a hinderance due to a problem with poping EFI fuses which was at fault for the secondary O2 sensor having it's outer wire covering melted through and touching a piece of metal attached to the block which all your EFI componets ground to, so i kept shorting out and popping fuses. The car had to spend the night at Target on its maiden voyage out to town because of this. Thanx a ton to Joe and Paul over at Dezod for helping me brainstorm on possible culprits to this problem.
So anyways, back to the kit. This kit runs STRONG!! The base map is exactly what it means, pretty base. Runs very rich under full throttle in boost and boggles a little in between gears. Getting a custom retune hopefully in 2 short weeks (gotta baby it til' then). Did the install entirely myself and only had minor issues. The biggest was a small fitment issue with the wastegate to the manifold and the dump flange into the downpipe. Wasnt' exactly perfect but after a bit of persuasion, i got it to see things my way, haha. Install went very smooth, however it was a pain in the neck, LITERALLY:

I pulled a muscle , or rather the doc said it was a muscle spasm from extreme exersion. (I look awful cuz i just woke up from trying to sleep in the neck brace all night. I guess that's what you get after lying on concrete all day. Haha, but in all seriousness the install went very very smoothly :D.
So impression of the kit thus far:
The turbo is LOUD. VERY LOUD! With the closed dump you can hear the compressor spooling up and screaming right in your ear! The bov, OMG! The BOV is the loudest freaking thing i've ever heard! (HKS SSQV with purple insert). The best part about the kit is the a/r housing on the exhaust side. It's a .48a/r and builds boost VERY quickly. You can build a pound or two simply by reving up on it. This is very very exciting to me because i use to have a turbocharged civic. I had a ball bearing garret T25 on it but the exhaust housing was an .80a/r which you could redline the car by reving up on it and build absolutely no boost what so ever. So with this turbo you can give it a nice good rev and PSSSSSSSSSSSSHHHHHHHHH! SWEET! Very very nice for when you want to "communicate" on the street. The car pulls very hard but with an AFR of ~10.5 there's lots more power to be gained with a retune.
Pics:


Here's the secret to making all the POWER:

Only thing holding me up is that i'm at the mercy of Jet-Hot. Manifold is off getting ceramic coated.
**UPDATE 12/3/06**
More eye-candy:
**UPDATE 12/5/06**
Clutch and plugs came in today. Clutch is going on thursday Dec. 14th. Plugs are in.
**UPDATE 12/8/06**
Intercooler is mounted!!! Alot easier than i projected which is GREAT! I was stressing this part the most due to having to drill the crash bar. That's some pretty tough metal i must say but even so, the install was perfect and it was dead center and even every which way the very first time! Props to Paul and the gang!
Pics:
I even trimmed up the plastic crash absorber just so i wouldn't have to compromise my saftey
The only thing you must get rid of when the intercooler goes in is the 2 plastic shrouds under the front bumper. Wouldn't fit around the intercooler and they come off with 3-4 bolts bolts and a few clips. Again, simple.
Got an extra bung welded into the s-pipe for wideband but i think there may be a problem with clearance from feedback from other people running the kit. I eyed the position of the bung in relation to the stock secondary bung on the stock s-pipe but i'm not all too sure that the're in the exact same location. My hopes are high however.
Even mounted the emanage in the glove box. you see the PnP harness in there with it but only because i have no need to plug it in yet.
Well, now i've basically done everything i think i can do for now. Just waiting.........
**UPDATE 12/11/06**
Still no word on the manifold. Still waiting. While waiting i added 2 more "toys" to my collection:
**UPDATE** 12/13/06
The manifold will be arriving FRIDAY! Car is also going into the shop Friday morning 7:30am to have the clutch installed. The shop says it can have the car out by the end of the day, so i will be doing the final install friday evening or saturday morning depending on how beat i am. Either way, saturday is going to be a fun day trying to put 500 miles on the clutch before i can beat on it
**UPDATE** 12/14/06
Since having paul call me and telling me that the manifold was in, i decided to go ahead and do all of the actual install that i could possibly do w/o the manifold. Install is about 80% done. Only thing left doing is dropping in the turbo assembly, feed line, and bolting up the S-pipe to the downpipe. All that has been done:
-Injectors are in
-Emanage is in
-Pressure sensor and harness are in
-Vaccum plumbing is done minus plugging into the wastegate
-Intercooler is on
-All charge plumbing is in minus the charge pipe coming off the turbo
-Oil pan has been dropped, tapped, and reinstalled.\
Pics:
The only bad experience with the install thus far was the dang primary oxygen sensor. What happened to me has happened to lots of other peeps here on scionlife. When removing the primary oxygen sensor, the threads were eatten up, due to incorrect install when the parts were initially assembled. Assembler cross-threaded the sensor. So joy, due to someone else mistake it cost me $276
Manifold WILL be here tomorrow and the install will be complete, stay tuned!!! No pun intened
**UPDATE*** 12/17/06
Alright guys! The kit is 100% in and running!! I had a bit of a hinderance due to a problem with poping EFI fuses which was at fault for the secondary O2 sensor having it's outer wire covering melted through and touching a piece of metal attached to the block which all your EFI componets ground to, so i kept shorting out and popping fuses. The car had to spend the night at Target on its maiden voyage out to town because of this. Thanx a ton to Joe and Paul over at Dezod for helping me brainstorm on possible culprits to this problem.
So anyways, back to the kit. This kit runs STRONG!! The base map is exactly what it means, pretty base
I pulled a muscle
So impression of the kit thus far:
The turbo is LOUD. VERY LOUD! With the closed dump you can hear the compressor spooling up and screaming right in your ear! The bov, OMG! The BOV is the loudest freaking thing i've ever heard! (HKS SSQV with purple insert). The best part about the kit is the a/r housing on the exhaust side. It's a .48a/r and builds boost VERY quickly. You can build a pound or two simply by reving up on it. This is very very exciting to me because i use to have a turbocharged civic. I had a ball bearing garret T25 on it but the exhaust housing was an .80a/r which you could redline the car by reving up on it and build absolutely no boost what so ever. So with this turbo you can give it a nice good rev and PSSSSSSSSSSSSHHHHHHHHH! SWEET! Very very nice for when you want to "communicate" on the street
Pics:
Here's the secret to making all the POWER:


Member
SL Member
Joined: Oct 2006
Posts: 49
From: Oahu, HI
it'd be great if somone could post how they routed their vac lines, I didn't have that digram you are working off of with my wastegate, well at least I never saw it, so I've been trying out some of the different routings in my BC manual and I really don't think I have it right yet, I've gone from hitting close to 15 psi, to about 2 psi, on what is supposed to be an 8.7psi spring, this is with the BC off,
to me "vent to atmosphere" just means to leave it open,
I'm gonna try routing it the way you described and see what happens
to me "vent to atmosphere" just means to leave it open,
I'm gonna try routing it the way you described and see what happens

Senior Member
SL Member
Joined: Jan 2006
Posts: 584
The poert on the top is to reference to atmoshperic pressure nothing gets hooked up on that. The one at the base of the wastegate goes to turbo outlet or at a port to reference manifold pressure, it's your call. Looks like the compressor oulet already has a spot for a barb-fitting so it will make it easier to do it that way if you want to. I've got my wastegate referenced of manifold pressure so my pressure guage and my waste-gate spring read of the same spot. Our cars run on relatively low boost pressure so it's not a big deal. If you where pushing like 16PSI then you may need to control the wastegate directly from the compressor outlet to prevent boost spikes.


Thread Starter
Senior Member
SL Member
Team ScioNRG
Joined: Apr 2005
Posts: 4,113
From: Goldsboro, NC
Originally Posted by zer0
how does the WG connect to the DP?


My only concern is exhaust leak?

Senior Member
SL Member
Joined: Apr 2006
Posts: 620
From: houston, TX
Originally Posted by zer0
Yea, exhaust leak for sure... that concerns me...although it is better then dumping to the engine bay, i dont understand the design..
It looks like that flange will slide right in.. the pressure of the system/heat should in theory make it a snug fit. Looks like the bolt together also.. or i'm reading it wrong.. Joe/Paul.. you guys chime in?
I can show you an old electronic version of the manual on how things fit together.. but I think the manual has been updated since then

Senior Member
SL Member
Joined: Apr 2006
Posts: 620
From: houston, TX
Originally Posted by satoman44
top port on wastegate is left open, the other barb connects a vac line to vac source, obtained most likely from your tapped vac source (brake booster in most cases).
Thread Starter
Senior Member
SL Member
Team ScioNRG
Joined: Apr 2005
Posts: 4,113
From: Goldsboro, NC
Originally Posted by cz3ch
Originally Posted by satoman44
top port on wastegate is left open, the other barb connects a vac line to vac source, obtained most likely from your tapped vac source (brake booster in most cases).
Thread Starter
Senior Member
SL Member
Team ScioNRG
Joined: Apr 2005
Posts: 4,113
From: Goldsboro, NC
Originally Posted by Byta27
nice man ur gonna love it