
FAQ Head Unit Blue Conversion (or any color)


Thread Starter
Senior Member
SL Member
Joined: Mar 2005
Posts: 180
From: San Francisco, CA
Tools needed:
2 3mm Blue LEDs
30 0603 Blue LEDs (order extra for backup)
Tweezer
15 or 20 watt soldering iron
solder
10mm socket with wrench
screwdriver
Edit: This is for '05 HU... for '06, there is a picture on page 3 of the PCB of iPOD HU.. props to Jowie... for '05, there are 30 to be replaced, in '06, 34 to be replaced...
Take the head unit off by unscrewing 2 screws(bottom) with Philips screw driver and 2 bolts(top) with 10mm socket and socket wrench.
Unplug the 2 groups of wires, which are clipped onto the Head Unit, and the antenna for radio.
Take the whole Head Unit with 2 metal brackets on each side to your clean working area.

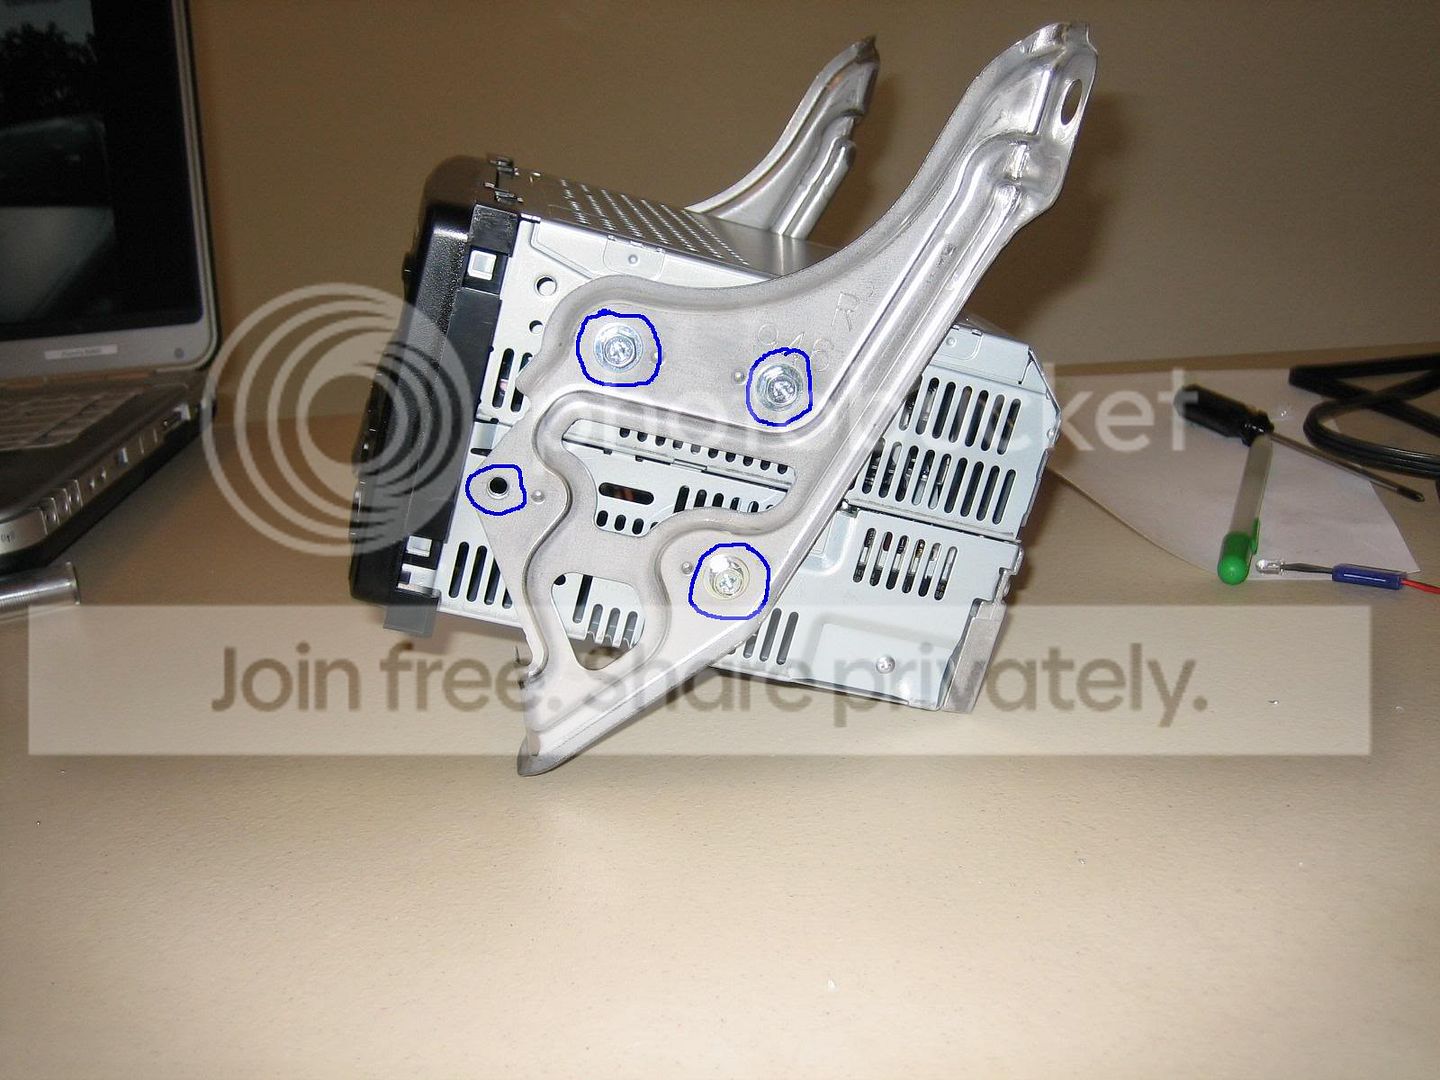
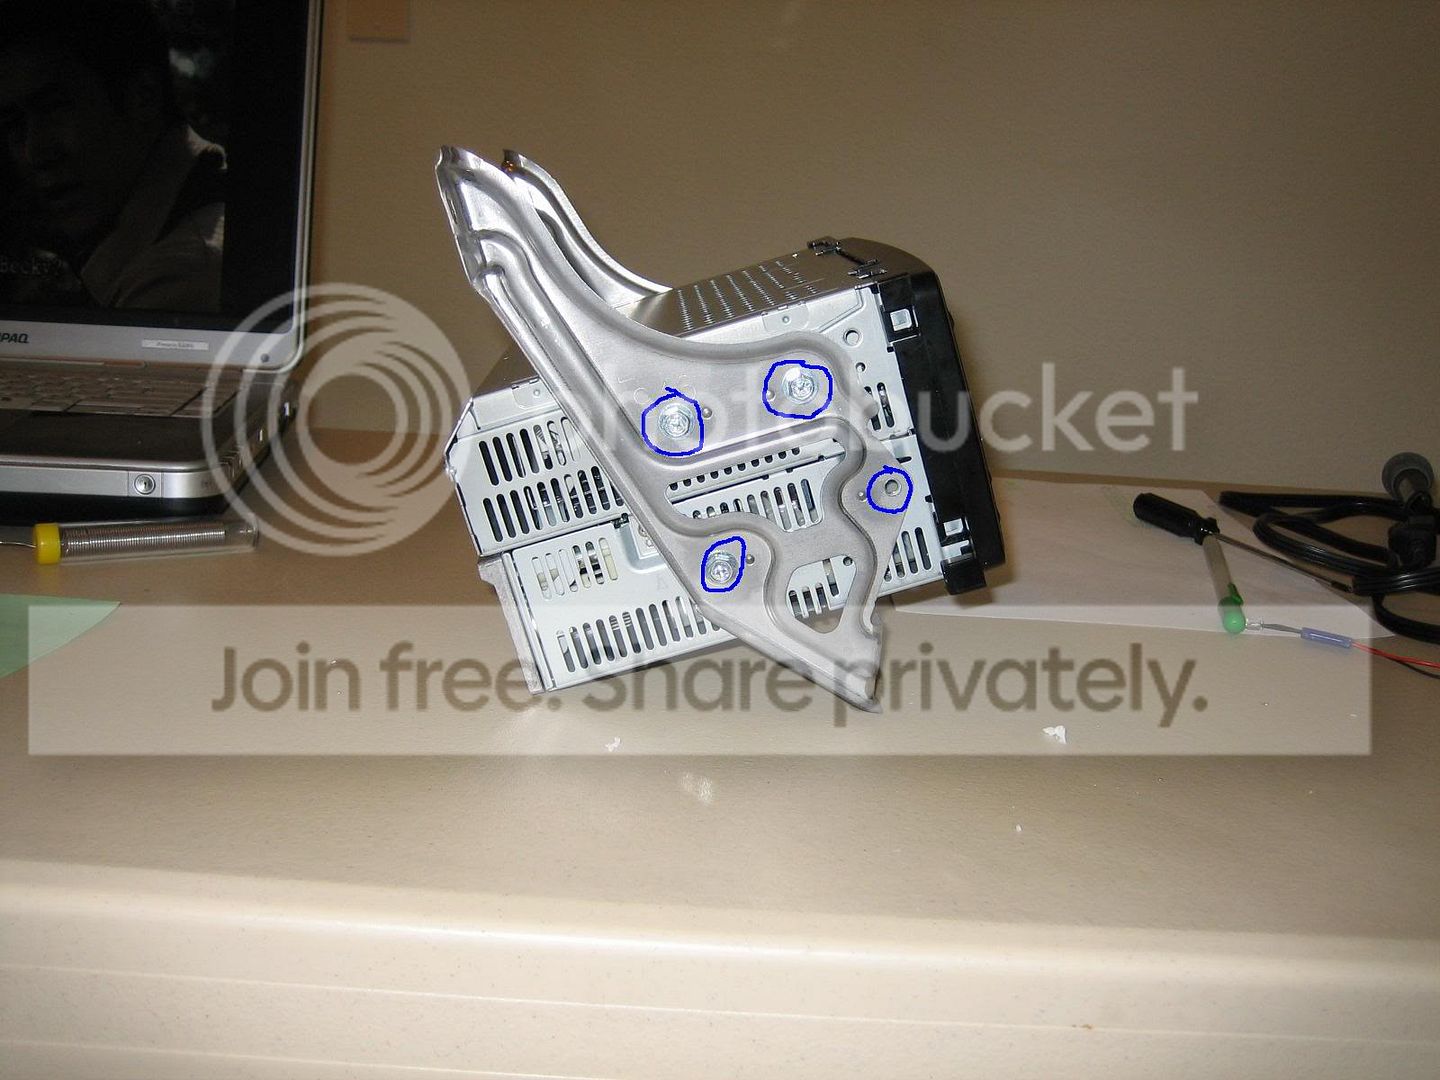
There are 8 screws to be unscrewed using Philips screw driver again. Take the 2 brackets off.
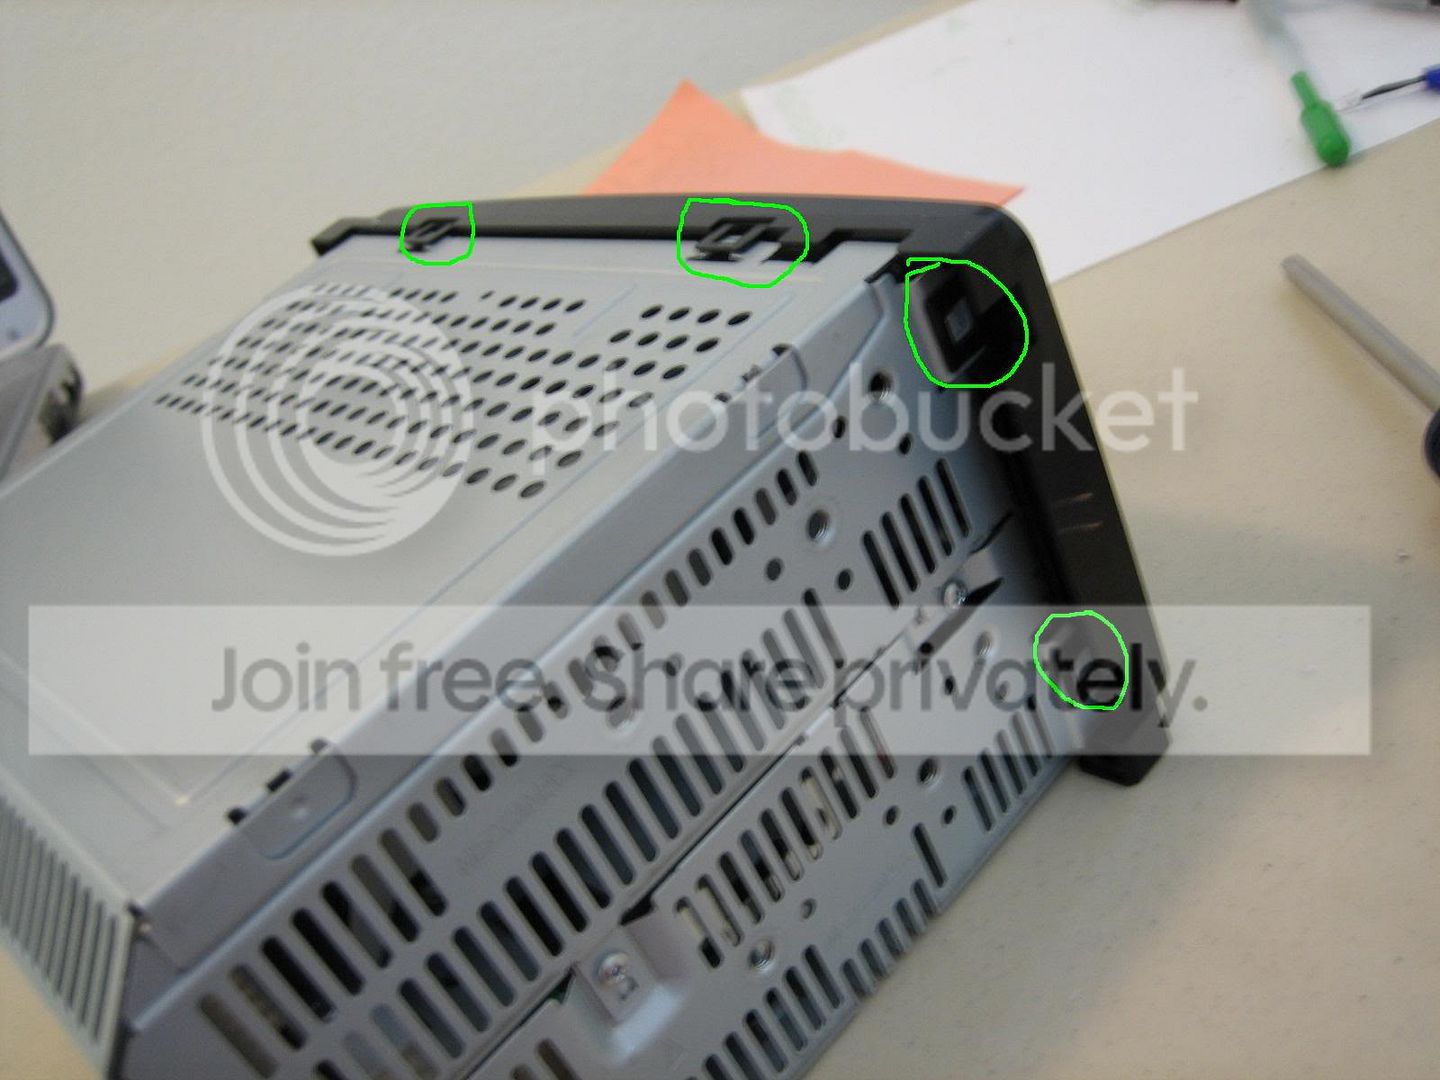
Now, you have the Head Unit sitting on your working area. There are 6 clips that hold the front plate...
 [img]
[img]
Make the front plate loose and put it aside. You can separate the part for LEDs and buttons from the part holding the CD.
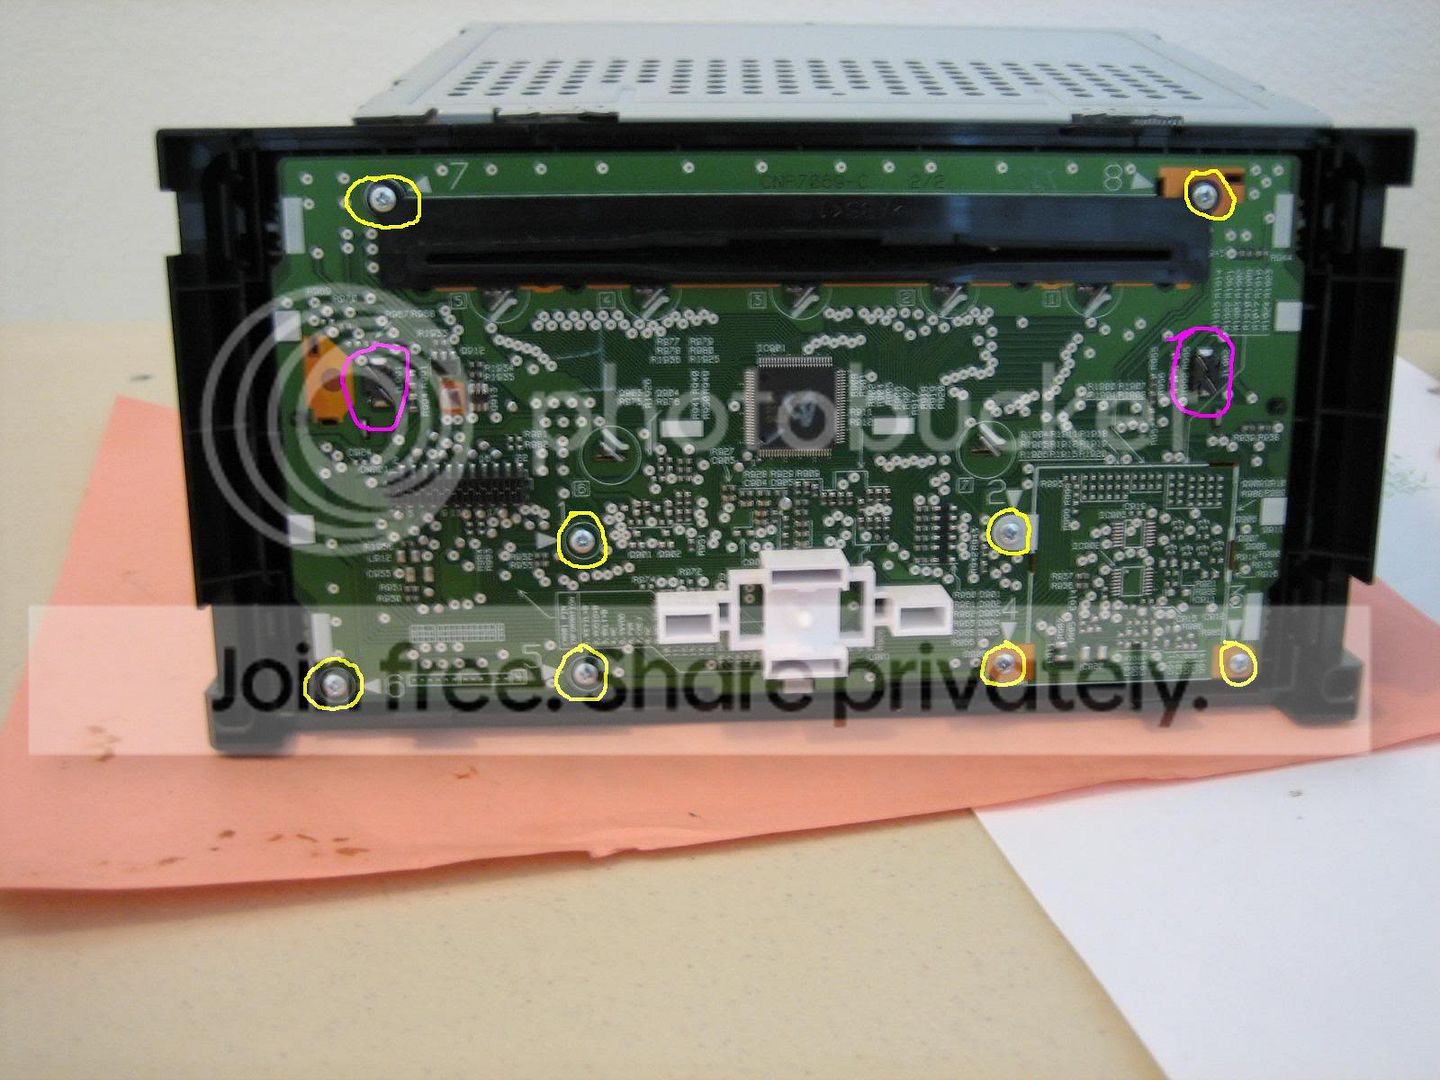
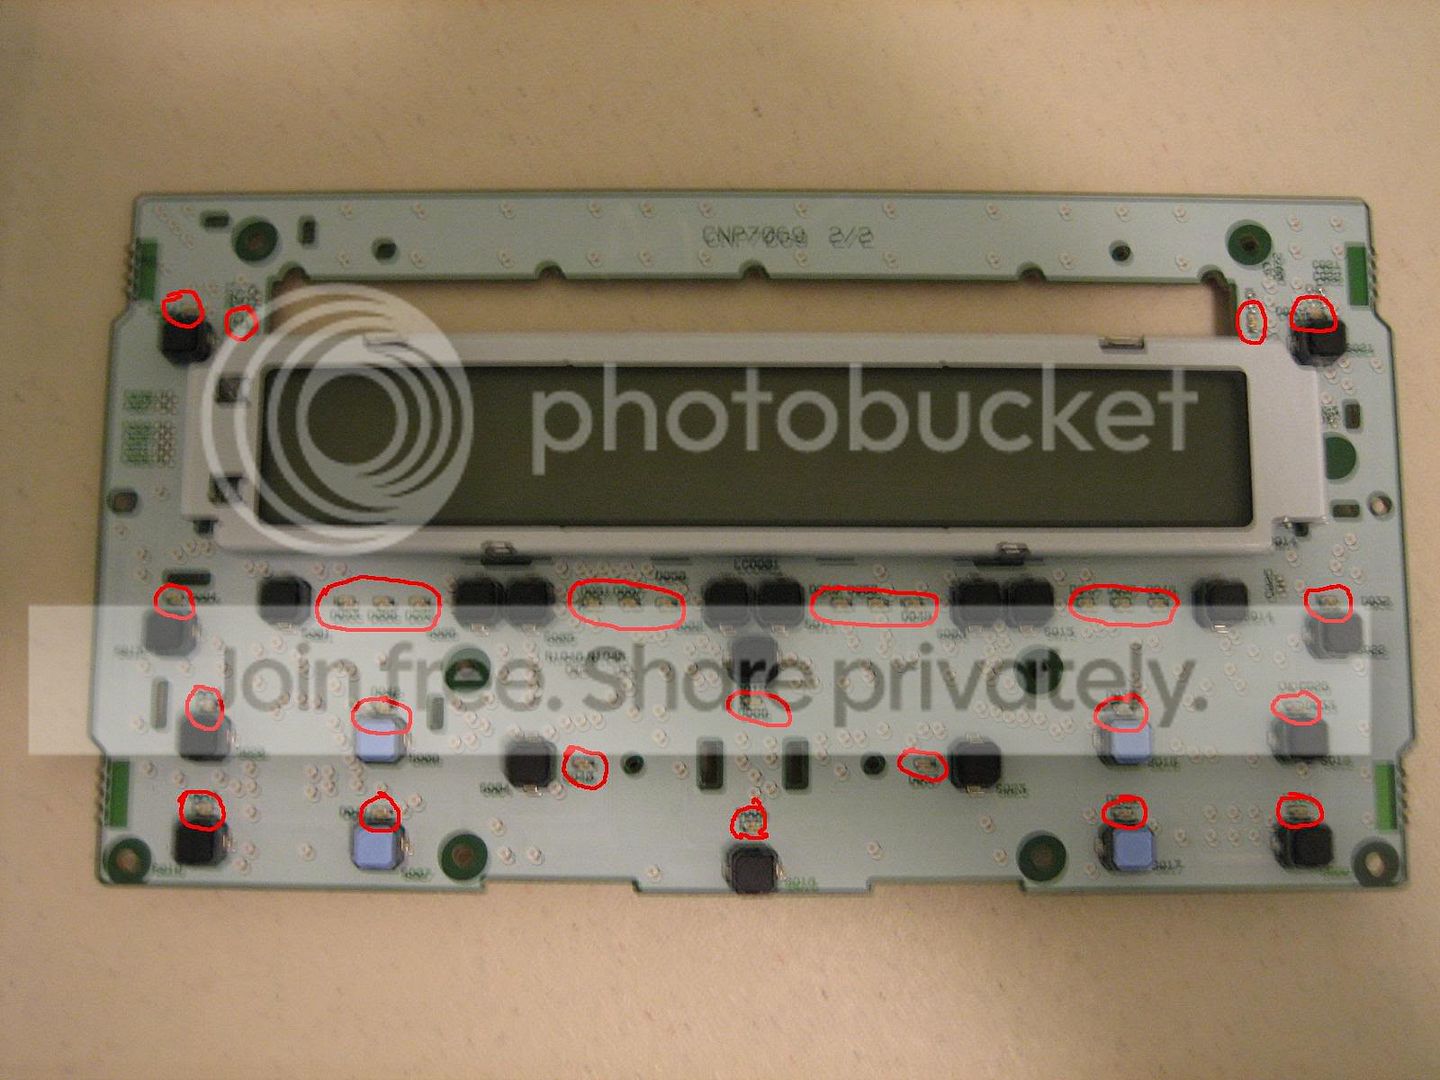
Unscrew all ( screws (in yellow) from the back of the LEDs' board and you should have the PCB alone in the clean working area. The purple circles 2 3mm LEDs for LCD display.
There are 30 LEDs to be replaced for the buttons. Order more for backup... These LEDs are extremely small, so be alert!
Here's the polarity that Blue_Estel makes, give props to him!
www.detroitscion.com/radio_diy/led_polarity.pdf
There are LEDs that you may not have enough space to remove them with tweezer...
I used a broken LED legs to help removing those... hope this helps
After you have replaced all of them, test them first before you reassemble the HU.
Reassemble the HU and plug the antenna and 2 groups of wires back in...
Put it back to its original position and you are done~!
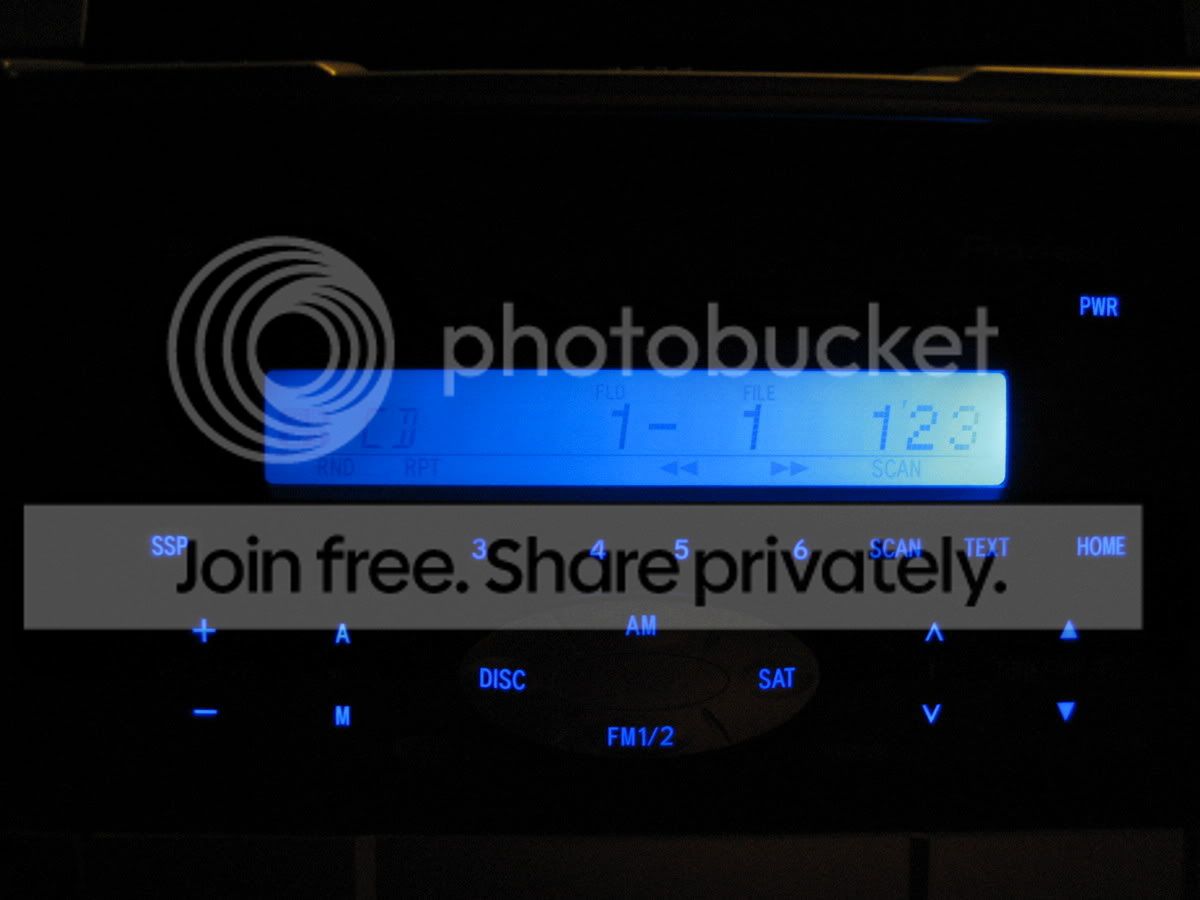
Although I still have several LEDs to replace, here is a general picture afterward...
The left 3mm LED for the LCD Display on my HU is a lil off... will fix the angle later...
I'll modify this post with updated pictures after I take more of disassembling and reassembling the HU and the result of the conversion! Feel free to ask any questions!
Give Props to Blue_Estel, engifineer, and everybody who have given clues for me doing this mod!
updated w/ pics. sorry for blurry pics...
2 3mm Blue LEDs
30 0603 Blue LEDs (order extra for backup)
Tweezer
15 or 20 watt soldering iron
solder
10mm socket with wrench
screwdriver
Edit: This is for '05 HU... for '06, there is a picture on page 3 of the PCB of iPOD HU.. props to Jowie... for '05, there are 30 to be replaced, in '06, 34 to be replaced...
Take the head unit off by unscrewing 2 screws(bottom) with Philips screw driver and 2 bolts(top) with 10mm socket and socket wrench.
Unplug the 2 groups of wires, which are clipped onto the Head Unit, and the antenna for radio.
Take the whole Head Unit with 2 metal brackets on each side to your clean working area.
There are 8 screws to be unscrewed using Philips screw driver again. Take the 2 brackets off.
Now, you have the Head Unit sitting on your working area. There are 6 clips that hold the front plate...
[img]Make the front plate loose and put it aside. You can separate the part for LEDs and buttons from the part holding the CD.
Unscrew all (
There are 30 LEDs to be replaced for the buttons. Order more for backup... These LEDs are extremely small, so be alert!
Here's the polarity that Blue_Estel makes, give props to him!
www.detroitscion.com/radio_diy/led_polarity.pdf
There are LEDs that you may not have enough space to remove them with tweezer...
I used a broken LED legs to help removing those... hope this helps
After you have replaced all of them, test them first before you reassemble the HU.
Reassemble the HU and plug the antenna and 2 groups of wires back in...
Put it back to its original position and you are done~!
Although I still have several LEDs to replace, here is a general picture afterward...
The left 3mm LED for the LCD Display on my HU is a lil off... will fix the angle later...
I'll modify this post with updated pictures after I take more of disassembling and reassembling the HU and the result of the conversion! Feel free to ask any questions!
Give Props to Blue_Estel, engifineer, and everybody who have given clues for me doing this mod!
updated w/ pics. sorry for blurry pics...

Senior Member
SL Member
Joined: May 2005
Posts: 5,103
From: I'm da BOOM King!!!
Nice write-up so far! Either your 6th & 7th pix are real blurry, or I really did drink a lot of beer tonight!  Pix made me kinda dizzy.
  Keep us posted as you progress! How long has it took so far? I would like to do this in green.

Thread Starter
Senior Member
SL Member
Joined: Mar 2005
Posts: 180
From: San Francisco, CA
I'll take another picture for the 30 LEDs... that's my shaky hand problem when not using flash light on my camera... sorry about that... the LEDs i bought are from mouser.com.... just search 0603 blue (or any color you want)... they are 40mcd.... i suppose that's bright enough....


Thread Starter
Senior Member
SL Member
Joined: Mar 2005
Posts: 180
From: San Francisco, CA
I took the HU apart several times.... took me around 4-5 hrs I think... but in 2 days.... the first day I didn't know the polarity... so I replaced all of them with most of them in incorrect direction... the second day I fixed the polarity, but I didn't have enough becuz when I desolder, the LED part was pulled out instead of the whole LED.... so they were broken.... now waiting for new LEDs to come...

Senior Member
Scikotics
SL Member
Joined: Feb 2005
Posts: 1,396
THANK YOU....THANK YOU...i have been waiting for a nice write up for a while.......exactly how do we know the polarity???.....that would be a good note to add in the walkthrough.....you are the man by the way!!!!!!

Thread Starter
Senior Member
SL Member
Joined: Mar 2005
Posts: 180
From: San Francisco, CA
from the original thread,
Blue_Estel indicates that there should be resistors on both LEDs... however, I am not sure how much the resistor should be... for the 3mm LEDs, there are 2 black blocks, the purple circle on one of the pictures above. They can be desoldered from the back of the PCB and you don't need to get the LCD out... there are glasses on each side of the LCD that reflect the light from the 3mm LEDs... just desolder the black things and you will see a LED in pretty solid yellow...
jmiller, for the 0603 LEDs, the mcd is 40mcd, 470nm...
I found out that the extra LEDs I ordered aren't exactly the same as the ones I bought before... I didn't get them to work... tried to find the old ones on mouser.com and they are out of them.... may go to a electronic supply store on monday to see if they have 0603 LEDs.... if someone can get the LEDs working, let me know...
Senior Member
Scikotics
SL Member
Joined: Feb 2005
Posts: 1,396
Hey guys in case you didnt see my post here
https://www.scionlife.com/forums/vie...299&highlight=
thanks to you guys

couple of notes for the Walk through
- When you take off the plastic front cover beware that the buttons are not stuck in there and if you flip it over to look at it like me....then they will fall all over the place!!!!
- The Lcd leds are easy to remove...once you desolder it from the back, which after doing those micro mini ones that one was a breeze....just remove the wires by bending them back pull the led through...then slip the new led in...NOTE the wires will be very long....once the wires are through follow the same bending as previous wire and clip the ends off.....place the led back on the board and resolder...make sure you test it to see if it works...both worked for me on the first try...they were the easiest thing to do
-Have extra LEDs
-It took me 4 HOURS so be prepared and have time and be patient!!!!
-last always go back and check after a few leds or so.....and fix any that dont light up.....i only had one while i was doing this that needed to switch the polarity on!!!!
-For those that want to know polarity....on the stock LED itself....there is a small dark spot that is further to on side then the other... and the new LED should have the same look with the dark spot....that equals the negative side.....so then use the polarity sheet provided by blue_estel from the link from the first post and follow accordingly.
-Thats all i can think of.....enjoy and check out my post!!!!
Thanks again!!!!
~Jason
https://www.scionlife.com/forums/vie...299&highlight=
thanks to you guys
couple of notes for the Walk through
- When you take off the plastic front cover beware that the buttons are not stuck in there and if you flip it over to look at it like me....then they will fall all over the place!!!!
- The Lcd leds are easy to remove...once you desolder it from the back, which after doing those micro mini ones that one was a breeze....just remove the wires by bending them back pull the led through...then slip the new led in...NOTE the wires will be very long....once the wires are through follow the same bending as previous wire and clip the ends off.....place the led back on the board and resolder...make sure you test it to see if it works...both worked for me on the first try...they were the easiest thing to do
-Have extra LEDs
-It took me 4 HOURS so be prepared and have time and be patient!!!!
-last always go back and check after a few leds or so.....and fix any that dont light up.....i only had one while i was doing this that needed to switch the polarity on!!!!
-For those that want to know polarity....on the stock LED itself....there is a small dark spot that is further to on side then the other... and the new LED should have the same look with the dark spot....that equals the negative side.....so then use the polarity sheet provided by blue_estel from the link from the first post and follow accordingly.
-Thats all i can think of.....enjoy and check out my post!!!!
Thanks again!!!!
~Jason

Senior Member

SL Member
Team N.V.S.
Joined: Sep 2004
Posts: 13,706
From: Sacramento, CA / Nor*Cal
just wondering. why do people spend sooo much time and a lil amount of money upgrading a pretty crappy deck? i mean no individual equilization , no line outs , no nothing......

Senior Member
SL Member
Joined: May 2005
Posts: 434
From: Hollywood, FL
A crappy desk that can play audio and MP3 CDs, satellite radio and AM/FM radio. Why spend soo much money on a HU when the stock does fine for some/most people?The LEDs is just a way to personalize their car, just like some people do custom paint jobs and custom stereo upgrades.
It's a stock HU but it's great for being stock, if you want more then go aftermarket.
It's a stock HU but it's great for being stock, if you want more then go aftermarket.

Senior Member
SL Member
Scion Evolution
Joined: Jul 2003
Posts: 1,176
stock headunits look SO much better than that aftermarket junk.
unless u got some impressive navi/dvd system.
them mp3 headunits with dolphins and tigers really
don't flow with ANYTHING in the car. whereas the stock
headunit looks AWESOME!
unless u got some impressive navi/dvd system.
them mp3 headunits with dolphins and tigers really
don't flow with ANYTHING in the car. whereas the stock
headunit looks AWESOME!

Senior Member
SL Member
Team ScioNRG
Joined: Oct 2004
Posts: 570
From: Birmingham
Originally Posted by hotbox05
just wondering. why do people spend sooo much time and a lil amount of money upgrading a pretty crappy deck? i mean no individual equilization , no line outs , no nothing......
Well done itstdt!

Senior Member
SL Member
Team N.V.S.
Joined: Sep 2004
Posts: 13,706
From: Sacramento, CA / Nor*Cal
Originally Posted by z-lite
A crappy desk that can play audio and MP3 CDs, satellite radio and AM/FM radio. Why spend soo much money on a HU when the stock does fine for some/most people?The LEDs is just a way to personalize their car, just like some people do custom paint jobs and custom stereo upgrades.
It's a stock HU but it's great for being stock, if you want more then go aftermarket.
It's a stock HU but it's great for being stock, if you want more then go aftermarket.