


MODS: please Lock


Member
SL Member
Joined: Apr 2007
Posts: 72

Originally Posted by tC4italy
Originally Posted by AdamtC_SW
i love the Italian flag idea in the op... represent!
The breaking point was that I didnt want ppl to confuse it with the mexican flag


Originally Posted by engifineer
Originally Posted by Ace83
nothing special but a proud DIYer.. 
Here's mine:
Here's mine:

Senior Member

SL Member
Joined: Jan 2008
Posts: 245
From: kissimmee
here's mine..........i would eventually like to change the color of the needles as well....all in time..................as to note, there is one thing i added that cant be seen through the pick and that would be the low fuel level warning LED indicator which now blinks when low instead of just stay on



Senior Member

Team Echo
SL Member
Joined: Dec 2007
Posts: 101


Junior Member
Joined: Jan 2008
Posts: 1
From: Al Asad, Iraq
Dang! I love that blue and silver on your gauges VIP! Is there any way I can get that same setup without sending my gauges out? I would pay extra for it. I am currently in Iraq right now so I cant take em off to have em sent out. I get back in March but I really want a set of these bad! Can anyone help me out with this?


Member
Joined: Jan 2008
Posts: 41
Two questions: how do people get the purple lighting on the needles (like Ace83)? I assume it's from putting in a blue LED on one side and a red on the other. Is there another way to do this?
Two: if you put in a needle light color that is different from the gauge backlighting near it, how do you "block" the light from the needle so it doesn't bleed to the gauge? (For instance, a blue lighted needle but a white lighted gauge...)
Thanks for the input!
Have a great night,
-Radar
Two: if you put in a needle light color that is different from the gauge backlighting near it, how do you "block" the light from the needle so it doesn't bleed to the gauge? (For instance, a blue lighted needle but a white lighted gauge...)
Thanks for the input!
Have a great night,
-Radar
Senior Member
Team Echo
SL Member
Joined: Dec 2007
Posts: 101
Originally Posted by wRadar
Two questions: how do people get the purple lighting on the needles (like Ace83)? I assume it's from putting in a blue LED on one side and a red on the other. Is there another way to do this?
Two: if you put in a needle light color that is different from the gauge backlighting near it, how do you "block" the light from the needle so it doesn't bleed to the gauge? (For instance, a blue lighted needle but a white lighted gauge...)
Thanks for the input!
Have a great night,
-Radar
Two: if you put in a needle light color that is different from the gauge backlighting near it, how do you "block" the light from the needle so it doesn't bleed to the gauge? (For instance, a blue lighted needle but a white lighted gauge...)
Thanks for the input!
Have a great night,
-Radar
The person do did mine, he used colored transparent overlays to have specific colors in specific spots.

Senior Member

Scikotics
SL Member
Joined: Nov 2004
Posts: 9,731
From: Minneapolis, MN
It really depends on what you want for colors. For example, if you paint needles red and have blue gauges, the needles wont be super red like mine are. They wont look bad, but they wont be red red To do a color changing needle setup, or to just have one color for the gauges and a different, bright color for the needles, I add separate circuit boards right behind the needles with the leds and resistors I need to make the color on the needles. The boards effectively block out the light behind the gauges from shining through behind the needles, and only allow the new leds to shine through that portion. That is why on mine you see a red glow around the needles, and why they are so red. So for one like mine, there would be added leds behind the needles, and I would paint the needles red as well. For a color changing swap, I would paint the needles white and use the appropriate leds behind them.
Using colored film is one option as well. However, I tend to only use it if someone wants different colors for different parts of the gauge face (like numbers and lines for example), because that is the only way to achieve that setup. Doing it with colored film is just fine quality wise as well, but for doing solid colors on the gauge faces with a different color needle, I find it looks nicer by adding the leds behind the needles.
You can also purchase pink or purple leds, but they are known to fade out in color in a short lifespan. Sean on here actually ran a test with them and found that they fade out even more quickly than the data we had previously found. Them not lasting as long is why I dont do pink/purple swaps.
The other purple leds are UV leds. Those are bad for your eyes and should never be used in your dash. People use them, but I wont due to the damage they cause to your eyes over the years. Even states it right on the original led packaging.
To do a color changing needle setup, or to just have one color for the gauges and a different, bright color for the needles, I add separate circuit boards right behind the needles with the leds and resistors I need to make the color on the needles. The boards effectively block out the light behind the gauges from shining through behind the needles, and only allow the new leds to shine through that portion. That is why on mine you see a red glow around the needles, and why they are so red. So for one like mine, there would be added leds behind the needles, and I would paint the needles red as well. For a color changing swap, I would paint the needles white and use the appropriate leds behind them. Using colored film is one option as well. However, I tend to only use it if someone wants different colors for different parts of the gauge face (like numbers and lines for example), because that is the only way to achieve that setup. Doing it with colored film is just fine quality wise as well, but for doing solid colors on the gauge faces with a different color needle, I find it looks nicer by adding the leds behind the needles.
You can also purchase pink or purple leds, but they are known to fade out in color in a short lifespan. Sean on here actually ran a test with them and found that they fade out even more quickly than the data we had previously found. Them not lasting as long is why I dont do pink/purple swaps.
The other purple leds are UV leds. Those are bad for your eyes and should never be used in your dash. People use them, but I wont due to the damage they cause to your eyes over the years. Even states it right on the original led packaging.
Member
Joined: Jan 2008
Posts: 41
Thanks for the quick and informative responses, guys!
Engifineer: what kind of smaller seperate circuit boards do you use for the needles? Where do you get them, and how do you splice them into the "normal" circuit board? If it's really involved, I'm not sure it's something I'd like to tackle, but, if I'm already doing the other LEDs, then I may give it a shot.
Thanks, again, and have a great day,
-Radar
Engifineer: what kind of smaller seperate circuit boards do you use for the needles? Where do you get them, and how do you splice them into the "normal" circuit board? If it's really involved, I'm not sure it's something I'd like to tackle, but, if I'm already doing the other LEDs, then I may give it a shot.
Thanks, again, and have a great day,
-Radar
Senior Member
Scikotics
SL Member
Joined: Nov 2004
Posts: 9,731
From: Minneapolis, MN
I dont have a full writeup on it. just my sketched notes  I use standard blank boards you can get at any electronics supply. I cut them to fit inside the round areas on the white bezel right behind the needles. I add the leds and proper size resistors ( resistor size depends on what colors I am using and how many leds per needle) to those boards, wire all of those together and run a main power to the same feed point that the leds for the gauges connect to. There are a lot of different ways to connect depending on what someone wants, so that is why I dont have a walkthrough built for it. It is a tad bit more involved, and takes more work to do, but comes out nice in the end. I actually have some drawings I need to update in order to get quotes on just having the boards made for me to save some work.
Here is a pic to give you an idea of what is involved:
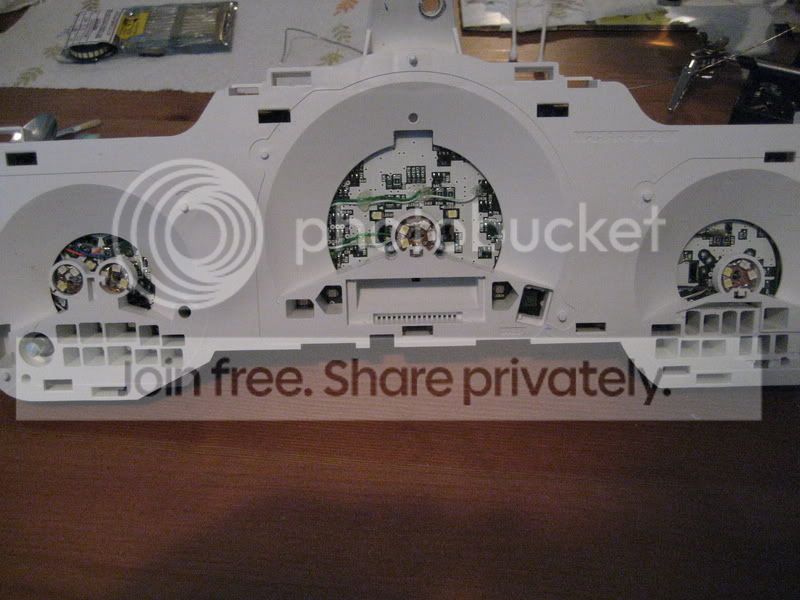
That was on a test cluster the first time I did one of those, so it isnt the cleanest in the world. The ones I do have all wiring running on the back of the bezel and only two wires running to the board.
If you need more in depth info, you can contact me at my email address listed on doctorisotope.com under the led swap section and I can try to help you figure out what you need to do.
I use standard blank boards you can get at any electronics supply. I cut them to fit inside the round areas on the white bezel right behind the needles. I add the leds and proper size resistors ( resistor size depends on what colors I am using and how many leds per needle) to those boards, wire all of those together and run a main power to the same feed point that the leds for the gauges connect to. There are a lot of different ways to connect depending on what someone wants, so that is why I dont have a walkthrough built for it. It is a tad bit more involved, and takes more work to do, but comes out nice in the end. I actually have some drawings I need to update in order to get quotes on just having the boards made for me to save some work. Here is a pic to give you an idea of what is involved:
That was on a test cluster the first time I did one of those, so it isnt the cleanest in the world. The ones I do have all wiring running on the back of the bezel and only two wires running to the board.
If you need more in depth info, you can contact me at my email address listed on doctorisotope.com under the led swap section and I can try to help you figure out what you need to do.


