MCH5 aka KidJustin's tC2 | why I can't update the first page... :(


 09-06-2011, 02:55 PM
#105
DaYUUM/Scion Evolution

SL Member
Thread Starter

legit man! great job taking the initiative! i am keeping in contact with them so assuming we get a great turnout in the thread u started...i'm sure CUSCO will sure to notice
09-06-2011, 09:20 PM
#106
DaYUUM/Scion Evolution
SL Member
Thread Starter
First I would very much like to thank the CUSCO team down at Huntington Beach for the sponsorship, the great product, as well as the opportunity to just get to know a great bunch of guys really dedicated to CUSCO and providing the best aftermarket products someone can get for their vehicle.
It has been a while since I first met them to test fit the first prototype and throughout all this time it became very clear to me early on that with their skills, knowledge, and the effort they have put into designing this strut bar, it is perfect for our tC2s and I would say one of the best must have mods for the car.
Now onto the review:
No Competition (visually, comparing to what other struts are out)-
Since I have not experience the other struts available, I am only going based off the photos I have seen. By looking at other strut bars, they are one piece setups and the brace around the shock are not full circles (TRD) or they have an adjustable preload (Tanabe), which has its own controversy. This here is a clear indication that CUSCO's strut bar will more likely be more secure and offer even more rigidity to the chassis. Installation-wise, each brace can be easily secured first before putting it all together with the bar. The braces can be secured with a socket and the bar with a large hex key.
Also, CUSCO takes the cake as far as the high quality of the materials they used for the strut bar, as well as all of their products. Here take a look:
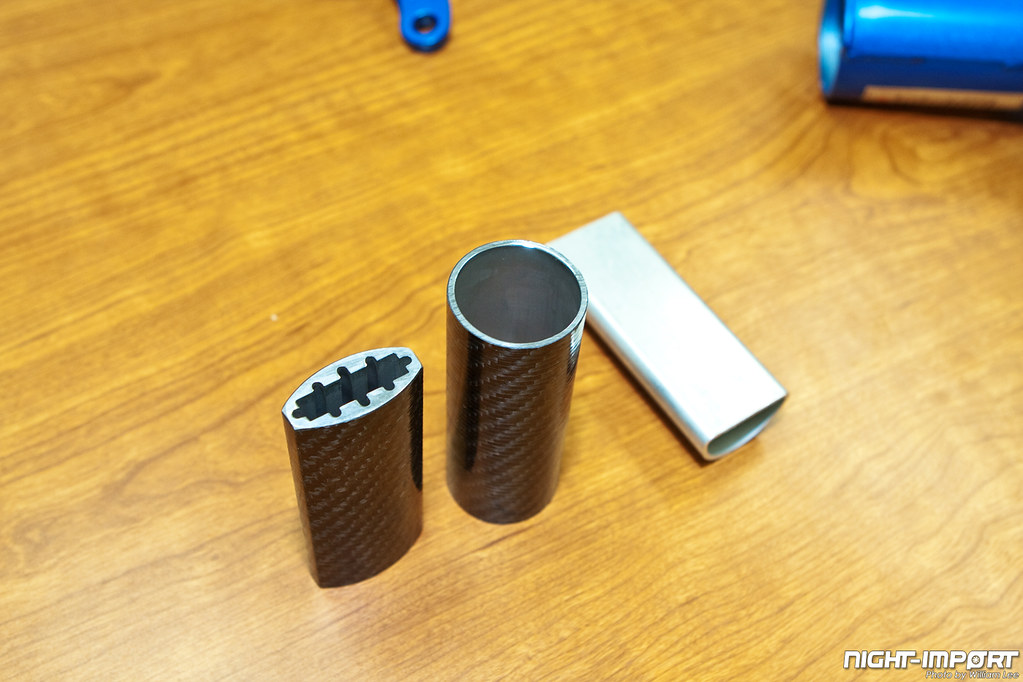
"Cusco makes their products into perfection. Most of the companies out there do not have any proof or show the materials used to finalize what they make. These three materials shown are different types and design of Strut Bars. You can see the crafting is absolutely in detail, such as the far left product which is 'twin layered oval sectioned lightweight aluminum shaft with carbon fiber'. The design is for proper fitment and most importantly, the rigidity. "
The Look (for all those "Show>Go" modders)-
DAMNNNN...doesn't that just look sexy??

Chrome finish strut bar with CUSCO blue braces, a very nice touch to dress up any engine bay. The design of the strut bar is flat, which keeps with the sleekness of it all as well as the slim, lightweight feel of it. Don't forget the CUSCO racing sticker that comes with it. Line in up perfectly in the middle and represent the product! But maybe the sticker thing is not for you, well never fear because the bar comes etched with the CUSCO logo and added "Made In Japan" to let everyone know you got a legit product.

This part of the review might not have a lot of words, mainly because you have to see how appealing it is to believe it. Here is the CUSCO strut bar with a stock air box:

And with an aftermarket (Descendant) cold air intake:

The strut bar only adds to the limitless possibilities a Scion enthusiast might have to dress up their engine bay. But what's really great about it is that it is not only visually appealing....
The Feel (What are the performance improvements?)-
The visually appeal the CUSCO strut bar also works well with the actual practical purpose of the product. The design is sleek and eye catching, but it is also meant to be like that to get the best improvements out of the bar.
Right away from a non-AutoXer's perspective you will feel that the steering feels stiffer. Not the kind of stiffness when the power steering goes out, but the kind that just makes it feel like there is more grip on the front tires and you have more control on handling the car. In addition to that, the CUSCO strut bar is VERY sturdy but VERY lightweight. Not this bar particularly, but I know of examples of when cars with a CUSCO strut bar have gotten into an accident and totaled the car, the CUSCO strut bar was still near perfect condition. You can have the enhanced feel of handling without compromising added unwanted weight to the car.
Obviously this is best for those AutoXers out there because the most noticeable improvements come with situations such as hard cornering at high speeds, quickly weaving around cones, and all that good stuff. And am completely sure that the CUSCO strut bar will greatly improve performance, feel, and probably even lap times.
But what about those daily drivers? This is exactly my situation and I can say that for someone that never cared about doing a strut bar upgrade, I have no idea what I was thinking before and will always have a strut bar on my must have list for any future car I will own. While the improvement is not night and day...because well, the turning on a new car isn't (and shouldn't) be bad in the first place, the CUSCO strut bar just has that slight, fine-tuning adjustment to make driving just a little more enjoyable. To be real, some may notice it, some may not, but either way it is better overall for the car.
Here is what I did notice...
(disclaimer: I do not enforce reckless driving of any sorts and I do not and will not take any liability for any accidents happening after trying to mimic any of the driving conditions I am about to say.)
The closet simulation I had to weaving around cones was weaving around traffic. Before I used to be worried of fitting in a gap on a tight lane change because the car doesn't completely get into the lane fast enough and end up annoying the other car...or worse...But now it is as if I just think it and the tC2 knows it and does it with the exact reaction time as me. I have also weaved around cars that have cut me off...all the while nothing (packages or people) in the car felt any jerkiness or ended up flying across the car. It all felt very stable. On some turns I used to feel as if the car was pulling itself across and everything in the hatch would start rolling around like crazy, that is all gone now.
Then as for testing out the feel on some hard cornering, I went to some residential turns I knew are usually relatively clear. Before the CUSCO strut bar I usually found myself either 1) slowing down a lot before the turn or 2) found myself taking a super wide turn and basically driving on the wrong side of the road. But after the CUSCO strut bar, I feel like I am still in complete control while not having to sacrifice speed. This is very good for lopping freeway on-ramps. I can get on the ramp and immediately start to get the speed up so that I will flow with traffic (if not faster) for super easy merging. And if its one of those two lane on-ramps, I can quickly change to the lane that is clear and pass up those other cars slowing down on the turn.
The Conclusion (The Look, the Feel, and how it affects your Wallet)-
It looks cool, its designed and tested, its strong, it adds to safety, it gives you better feel behind the wheel, its made in Japan, its cheaper than TRD (CUSCO MSPR is $200, TRD MSRP is $245). What else can you ask for???
From daily drivers to full on racers, a strut bar is a must just for that better feel in handling and added quick response times, and CUSCO clearly goes above and beyond on their product. This is arguably one of the best products on the market and only a start of things to come. It's a simple fact, CUSCO makes great products and its is great for them to dip into the tC2 market.
They are currently in production as I write this and will be available any authorized dealer soon! But here's a little hint...a group buy is being finalized in the meantime, so get on it!
It has been a while since I first met them to test fit the first prototype and throughout all this time it became very clear to me early on that with their skills, knowledge, and the effort they have put into designing this strut bar, it is perfect for our tC2s and I would say one of the best must have mods for the car.
Now onto the review:
No Competition (visually, comparing to what other struts are out)-
Since I have not experience the other struts available, I am only going based off the photos I have seen. By looking at other strut bars, they are one piece setups and the brace around the shock are not full circles (TRD) or they have an adjustable preload (Tanabe), which has its own controversy. This here is a clear indication that CUSCO's strut bar will more likely be more secure and offer even more rigidity to the chassis. Installation-wise, each brace can be easily secured first before putting it all together with the bar. The braces can be secured with a socket and the bar with a large hex key.
Also, CUSCO takes the cake as far as the high quality of the materials they used for the strut bar, as well as all of their products. Here take a look:
"Cusco makes their products into perfection. Most of the companies out there do not have any proof or show the materials used to finalize what they make. These three materials shown are different types and design of Strut Bars. You can see the crafting is absolutely in detail, such as the far left product which is 'twin layered oval sectioned lightweight aluminum shaft with carbon fiber'. The design is for proper fitment and most importantly, the rigidity. "
DAMNNNN...doesn't that just look sexy??
Chrome finish strut bar with CUSCO blue braces, a very nice touch to dress up any engine bay. The design of the strut bar is flat, which keeps with the sleekness of it all as well as the slim, lightweight feel of it. Don't forget the CUSCO racing sticker that comes with it. Line in up perfectly in the middle and represent the product! But maybe the sticker thing is not for you, well never fear because the bar comes etched with the CUSCO logo and added "Made In Japan" to let everyone know you got a legit product.
This part of the review might not have a lot of words, mainly because you have to see how appealing it is to believe it. Here is the CUSCO strut bar with a stock air box:
And with an aftermarket (Descendant) cold air intake:
The strut bar only adds to the limitless possibilities a Scion enthusiast might have to dress up their engine bay. But what's really great about it is that it is not only visually appealing....
The Feel (What are the performance improvements?)-
The visually appeal the CUSCO strut bar also works well with the actual practical purpose of the product. The design is sleek and eye catching, but it is also meant to be like that to get the best improvements out of the bar.
Quickly in case you didn't know...
A strut bar is designed to add rigidity to the chassis and allow for better handling because the bar will keep the chassis from flexing and putting extra strain on the suspension. In addition to better steering it will also help keep the wheels aligned and pointed in the right desired direction.
A strut bar is designed to add rigidity to the chassis and allow for better handling because the bar will keep the chassis from flexing and putting extra strain on the suspension. In addition to better steering it will also help keep the wheels aligned and pointed in the right desired direction.
Obviously this is best for those AutoXers out there because the most noticeable improvements come with situations such as hard cornering at high speeds, quickly weaving around cones, and all that good stuff. And am completely sure that the CUSCO strut bar will greatly improve performance, feel, and probably even lap times.
But what about those daily drivers? This is exactly my situation and I can say that for someone that never cared about doing a strut bar upgrade, I have no idea what I was thinking before and will always have a strut bar on my must have list for any future car I will own. While the improvement is not night and day...because well, the turning on a new car isn't (and shouldn't) be bad in the first place, the CUSCO strut bar just has that slight, fine-tuning adjustment to make driving just a little more enjoyable. To be real, some may notice it, some may not, but either way it is better overall for the car.
Here is what I did notice...
(disclaimer: I do not enforce reckless driving of any sorts and I do not and will not take any liability for any accidents happening after trying to mimic any of the driving conditions I am about to say.)
The closet simulation I had to weaving around cones was weaving around traffic. Before I used to be worried of fitting in a gap on a tight lane change because the car doesn't completely get into the lane fast enough and end up annoying the other car...or worse...But now it is as if I just think it and the tC2 knows it and does it with the exact reaction time as me. I have also weaved around cars that have cut me off...all the while nothing (packages or people) in the car felt any jerkiness or ended up flying across the car. It all felt very stable. On some turns I used to feel as if the car was pulling itself across and everything in the hatch would start rolling around like crazy, that is all gone now.
Then as for testing out the feel on some hard cornering, I went to some residential turns I knew are usually relatively clear. Before the CUSCO strut bar I usually found myself either 1) slowing down a lot before the turn or 2) found myself taking a super wide turn and basically driving on the wrong side of the road. But after the CUSCO strut bar, I feel like I am still in complete control while not having to sacrifice speed. This is very good for lopping freeway on-ramps. I can get on the ramp and immediately start to get the speed up so that I will flow with traffic (if not faster) for super easy merging. And if its one of those two lane on-ramps, I can quickly change to the lane that is clear and pass up those other cars slowing down on the turn.
The Conclusion (The Look, the Feel, and how it affects your Wallet)-
It looks cool, its designed and tested, its strong, it adds to safety, it gives you better feel behind the wheel, its made in Japan, its cheaper than TRD (CUSCO MSPR is $200, TRD MSRP is $245). What else can you ask for???
From daily drivers to full on racers, a strut bar is a must just for that better feel in handling and added quick response times, and CUSCO clearly goes above and beyond on their product. This is arguably one of the best products on the market and only a start of things to come. It's a simple fact, CUSCO makes great products and its is great for them to dip into the tC2 market.
They are currently in production as I write this and will be available any authorized dealer soon! But here's a little hint...a group buy is being finalized in the meantime, so get on it!
Last edited by KidJustin; 01-09-2012 at 05:27 PM.
09-06-2011, 10:33 PM
#107
So is the install on this really as simple as removing the black plastic cover thing that extends from the firewall, removing the nuts from the strut tower, placing the braces, and screwing everything back in? This is one thing I'm really hoping to be able to do myself...
09-06-2011, 10:35 PM
#108

So is the install on this really as simple as removing the black plastic cover thing that extends from the firewall, removing the nuts from the strut tower, placing the braces, and screwing everything back in? This is one thing I'm really hoping to be able to do myself...
09-06-2011, 10:42 PM
#109
Senior Member
SL Member


Join Date: Apr 2008
Location: Rockland County NY
Posts: 753
So is the install on this really as simple as removing the black plastic cover thing that extends from the firewall, removing the nuts from the strut tower, placing the braces, and screwing everything back in? This is one thing I'm really hoping to be able to do myself...
 09-07-2011, 05:49 AM
#112
DaYUUM/Scion Evolution
SL Member
Thread Starter
i'm working on the install guide right now! haha
but yes over all....remove the black plastic thing...you HAVE to because the CUSCO bolts are underneath it. (because it is a full circle, unlike the TRD which is just the front) WAY to hard to put it in with the plastic thing.
from there u remove those black pieces and then put in the CUSCO strut...u can do either the braces first or the whole thing (bar attached to braces)
no need to hold it with a jack or anything like that...those nuts only go on the chassis...to be honest (maybe i dont know enough) but the stock black parts looks completely worthless, they dont attached to anything really
i think all they do is "try" to use the black plastic thing as a strut bar since those black pieces screw into the black plastic thing
09-07-2011, 08:27 AM
#113
DaYUUM/Scion Evolution
SL Member
Thread Starter
This is an unofficial install guide of the CUSCO Strut Tower Bar. The photo used were collected throughout my visits at HQ, which means some of the pictures might include the first prototype designed strut bar and not the final product.

- Remove the Wipers
- The hood has to be down for this.
- Both wipers have caps over them than can pop out. Look for a groove toward the top of the cap.
- Then with the cap removed, the nut hold them down is available to be removed and then the wipers can be pulled out. They may need some wiggling and some force to get them out, just not too hard.
- Remove the the black plastic thing
- You can now pop open the hood.
- First remove the 2 pop screw things (push down in the middle then pull the thing out). There is one on each side of the plastic thing.
- There are clips all around that are holding it down, just apply some pressure to pop them out
- Once it is loose, the best way to remove it is up toward the windshield and NOT down into the engine bay

- Remove the Wiper assembly and the other black piece
- Remove the bolts holding down the Wiper assembly. There should be 3, 2 at each end and 1 in the middle. Unclip the cable connected to the assembly before removing it.
- Remove the remaining bolts holding down the black piece, I believe there are 4 more. 2 at each end and 2 holding down the stock brackets
- Pull the black piece out and set it aside

- Remove the stock brackets
- Just unbolt them then store it somewhere, you wont need it anymore

- Install the CUSCO Strut Tower Bar
- You can do this in two ways
- Install the brackets first then secure the bar
- Secure the bar to the brackets and install it as one piece
- Install the brackets first then secure the bar
- Once it is installed, reinstall everything else in reverse order. Double check everything is secure.

- You can do this in two ways
- It is also recommended to re-tighen the bolts that connect the bar to the braces after about 100 or so miles of driving with them.
- This is just so the bar and the car get used to each other and the newly found rigidity
- You only have to do this ONE TIME


Last edited by KidJustin; 01-09-2012 at 05:51 PM.
 09-08-2011, 05:11 PM
#115
DaYUUM/Scion Evolution
SL Member
Thread Starter
 09-09-2011, 08:38 AM
#117
DaYUUM/Scion Evolution
SL Member
Thread Starter
haha thanks! i actually just drove it to/from vegas and haven't wash the car...
they e-mailed me ahead of time that they were taking pictures of the engine bay so that morning i took an air compressor n just tried to blow out as much dust...they didnt say they were going to take photos of the outside though.....
they e-mailed me ahead of time that they were taking pictures of the engine bay so that morning i took an air compressor n just tried to blow out as much dust...they didnt say they were going to take photos of the outside though.....
09-17-2011, 08:45 AM
#118
DaYUUM/Scion Evolution
SL Member
Thread Starter
Last edited by KidJustin; 09-19-2011 at 07:54 AM.
09-18-2011, 07:01 AM
#119
DaYUUM/Scion Evolution
SL Member
Thread Starter
Just a small update after the Extreme Dimensions Open House

(by the way that headlight of the MGM tC2 on the bottom right corner is johndoe11's)
photos: http://www.facebook.com/media/set/?s...5107364&type=1
i also had some stickers i haven't put on yet...so they went on before the show
one from Encore car meet back in July
and the other from Nisei Week Showoff back in August

I also just got all my LEDs in so I will start working on them over the next few weeks. It will be a full interior and exterior swap...in the photo above i just swapped out the side marks with LEDs..
hopefully tomorrow I have time for the dome/hatch light, brake light, and turn signals
(by the way that headlight of the MGM tC2 on the bottom right corner is johndoe11's)
photos: http://www.facebook.com/media/set/?s...5107364&type=1
i also had some stickers i haven't put on yet...so they went on before the show
one from Encore car meet back in July
and the other from Nisei Week Showoff back in August
I also just got all my LEDs in so I will start working on them over the next few weeks. It will be a full interior and exterior swap...in the photo above i just swapped out the side marks with LEDs..
hopefully tomorrow I have time for the dome/hatch light, brake light, and turn signals
Last edited by KidJustin; 01-09-2012 at 06:55 PM.
