


Airbag warning LED change


Thread Starter
Junior Member

Joined: Aug 2006
Posts: 7
From: Mesquite, Texas
 Airbag warning LED change
I recently bought my box in April and have been enjoying playing with it. Thanks to the ideas and tips from the members of Scion Life and these forums I have managed to create quite a wish list for my new toy. After nearly going nuts doing all the LED mods on the clock, radio, steering wheel and heater-A/C controls, I sat back to enjoy the fruits of my labor. All through the dash was a soothing blue glow... Until I came to the passenger air bag indicator... standing out in all its garish amber obnoxiosness.javascript:emoticon(' ')
')
Finger Tap
So, deciding why not, I proceeded to attempt to change it. (I know a lot of people would just disconnect it, but other than the color it really does not bother me and I would like to be able to see the warning if something went wrong.)
Usual disclaimer: You are responsible for your actions- Not ME. Try at your own risk. Etc. Etc..
My box is a later 2006 model with the airbag indicator under the cubby- not the earlier style in the climate control panel. I don't know if the units are the same or if the same method can be used to change the color on it. Good luck if you try.
First take off the center dash trim and take out the ashtray/cubby assembly. (Both well documented elsewhere in these forums.)
Then from behind unclip the two retaining prongs on the top and bottom of the airbag indicator unit and remove it through the back.
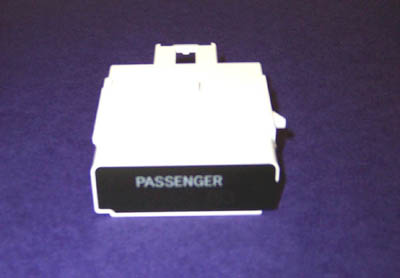
It looks like this:
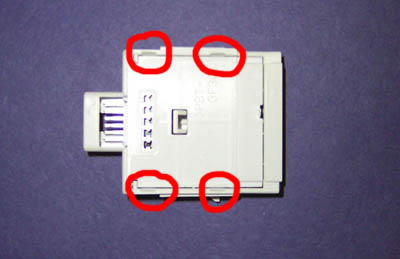
Now turn it over and locate the four tabs (red circles) that hold the top cover to the bottom and gently pry them open/out to remove the cover.
With the cover off you can see the board with the LED's.
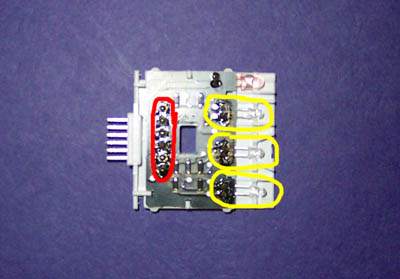
The three in the yellow circles are the ones your after. The red LED on the top is for the seat belt warning indicator.
You will need to unsolder the six terminals circled in red from the connector pins to separate the board from the base to replace the LED's. As you will notice with it in your hands, the solder connections are on the top of the board but the LED's are installed from the bottom. I used standard 5mm blue LED's and I have no reason to suspect other colors would not work. Remember to check your polarity and replace away.
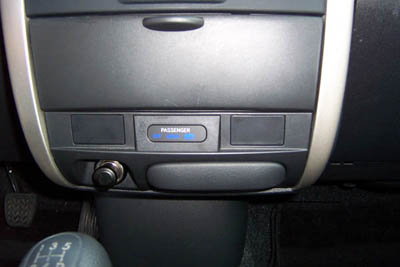
Re-assemble everything in reverse order (don't you just love that catch-all) and if your luck held like mine,it should look like this:
Good luck, and thanks to all you other LED modders that helped me get started.
')Finger Tap
So, deciding why not, I proceeded to attempt to change it. (I know a lot of people would just disconnect it, but other than the color it really does not bother me and I would like to be able to see the warning if something went wrong.)
Usual disclaimer: You are responsible for your actions- Not ME. Try at your own risk. Etc. Etc..
My box is a later 2006 model with the airbag indicator under the cubby- not the earlier style in the climate control panel. I don't know if the units are the same or if the same method can be used to change the color on it. Good luck if you try.
First take off the center dash trim and take out the ashtray/cubby assembly. (Both well documented elsewhere in these forums.)
Then from behind unclip the two retaining prongs on the top and bottom of the airbag indicator unit and remove it through the back.
It looks like this:
Now turn it over and locate the four tabs (red circles) that hold the top cover to the bottom and gently pry them open/out to remove the cover.
With the cover off you can see the board with the LED's.
The three in the yellow circles are the ones your after. The red LED on the top is for the seat belt warning indicator.
You will need to unsolder the six terminals circled in red from the connector pins to separate the board from the base to replace the LED's. As you will notice with it in your hands, the solder connections are on the top of the board but the LED's are installed from the bottom. I used standard 5mm blue LED's and I have no reason to suspect other colors would not work. Remember to check your polarity and replace away.
Re-assemble everything in reverse order (don't you just love that catch-all) and if your luck held like mine,it should look like this:
Good luck, and thanks to all you other LED modders that helped me get started.

Senior Member

SL Member
Joined: Jul 2006
Posts: 427
From: Northeast USA
Good writeup! Yeah, this one is a piece-of-cake.
Funny, I just did this mod last week. But the withe LED was way too bright for may taste, so I replaced the current limiting resistor to make it bit dimmer. I also kept the red seatbelt LED and Amber "OFF" and "ON" LED. I like a bit of a variety in my idiot lights. Monochrome is too boring IMO.
And this weekend I finished converting my Scion radio to mostly white LED backlight. That was some serious work - it took me most of the weekend. My entire dash is pertty much done. All white LED illumination with some color sprinkled in. I need to take a photo and post it.
Funny, I just did this mod last week. But the withe LED was way too bright for may taste, so I replaced the current limiting resistor to make it bit dimmer. I also kept the red seatbelt LED and Amber "OFF" and "ON" LED. I like a bit of a variety in my idiot lights. Monochrome is too boring IMO.
And this weekend I finished converting my Scion radio to mostly white LED backlight. That was some serious work - it took me most of the weekend. My entire dash is pertty much done. All white LED illumination with some color sprinkled in. I need to take a photo and post it.
Thread Starter
Junior Member
Joined: Aug 2006
Posts: 7
From: Mesquite, Texas
Thanks for the good words.
I know what you mean on the radio LED's. I didn't realize how small 1.5 by .8 millimeters was 'till I opened the package my order came in and realized what I was about to get into. Fortunately I have access to a precision power supply so I was able to make sure they worked as I replaced them without having to put the radio back together and pray for success. It still took me an entire day to do the clock and radio though. I plan to add some other color around the interior as accents later, but I'm too "conformist" to not have all my guages and panels match.
I know what you mean on the radio LED's. I didn't realize how small 1.5 by .8 millimeters was 'till I opened the package my order came in and realized what I was about to get into. Fortunately I have access to a precision power supply so I was able to make sure they worked as I replaced them without having to put the radio back together and pray for success. It still took me an entire day to do the clock and radio though. I plan to add some other color around the interior as accents later, but I'm too "conformist" to not have all my guages and panels match.
Senior Member
SL Member
Joined: Jul 2006
Posts: 427
From: Northeast USA
Yeah, those 0603 LEDs are flea-sized. But I've dealt with 0402 ones in the past - those are even smaller :D
I too have an electronic workshop setup (one of my many hobbies and professions) so I had no problem dealing with them.
But there were so many to do by hand. When those PC boards are originally populated, that is done by robots. Unsoldering and resoldering close to 50 of those LEDs (plus some resistors) is a major paiin. I also wired up an RGB LED under the "color" button so now it follows the colors on the main display. Just to be different... Bit that was a bit more involved. Drilling, cutting traces and reverse engineering of the circuit.
Yeah, I know what you mean about all the dash lights being the same color. I didn't like the amber dash and white speedo combination when I first bought my xB. It had to go!
I too have an electronic workshop setup (one of my many hobbies and professions) so I had no problem dealing with them.
But there were so many to do by hand. When those PC boards are originally populated, that is done by robots. Unsoldering and resoldering close to 50 of those LEDs (plus some resistors) is a major paiin. I also wired up an RGB LED under the "color" button so now it follows the colors on the main display. Just to be different... Bit that was a bit more involved. Drilling, cutting traces and reverse engineering of the circuit.
Yeah, I know what you mean about all the dash lights being the same color. I didn't like the amber dash and white speedo combination when I first bought my xB. It had to go!
Senior Member
SL Member
Joined: Jul 2006
Posts: 427
From: Northeast USA
Thread Starter
Junior Member
Joined: Aug 2006
Posts: 7
From: Mesquite, Texas
Sweet. I wish I was brave enought for that kind of originality.
Gotta love the irony of having a color change head unit and still having to change the 603's.
I gave up using LED's on my A/C panel because they were to directional for even illumination, but I saw your lens mod and will hopefully get a chance to try it soon. The dye I used for the stock bulbs doesn't quite match the LED color of everything else.
(My conformity issue again.)
Gotta love the irony of having a color change head unit and still having to change the 603's.
I gave up using LED's on my A/C panel because they were to directional for even illumination, but I saw your lens mod and will hopefully get a chance to try it soon. The dye I used for the stock bulbs doesn't quite match the LED color of everything else.
(My conformity issue again.)
Senior Member
SL Member
Joined: Jul 2006
Posts: 427
From: Northeast USA
Thanks for the kind words!
It did take some experimentation to get the A/C panel right. Those are 10,000mcd LEDs I found on eBay couple of years back. I run them around 20mA (whch is at their spec brightness). And as you've noticed, tunring down (and roughing up ) the lenses made a big difference.
I was also tired of not seeing whether my vent was on fresh or recycled air. So, I installed another white LED in the lever. Funny, that mechanical lever only activates a micro-switch. I wish they made it like the illuminated A/C switch instead that silly lever.
It did take some experimentation to get the A/C panel right. Those are 10,000mcd LEDs I found on eBay couple of years back. I run them around 20mA (whch is at their spec brightness). And as you've noticed, tunring down (and roughing up ) the lenses made a big difference.
I was also tired of not seeing whether my vent was on fresh or recycled air. So, I installed another white LED in the lever. Funny, that mechanical lever only activates a micro-switch. I wish they made it like the illuminated A/C switch instead that silly lever.


Senior Member
SL Member
Joined: Jul 2006
Posts: 427
From: Northeast USA
There is no such thing as a 12V LED. All the LEDs run on lower voltages. Most red, green amber and orange LEDs run at about 1.7 to 2.1 Volts. Most blue and white (and other colors like UV, purple, pink and aqua) run about 3.1-4.2 Volts. A 12V LED is a standard LED with an addional resistor in series (which limits the current which also controls the voltage).
So, you can make any LED a 12V LED. You could even make one run from 120V AC if you added a correct value resistor and a reverse bias protection diode.
But if you take a plain LED and hook it up directly to 12V, you'll let the smoke out of it. And smoke is what makes them work... :D
So, you can make any LED a 12V LED. You could even make one run from 120V AC if you added a correct value resistor and a reverse bias protection diode.
But if you take a plain LED and hook it up directly to 12V, you'll let the smoke out of it. And smoke is what makes them work... :D

Thread
Thread Starter
Forum
Replies
Last Post
thefranks5
Maintenance & Car Care
0
Mar 25, 2015 08:24 PM
fur_pig
Scion tC 1G ICE & Interior
1
Jan 27, 2015 12:52 PM
mrsocks
Scion xA/xB 1st-Gen Drivetrain & Power
2
Jan 20, 2015 01:29 PM
