
Got my Katzkin Leather Kit!! " HOW TO ADDED" 56K s


Former Sponsor
SL Member
Team ScioNRG
Joined: Jul 2005
Posts: 1,600
From: Myrtle Beach, SC
Originally Posted by Sciond
Originally Posted by josh_trdsparks
Nice! I just had my leather put in yesterday. No time to DIY it. Great write up!
Hey I do what I can do when i can do it. lol Yes I will be ready.


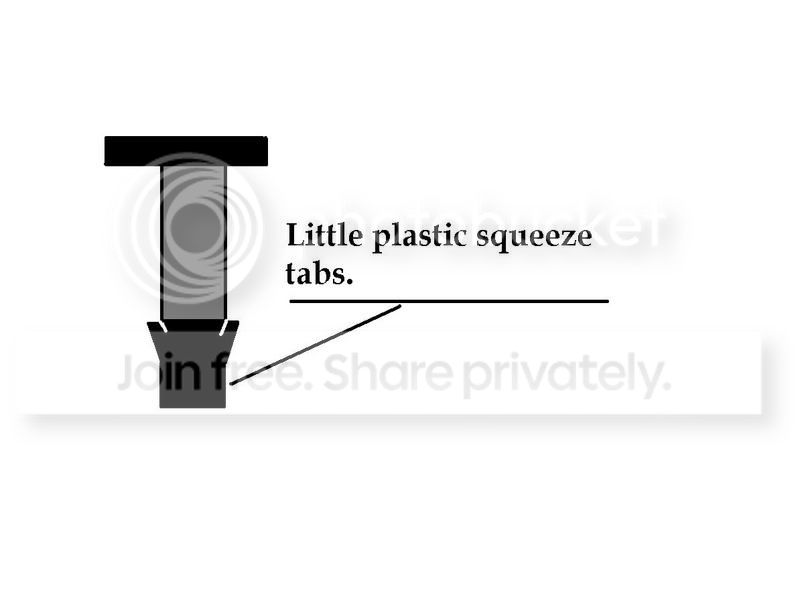
Quick note to add to this post. This whole right up is very helpfull, but there was one minor detail that would have helped a lot,. To remove the headrest mount plastic from the seats you must first pull the fabric off the seat, and then remove the foam, it slips off easily. Then you can see that the plastiv head rest mounts slide through square tubing in the seat and have plastic squeeze tabs that you could not access otherwise. Included is a low budget drawing for some detail; good luck and thanks again.

Senior Member
SL Member
Joined: Dec 2004
Posts: 377
From: Agoura Hills, CA
^ you actually do not need to remove those plastic peices. If you just cut a small square in your leather, you can work it around the plastic peices so that it fits snug underneath with no cuts showing. It just takes a little patience and prying.

Thread Starter
Senior Member
SL Member
Joined: Sep 2005
Posts: 157
Originally Posted by MikeC
Quick note to add to this post. This whole right up is very helpfull, but there was one minor detail that would have helped a lot,. To remove the headrest mount plastic from the seats you must first pull the fabric off the seat, and then remove the foam, it slips off easily. Then you can see that the plastiv head rest mounts slide through square tubing in the seat and have plastic squeeze tabs that you could not access otherwise. Included is a low budget drawing for some detail; good luck and thanks again.
Hey thanks for the drawing!
Although If you read the "how to" you will find the following quote "Take off the foam and remove the headrest mounts and release pull. The release pull unscrews and the headrest mounts have squeeze tabs."
But the pic does illustrate it well too.
Thanks!!
Originally Posted by Pitman
Originally Posted by MikeC
Quick note to add to this post. This whole right up is very helpfull, but there was one minor detail that would have helped a lot,. To remove the headrest mount plastic from the seats you must first pull the fabric off the seat, and then remove the foam, it slips off easily. Then you can see that the plastiv head rest mounts slide through square tubing in the seat and have plastic squeeze tabs that you could not access otherwise. Included is a low budget drawing for some detail; good luck and thanks again.
Hey thanks for the drawing!
Although If you read the "how to" you will find the following quote "Take off the foam and remove the headrest mounts and release pull. The release pull unscrews and the headrest mounts have squeeze tabs."
But the pic does illustrate it well too.
Thanks!!

Thread
Thread Starter
Forum
Replies
Last Post
anti_virus347
PPC: Misc and Lots
1
May 28, 2015 06:01 AM
anti_virus347
PPC: Engine / Drivetrain
8
Apr 3, 2015 05:17 PM