


Let there be (xB dome) light!


Thread Starter
Member

SL Member
Joined: Nov 2006
Posts: 83
From: Nashville, TN
 Let there be (xB dome) light!
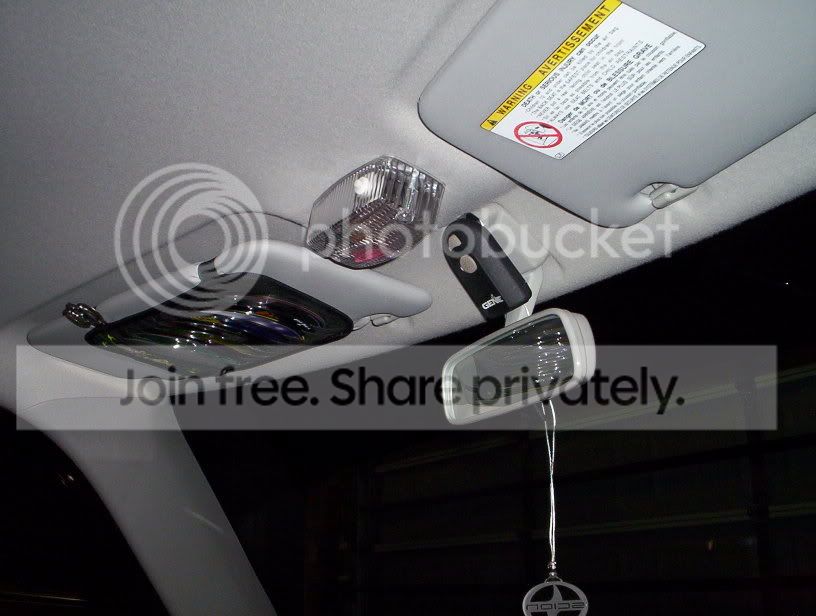
I finally got around to installing my new map and dome light this weekend. I was going to take how-to pictures, but it is really simple and I hate taking the time to take them :D
Anyway, I got this Grote light from Amazon ($15.43 with free shipping on a $25 order/prime). http://www.amazon.com/exec/obidos/AS...torcyctoure-20 . No picture at Amazon, but here is the link to the info from the manufacturer complete with dimensions and picture: http://grote.com/product.php?product_number=61301
The box dome circuit has an always on +12v on the light and switches the other wire to ground to get the dome light to come on. The Grote light has wiring instructions for this type of system (or switch +12v) so no problem.
1) Cut some sheet ABS to mount the on the back of the light. You will also need 4 machine screws, washers, lock washers, and nuts. Drill a hole for the wires and the 4 screws and mount the ABS to the light. Put the smooth side out on the ABS - if one side is textured.
2) Pull the dome light cover and assembly (2 screws)
3) Pull the dome light connector and figure out which wire is +12 and which is switched to ground.
4) Tap into the wires (solder, 3m taps, etc)
5) Add a 3rd wire with a ring lug - this will be the ground so the new light can be switched on via its own switch.
6) Pull the rear view mirror and the visor hooks to free up the headliner
7) Run the 3 wires from the dome light to the front of the car under the headliner with a fish tape (or wire coat hanger)
8 ) Connect up the new Grote light and test - instructions are included with the light, use the last ones "for use where chassis ground (-) is obtained through the door switch"
9) Put the mirror and visor clips back
11) Tape up the wires where they exit the light or use a loom.
12) Prep the back of the light (now your ABS sheet) and the mirror mount cover with strong cleaner and alcohol, then use something like 3M VHB to stick it up
13) Pull the slack back through the rear dome light opening and stuff it out of the way.
14) Put the dome light assembly back in place, putting the ring ground terminal on the new wire UNDER the assembly to ground
All done!
I would advise you to pull the battery terminal once you determine which wire is hot - or at least pull the fuse to the interior lights. If you don't and short out something you could fry the fade-in/fade-out circuit.
The results? Really nice - a lot more light where you need it. To make sure I don't overload the fade circuit for now I have the OEM dome off unless I need it. I think I will replace the new light's bulbs with low draw LEDs then I can run all of them and not worry (it seem to run all of them now w/o a problem anyway).
The only downside is that the new light can't be switched off like the OEM light - open a door and the dome light side comes on. The built in switch lets you turn on the reading/map light only or both lights.
Now the pix:


Next time I am trying to find something in the box at night, I will be so much happier
Dennis "I saw the light"
Anyway, I got this Grote light from Amazon ($15.43 with free shipping on a $25 order/prime). http://www.amazon.com/exec/obidos/AS...torcyctoure-20 . No picture at Amazon, but here is the link to the info from the manufacturer complete with dimensions and picture: http://grote.com/product.php?product_number=61301
The box dome circuit has an always on +12v on the light and switches the other wire to ground to get the dome light to come on. The Grote light has wiring instructions for this type of system (or switch +12v) so no problem.
1) Cut some sheet ABS to mount the on the back of the light. You will also need 4 machine screws, washers, lock washers, and nuts. Drill a hole for the wires and the 4 screws and mount the ABS to the light. Put the smooth side out on the ABS - if one side is textured.
2) Pull the dome light cover and assembly (2 screws)
3) Pull the dome light connector and figure out which wire is +12 and which is switched to ground.
4) Tap into the wires (solder, 3m taps, etc)
5) Add a 3rd wire with a ring lug - this will be the ground so the new light can be switched on via its own switch.
6) Pull the rear view mirror and the visor hooks to free up the headliner
7) Run the 3 wires from the dome light to the front of the car under the headliner with a fish tape (or wire coat hanger)
8 ) Connect up the new Grote light and test - instructions are included with the light, use the last ones "for use where chassis ground (-) is obtained through the door switch"
9) Put the mirror and visor clips back
11) Tape up the wires where they exit the light or use a loom.
12) Prep the back of the light (now your ABS sheet) and the mirror mount cover with strong cleaner and alcohol, then use something like 3M VHB to stick it up
13) Pull the slack back through the rear dome light opening and stuff it out of the way.
14) Put the dome light assembly back in place, putting the ring ground terminal on the new wire UNDER the assembly to ground
All done!
I would advise you to pull the battery terminal once you determine which wire is hot - or at least pull the fuse to the interior lights. If you don't and short out something you could fry the fade-in/fade-out circuit.
The results? Really nice - a lot more light where you need it. To make sure I don't overload the fade circuit for now I have the OEM dome off unless I need it. I think I will replace the new light's bulbs with low draw LEDs then I can run all of them and not worry (it seem to run all of them now w/o a problem anyway).
The only downside is that the new light can't be switched off like the OEM light - open a door and the dome light side comes on. The built in switch lets you turn on the reading/map light only or both lights.
Now the pix:
Next time I am trying to find something in the box at night, I will be so much happier
Dennis "I saw the light"

Thread Starter
Member
SL Member
Joined: Nov 2006
Posts: 83
From: Nashville, TN
I should have added that I wanted to attach the new light with screws (the mirror screw holes) but I had nothing in my junk box of parts that would match the mirror screws and were the right length. My next thought was to pull the mirror cover and screw that to the new light, then try to slide the cover /light back on. I may try that one still, when I have more time.
The VHB has held fine so far, but I would rather the light be attached in a better way.
Dennis
The VHB has held fine so far, but I would rather the light be attached in a better way.
Dennis






Thread Starter
Member
SL Member
Joined: Nov 2006
Posts: 83
From: Nashville, TN
To update: the original 3m double sticky tape started losing its grip in the heat even though I had thoroughly prepared both surfaces. I tried some 3m VHB tape from Radio Shaft - it was worse. I picked up some "3M Scotch Mount Molding Tape" from the local O'Reilly Auto Parts store. It was only 1/2" wide, but was all they had in stock - it appears to be this http://tinyurl.com/33vlt7 .

This stuff works! It survived the weeks of 100+ degree days this summer without a problem. It would be ideal if you would find it in a wider width, but I just covered the mirror screw cover with these narrow strips. It works just fine.
The light may not look like a fancy, expensive dome light - but it works
Dennis
This stuff works! It survived the weeks of 100+ degree days this summer without a problem. It would be ideal if you would find it in a wider width, but I just covered the mirror screw cover with these narrow strips. It works just fine.
The light may not look like a fancy, expensive dome light - but it works
Dennis




Senior Member

SL Member
Joined: Sep 2007
Posts: 238
From: South Florida
I went to the junk yard and got a light out of a eclipse. it had two map lights and a dome light. I mounted it up front so I can see. I replaced the bulbs at autolumination and wow what a difference. I get compliments all the time. I will take a pic and post some.

Thread
Thread Starter
Forum
Replies
Last Post
wonderworm
Scion xA/xB 1st-Gen ICE & Interior
7
Nov 19, 2023 01:44 AM
XB06
Scion xB 2nd-Gen ICE & Interior
1
May 30, 2015 02:42 AM
cowboy
Scion xA/xB 1st-Gen ICE & Interior
8
Jan 13, 2004 07:55 AM
