
DIY: Gen1 xB Rear Wiper Arm Conversion to Standard Blades


Thread Starter
Senior Member
SL Member
Joined: Mar 2005
Posts: 167
From: Southern Florida
Hi,
For those of us Gen1 xB owners that have been PO'd at the rear wiper arm & blade I kindly offer this DIY (Pics to follow) for your consideration:
Keep in mind that this is somewhat of a proto-type type of project, altho I present this DIY without the head banging I may have done !!
Please be careful and safe !! Wear safety glasses when using bench grinders, drills and the like !!
As always, READ this DIY completely before starting out !! You may choose to do something differently than I did.
If you crack your OEM rear wiper arm, they are not cheap to replace, if you use yours as I do.... Obviously, lots of folks have simply removed theirs.
PARTS I USED:
==========
* Original xB Rear Wiper Arm
* A Donor wiper arm with a straight "Hook" section of (at least) 9 1/2 inches from the tip of the hook to the other end ($2.46 at junk yard)
* Standard Wiper Blade (I used an Anco 13 inch) ($4.96 at Walmart)
* Approx 6 small-ish tie wraps (6 inch length)
* Spray Paint in color of choice ($0.97 at Walmart)
* Qty: 2 or 3 #8 x 1 inch self-tapping screws (I used hex head) (Home Depot)
TOOLS I USED: The tool listing may not be all inclusive for you
==========
* 10mm Wrench to remove OEM wiper arm nut
* Bench Grinder to help improvise if needed
* Various screwdrivers as needed
* Small ViseGrips also for improvising
* Power Drill
* Drill Bits for use on metal - I used several 1/8 inch because I broke them
* Work Bench area - I used a 40 inch 2 x 12 on two jack stands
* File - Medium coarse - Flat Bottom / Curved Top for shaping fitment
* Needle Nose Pliers - Medium Large size for support webbing removal
* Sharpie
"The Hook Section of the donor arm is REALLY strong metal for its thickness"
TIPS: To Help Save You Time
====================
* I chose a specific mounting method (self tapping screws), but you may find a different one works for you
* Allow extra time for improvising if needed
* Original Wiper Arm is prone to cracking / chipping so be gentle !!!!
* Removing the Hook Section from the donor arm can take a while depending on your removal method. I used brute force and visegrips which took much longer than other methods I suspect; like maybe grinding the edge material off with the bench grinder ?
* OEM Rear Wiper Arm has plastic support webbing underneath (bottom side); Remove only the final Eight ( inches of webbing under the straight section
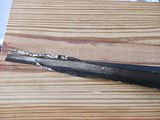
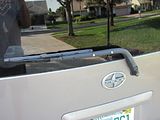
* The new Hook Section, when mounted to the OEM arm needs to extend past the end of the OEM arm by an inch or so to be able to get the new standard blade on and off
 Note that the Hook section extends beyond the end of the OEM arm
* Donor Arm I bought at local "You Pull" junkyard had two 30 degree bends near the hook end of the arm that I ended up having to flatten straight using blacksmith skills I never had before
* I had intended to use Three (3) self-tapping screws to attach the hook section to the OEM arm, but one of them sheared off so I only used Two(2)
* I used the bench grinder to trim the length of my donor hook section, your method may vary
* The plastic support webbing on the bottom of the OEM arm that gets removed needs to be removed so the donor hook section will lay flat which affects how the new blade lays on the rear window glass
* I had to massage several inches of the OEM arm's end to conform to the curvature of the new standard wiper blade; not unlike how the OEM arm does for the OEM blade. I used the bench grinder and the curved file to do this
* The HARDEST part of this was extricating the donor hook section from the donor arm lower section. It is machine stamped hard and tight !! Be patient and be careful ! I wore gloves.
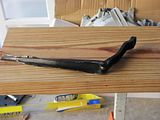 Donor Arm after extricating the Hook Section
ASSEMBLY PROCESS: BE PATIENT !!
==============
* Remove the plastic cover over the Rear wiper arm nut (mine was long gone anyhow)
* Using the 10mm wrench, remove the nut and store it safely
* Gently remove the OEM Rear Wiper Arm assembly from the Wiper motor "Stud"
* Gently Remove the OEM Wiper Blade from the Wiper Arm Assembly; I used a small flat blade screwdriver to pry it off on each side
* Extricate the donor arm hook section from the donor arm lower section. BE PATIENT ! Wear safety glasses if you use the bench grinder for any part of this project !!!!
* Trim the total length of the (now "free") hook section of the donor arm to approx. 9 1/2 inches from the tip of the hook to the end of the hook section. It can be a tiny bit shorter, but shouldn't be any longer or the new blade when installed will wipe above the rear window glass
* Turn the OEM Arm over and remove the Eight ( inches of the plastic support webbing from the open end inward to the || divider where the curve starts to develop down the OEM arm. On mine it was an obvious separator. There are a few little plastic "posts" as part of the webbing that also need to be removed. You want the underneath to be flat
* Using a sharpie (or pencil) mark 2 or 3 spots on the Hook Section approx 3 1/2 inch from end of hook (if using three holes), 6 1/2 inches from end of the hook and 9 1/2 inches from the end of the hook
* Using the power drill and the 1/8 inch drill bit, drill (2 or 3) 1/8 inch holes at the spots you just marked. I clamped my hook section to my workbench to make this part easier
* Insert the now drilled Hook Section into the underside of the OEM Arm section. I butted mine up against the divider part of the plastic support webbing. You'll see what I mean
* Turn the OEM Arm over and with the hook section in place, Re-Drill through the 2 or 3 holes in the hook section so that you go all the way through the plastic of the OEM arm. Be Patient and gentle
* With the holes through both the Hook section and the OEM Arm, Line them up and install tie-wraps in each hole to pre-test the fitment of the arm assembly AT the car but not re-mounted ON the car. Line up the mounting hole over the wiper motor stud and sweep the arm assembly from flat (far left) to the upper right position (follow the wiping pattern if you have used your original wiper before). I settled on the 9 1/2 inch length of the hook section by doing this before I drilled the holes originally
* Once satisfied with the pre-test, I removed the tie-wraps and by hand, carefully installed the first self-tapping screw through the OEM arm and into the hole in the hook section. My holes didn't line up quite perfect and the third hole ended up shearing the screw so I only have the lower two screws in place. The screws I used left some length extending beyond the bottom of the OEM arm that I carefully ground off with the bench grinder
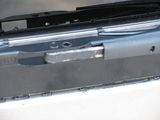
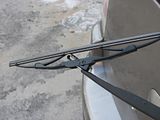
 Screws ground down and notice the shaping of the bottom of the OEM Arm to allow for meshing with the top of the new wiper blade
* Install new wiper blade and Pre-Test again at car for range of wiping motion / pattern
* Check for new wiper blade contact with the bottom of the OEM arm. The underside of the OEM Arm near the hook will likely need to be rounded in a pattern to match the top of the new wiper blade so they end up "meshing". This will help ensure the new wiper blade lays flat on the rear window glass as it wipes in its pattern of motion. Be PATIENT !! Better to go slow than go to fast and remove too much material. I used my curved edge file to fine tune this fitment (like shaping a surf board)
* Remove the new wiper blade and Paint to color of choice. Allow to dry
* At car, power cycle the rear wiper motor fully to make sure it is parked to far left position (it should be already in most cases, but just to be safe)
* At the car, remove the rear wiper motor nut off the stud, if you stored it there
* With paint dry to your taste, re-install the new wiper blade on the now modded OEM arm; Go to the car and position the modded OEM Arm with the blade in the horizontal (flat) position to the far left (follow wiping pattern)
* Re-install the modded arm onto the stud so that the arm lays flat (horizontal). I had to do this a couple times to get it in the right position
* Using the 10mm wrench, re-install the nut onto the wiper motor stud. Do NOT over-tighten, but snug it up good
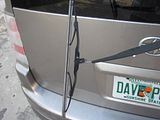
* With ignition on, power test the now modded rear wiper for proper operation. I saw a slightly different wiping pattern begin to form on the glass because I chose a 13 inch wiper blade and the slightly different geometry of the modded OEM arm. New blade should be in contact with the rear window glass through the entire wiping pattern.
****** FINISH ******
You have now solved one of the biggest frustrations in being a Gen1 xB owner !!!
For those of us Gen1 xB owners that have been PO'd at the rear wiper arm & blade I kindly offer this DIY (Pics to follow) for your consideration:
Keep in mind that this is somewhat of a proto-type type of project, altho I present this DIY without the head banging I may have done !!
Please be careful and safe !! Wear safety glasses when using bench grinders, drills and the like !!
As always, READ this DIY completely before starting out !! You may choose to do something differently than I did.
If you crack your OEM rear wiper arm, they are not cheap to replace, if you use yours as I do.... Obviously, lots of folks have simply removed theirs.
PARTS I USED:
==========
* Original xB Rear Wiper Arm
* A Donor wiper arm with a straight "Hook" section of (at least) 9 1/2 inches from the tip of the hook to the other end ($2.46 at junk yard)
* Standard Wiper Blade (I used an Anco 13 inch) ($4.96 at Walmart)
* Approx 6 small-ish tie wraps (6 inch length)
* Spray Paint in color of choice ($0.97 at Walmart)
* Qty: 2 or 3 #8 x 1 inch self-tapping screws (I used hex head) (Home Depot)
TOOLS I USED: The tool listing may not be all inclusive for you
==========
* 10mm Wrench to remove OEM wiper arm nut
* Bench Grinder to help improvise if needed
* Various screwdrivers as needed
* Small ViseGrips also for improvising
* Power Drill
* Drill Bits for use on metal - I used several 1/8 inch because I broke them
* Work Bench area - I used a 40 inch 2 x 12 on two jack stands
* File - Medium coarse - Flat Bottom / Curved Top for shaping fitment
* Needle Nose Pliers - Medium Large size for support webbing removal
* Sharpie
"The Hook Section of the donor arm is REALLY strong metal for its thickness"
TIPS: To Help Save You Time
====================
* I chose a specific mounting method (self tapping screws), but you may find a different one works for you
* Allow extra time for improvising if needed
* Original Wiper Arm is prone to cracking / chipping so be gentle !!!!
* Removing the Hook Section from the donor arm can take a while depending on your removal method. I used brute force and visegrips which took much longer than other methods I suspect; like maybe grinding the edge material off with the bench grinder ?
* OEM Rear Wiper Arm has plastic support webbing underneath (bottom side); Remove only the final Eight (
* The new Hook Section, when mounted to the OEM arm needs to extend past the end of the OEM arm by an inch or so to be able to get the new standard blade on and off
 Note that the Hook section extends beyond the end of the OEM arm
 * Donor Arm I bought at local "You Pull" junkyard had two 30 degree bends near the hook end of the arm that I ended up having to flatten straight using blacksmith skills I never had before
* I had intended to use Three (3) self-tapping screws to attach the hook section to the OEM arm, but one of them sheared off so I only used Two(2)
* I used the bench grinder to trim the length of my donor hook section, your method may vary
* The plastic support webbing on the bottom of the OEM arm that gets removed needs to be removed so the donor hook section will lay flat which affects how the new blade lays on the rear window glass
* I had to massage several inches of the OEM arm's end to conform to the curvature of the new standard wiper blade; not unlike how the OEM arm does for the OEM blade. I used the bench grinder and the curved file to do this
* The HARDEST part of this was extricating the donor hook section from the donor arm lower section. It is machine stamped hard and tight !! Be patient and be careful ! I wore gloves.
 Donor Arm after extricating the Hook Section
ASSEMBLY PROCESS: BE PATIENT !!
==============
* Remove the plastic cover over the Rear wiper arm nut (mine was long gone anyhow)
* Using the 10mm wrench, remove the nut and store it safely
* Gently remove the OEM Rear Wiper Arm assembly from the Wiper motor "Stud"
* Gently Remove the OEM Wiper Blade from the Wiper Arm Assembly; I used a small flat blade screwdriver to pry it off on each side
* Extricate the donor arm hook section from the donor arm lower section. BE PATIENT ! Wear safety glasses if you use the bench grinder for any part of this project !!!!
* Trim the total length of the (now "free") hook section of the donor arm to approx. 9 1/2 inches from the tip of the hook to the end of the hook section. It can be a tiny bit shorter, but shouldn't be any longer or the new blade when installed will wipe above the rear window glass
* Turn the OEM Arm over and remove the Eight (
* Using a sharpie (or pencil) mark 2 or 3 spots on the Hook Section approx 3 1/2 inch from end of hook (if using three holes), 6 1/2 inches from end of the hook and 9 1/2 inches from the end of the hook
* Using the power drill and the 1/8 inch drill bit, drill (2 or 3) 1/8 inch holes at the spots you just marked. I clamped my hook section to my workbench to make this part easier
* Insert the now drilled Hook Section into the underside of the OEM Arm section. I butted mine up against the divider part of the plastic support webbing. You'll see what I mean
* Turn the OEM Arm over and with the hook section in place, Re-Drill through the 2 or 3 holes in the hook section so that you go all the way through the plastic of the OEM arm. Be Patient and gentle
* With the holes through both the Hook section and the OEM Arm, Line them up and install tie-wraps in each hole to pre-test the fitment of the arm assembly AT the car but not re-mounted ON the car. Line up the mounting hole over the wiper motor stud and sweep the arm assembly from flat (far left) to the upper right position (follow the wiping pattern if you have used your original wiper before). I settled on the 9 1/2 inch length of the hook section by doing this before I drilled the holes originally
* Once satisfied with the pre-test, I removed the tie-wraps and by hand, carefully installed the first self-tapping screw through the OEM arm and into the hole in the hook section. My holes didn't line up quite perfect and the third hole ended up shearing the screw so I only have the lower two screws in place. The screws I used left some length extending beyond the bottom of the OEM arm that I carefully ground off with the bench grinder
 Screws ground down and notice the shaping of the bottom of the OEM Arm to allow for meshing with the top of the new wiper blade
* Install new wiper blade and Pre-Test again at car for range of wiping motion / pattern
* Check for new wiper blade contact with the bottom of the OEM arm. The underside of the OEM Arm near the hook will likely need to be rounded in a pattern to match the top of the new wiper blade so they end up "meshing". This will help ensure the new wiper blade lays flat on the rear window glass as it wipes in its pattern of motion. Be PATIENT !! Better to go slow than go to fast and remove too much material. I used my curved edge file to fine tune this fitment (like shaping a surf board)
* Remove the new wiper blade and Paint to color of choice. Allow to dry

* At car, power cycle the rear wiper motor fully to make sure it is parked to far left position (it should be already in most cases, but just to be safe)
* At the car, remove the rear wiper motor nut off the stud, if you stored it there
* With paint dry to your taste, re-install the new wiper blade on the now modded OEM arm; Go to the car and position the modded OEM Arm with the blade in the horizontal (flat) position to the far left (follow wiping pattern)
* Re-install the modded arm onto the stud so that the arm lays flat (horizontal). I had to do this a couple times to get it in the right position
* Using the 10mm wrench, re-install the nut onto the wiper motor stud. Do NOT over-tighten, but snug it up good
* With ignition on, power test the now modded rear wiper for proper operation. I saw a slightly different wiping pattern begin to form on the glass because I chose a 13 inch wiper blade and the slightly different geometry of the modded OEM arm. New blade should be in contact with the rear window glass through the entire wiping pattern.

****** FINISH ******
You have now solved one of the biggest frustrations in being a Gen1 xB owner !!!
Last edited by sammydad1; Feb 24, 2012 at 04:56 AM. Reason: saving my work...Adding Pics


Senior Member

SL Member
Team N.V.S.
Joined: Sep 2004
Posts: 13,706
From: Sacramento, CA / Nor*Cal
I don't get it. It looks hideous now. but seriously what's the point the oem blade refills range between $2.00 - $8.00.
Is there another benefit than the slightly larger (longer) blade?
Is there another benefit than the slightly larger (longer) blade?
Thread Starter
Senior Member
SL Member
Joined: Mar 2005
Posts: 167
From: Southern Florida
Wait til your wiper arm cracks off a couple of the insert support tangs. $75 +/- for a new arm from scion. For those folks who actually use their rear wiper, this mod is a good alternative.

Junior Member
Joined: Jun 2012
Posts: 6
From: Columbus, Ohio
I like your mod and write-up. Perhaps a little aesthetically challenged with the silver screws, but the solution seems like a big improvement. What is the size limit on the wiper blade?
I have been looking at doing something on this "problem" as well. I was considering replacing the entire wiper arm.
Thanks sammydad1
I have been looking at doing something on this "problem" as well. I was considering replacing the entire wiper arm.
Thanks sammydad1
Thread Starter
Senior Member
SL Member
Joined: Mar 2005
Posts: 167
From: Southern Florida
Hi,
I am very happy with the 13" blade I used.
It gives far better coverage now than the oem.
We get some heavy rains here and having a
functional rear wiper makes me feel safer when
I drive.
I am very happy with the 13" blade I used.
It gives far better coverage now than the oem.
We get some heavy rains here and having a
functional rear wiper makes me feel safer when
I drive.

Junior Member
Joined: Sep 2009
Posts: 4
From: SE, MI
So my question is, does this modification help with that issue at all? From a cost perspective, it's nuetral since blade refills are ~$10, but having a quiet wiper would be a tremendous improvement! I also have been looking at entire arm replacements... TIA!

Member
Joined: May 2013
Posts: 15
Where do you get these refills ? Online? Cant find anything in the auto parts stores.

Senior Member
SL Member
Joined: Jun 2010
Posts: 403
From: Tucson, AZ
i dunno about the refil, but i just bought a new wiper at orielly auto parts for like 12 bucks i think. Its works just like the front wipers, pop off the old ones, click in the new and your good to go.
Member
Joined: May 2013
Posts: 15
Is it made by OReilly or is it some other brand. Not sure why I cant find it in any of our local parts stores.
Senior Member
SL Member
Joined: Jun 2010
Posts: 403
From: Tucson, AZ
Member
Joined: May 2013
Posts: 15

Thread
Thread Starter
Forum
Replies
Last Post
Slopoke21m
Scion xA/xB 1st-Gen Suspension & Handling
54
Apr 23, 2007 12:25 AM