
Three New Mods For The Box


Thread Starter
Member
Joined: Nov 2007
Posts: 49
From: Honolulu
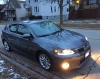
I just finished 3 new mods for my box. The first was to remove my lower grill blazer fogs and replace them with Micro ff ones. The quality is much better and they fit the opening better. That took a lot a fabrication as it is much to large to fit with the mounting bracket. I had to mill it off and create new ones with JB weld.
Next mod was to remove the ugly Enkei center cap and replace them with CNC'd alum. ones with a skull on it. This was then anodized gunmetal. Island Rocket Reels did all the work. He does a lot of stuff for me so you may want to check him out.
Last mod was to paint a center stripe to match the grill opening. My pal Reid painted it with a dark charcoal with blue pearl. The whole thing was then buried in clear. I value your opinions, so tell me what you think. Thanks


AND NOW THE MONEY SHOT.........................

Next mod was to remove the ugly Enkei center cap and replace them with CNC'd alum. ones with a skull on it. This was then anodized gunmetal. Island Rocket Reels did all the work. He does a lot of stuff for me so you may want to check him out.
Last mod was to paint a center stripe to match the grill opening. My pal Reid painted it with a dark charcoal with blue pearl. The whole thing was then buried in clear. I value your opinions, so tell me what you think. Thanks
AND NOW THE MONEY SHOT.........................


Thread Starter
Member
Joined: Nov 2007
Posts: 49
From: Honolulu
I'd lower it in a heartbeat but I can't because of where I live. It wouldn't clear the driveway! Bums me out, but that's the breaks. I hear that comment all the time. Too Bad, I see other ones lowered and I get box envy!


Thread Starter
Member
Joined: Nov 2007
Posts: 49
From: Honolulu
Sorry I didn't take any pics while doing the fab but here goes.... Some of this may be hard to follow without pics but seeing that the whole front clip of the car has to come off to shoot it, I can't.
The Hella micro ff is too big to fit out of the box. The mounting bracket which is molded into the body sticks out too far and the light itself just fits.
Step one is to scuff up the mounting bracket with sandpaper and then wipe it with alcohol. The bracket is basically a hollow tube molded into the housing. Next, fill it and some of the surrounding area with JB Weld. Makd sure you have no air holes in the tube as you fill it. Let harden fully.
Step two is to mill off the bracket flush to the housing. Shape some of the surrounding area you JB welded with sandpaper or a dremel to make it presentable. What you are doing here is making a solid flat surface that is reinforced, You will be making a fixed post type of mount out of this. Paint it black for looks and to protect the epoxy.
Next, take off the lamp, 2 screws hold it on. Lay the bracket flat ( lens area down ), and make a hole to accept a 5/16ths SS bolt. This has got to be as perfectly centered as possible. I'd use a lathe. Drill right through right down the center. If you look inside the housing, you will see a small groove on the opposite side. The hole must exit in this channel. I'd use a small pilot hole to be sure.
Next, take a 5/16ths SS bolt and cut the head so that it fits in the channel and stick it from the inside of the housing out of the hole you just made. The bolt head will have to be cut like the letter t to that it rests inside the slot or channel. Glue it in using JB Weld. Use a nut on the outside to hold it tight to the body.
When the epoxy hardens, you can reassemble the lamp. I put a small bead of silicone over the epoxy so that the heat of the light wouldn't heat up the bolt too much and perhaps loosen the hold of the epoxy.
You have now created a light with a single post attachment. To put this on the box you will have to remove the front clip and the lower skirt. the light barely fits so you will have to separate the two halfs to mount it in. You will also have to cut away some of the hard plastic that is behind the pop off grill. Mount your new light using 2 pieces of 1" by 2" alum. or stainless as base plates for each light. One above the skirt and one below. You will need this as the base is not very big and will cause the light to shake a little, even if you crank it down. ( and this is not what you want to do as this may cause the epoxy to crack) You will notice that even on your blazers the base is a little big. Use a nylock nut to hold her on.
If this does not make sense, I don't blame you. It's hard to follow without pics. Again, sorry!!!! If you look up a hella micro ff online you will see the bracket I'm talking about. Good Luck, It's actually not that hard, just a lot of steps.

Thread
Thread Starter
Forum
Replies
Last Post
DJ_FroZone
Scion xB 2nd-Gen Owners Lounge
25
May 30, 2019 07:17 PM
SkillFreeJake
Scion tC 2G Aero & Exterior
17
Jul 27, 2015 12:34 AM
Godfryness
Scion xB 1st-Gen Owners Lounge
2
Jan 2, 2015 11:18 PM