


Reupholstering door panels...


Thread Starter
Senior Member


SL Member
Joined: Aug 2007
Posts: 433
From: Tacoma, WA
 Reupholstering door panels...
So... I know that the fabric on the door panels is a cut and tuck job... so here's the question. What kind of tool(s) would one need to do a proper "tuck" into the crevaces and what glue would one use to adhere a vinyl?

Member
SL Member
Joined: May 2010
Posts: 79
From: San Antonio, TX
So does cut and tuck mean that you can't take the door panels off and remove the fabric from the back side? Sounds like you leave the door panels on and just cut them from the outside? I am looking at getting a leather kit for mine and it includes these door panel sections and it sounds like I will have to glue them on.


Yes the xB2 fabric sections are not removable from the door so it has to be done in place. If you are trying to do vinyl I would recommend DAP Weldwood contact cement. You're going to need something really strong to hold the vinyl against the inside curve in the middle of the panel when it gets hot in there. Spray glues just aren't going to do it.


Thread Starter
Senior Member
SL Member
Joined: Aug 2007
Posts: 433
From: Tacoma, WA
I'm gonna pull the old fabric off because the vinyl will probably need as much room to fit in the groove as possible, plus I don't like the idea of gluing to another fabric. Once I get the fabric off I am gonna use a fine grit sand paper, most likely 150 or 200 to remove any old adhesive, and use the DAP Weldwood to glue on the vinyl. I will try to post a DIY note if it turns out good so everyone has a better idea of how it's done. As far as I know and have looked no one else has done a "how-to" on this...


Thread Starter
Senior Member
SL Member
Joined: Aug 2007
Posts: 433
From: Tacoma, WA
You know, I am honestly not quite sure, I heard that 3M's Super 77 is pretty good, but if you can use a stronger adhesive without it bleeding through, why not. I just want to make sure that I do it once and do it right. That would be my own personal advice.
Member
SL Member
Joined: May 2010
Posts: 79
From: San Antonio, TX
were you guys able to get the fabric out of the groove when you cut the fabric? I am getting leather kit with the vinyl and I really don't want to screw this one up. It sounds complicated getting everything glued, countoured, tucked and cut.

Thread Starter
Senior Member
SL Member
Joined: Aug 2007
Posts: 433
From: Tacoma, WA
Here it is folks... my DIY door panel re-upholstering.
So, to start off here are the materials that I used:
A retractable razor blade (make sure you have new blades)
1.5" wide Putty Knife
60, 80, 140 grit sand papers
Painters tape
Old Newspapers (for protecting from overspray)
3M High Strength 90 spray adhesive
Black Piping
Piping Roller (I'll explain these two later)
Now for the good stuff:
I will tell you there is nothing more unnerving, if you've never done this before, than taking a knive to your door panel... but away we go. I've written the comments about the photos, underneathe the photos themselves .
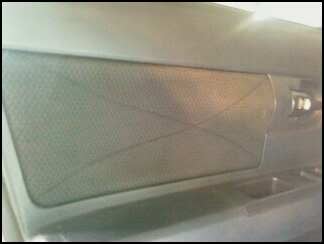
After making the cuts, I pulled all the fabric away. If your lucky some of the foam comes off with it.
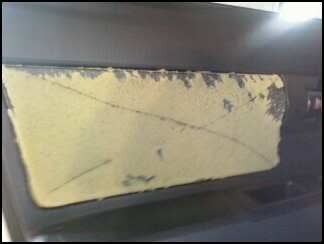
Once you have it un covered, you can then take your putty knife and scrape all the foam off. This will be the most painstaking part of the process, I guarantee it. But take your time, be patient, and try to get as much as the foam and glue off as possible. It will make the sanding go ten times quicker. Also be sure to concentrate on the groove around the edge because when you do the tuck you don't want any material to interfere with promoting the adhesion. When removing the foam and glue from the groove, I actually removed a razor blade from the knive so I could get in there more accurately.
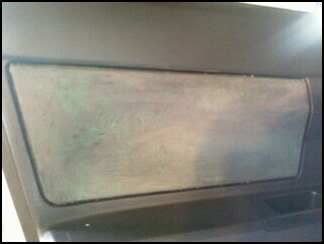
Now that you have scraped off all the foam, you can take the varying grits of sandpaper and remove the last little bits of foam and glue. Be sure to vacuum the area once the sanding is complete or wipe it down with a tack cloth so that there is no dust particles when you glue the new fabric onto the panel.
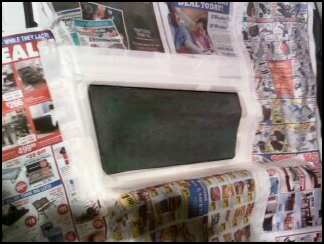
Whether or not you are using a brush on or a spray on adhesive it is definitely a good idea to cover the surrounding area so you don't get any overspray or drips on the rest of your door panel. I opted to use the 3M "90" because of the setup time and no temperature requirements. The "90"
acheives the proper tackiness in 1 to 2 min and gives you a 10 min window of worktime. The DAP Weldwood takes 30 to 40 min to set up proper tack, and requires the material and panel to be in at least a 65 degree environment 24 hours before and after application. Being that I live in WA and it is still technically "Winter" that wasn't gonna happen. LOL
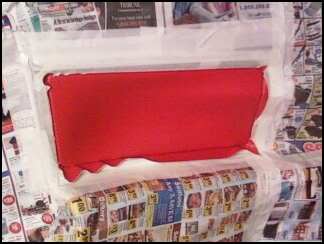
Before you put any adhesive on the door or the fabric, try to get the piece of material the approximate size of the panel. I recommend at LEAST a 1/2" overlap. Once you have applied the adhesive (READ THE DIRECTIONS ON THE CONTAINER! Lol) you can then apply the fabric of your choice onto the door panel. Be sure that if you are working with a vinyl that you work out any bubbles. With the material on the panel you can start tucking the material into the grooves. I did have to use a fair amount of pressure because I used a vinyl, but with that being said, make sure that you work from the center out to the corners, and be careful not to actually puncture or tear the material.
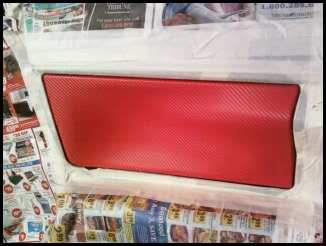
With the material now in place, give it a while to set so when you trim the excess you don't end up removing any of the material that is supposed to stay on the door. I admittedly jumped the gun on the first panel and ended up having to redo the process. I gave the panels a good half hour to sit then trimmed the excess off.
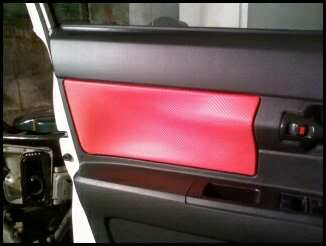
And Tadah! Fabric applied. One thing you will notice is that with the foam removed, the gap around the edges becomes a lot more visible. I wanted to do something to fill that gap, just to clean it up and not leave the trimmed material visible (believe me, with a bright colored material it is extremely pronounced.)
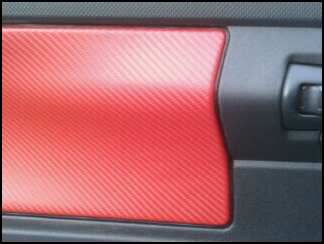
Now some might think this is a bit tacky, but I thought it was brilliant. In trying to find a means to fill that gap, I wanted something that would be resistant to oils, heat, dirt, etc. etc. It just so happens that a perfect material is that rubber piping that is used to hold screens in windows. I got a 25' foot long piece of .0125" black piping for $5. The tool used to roll that piping in was another $5 but well worth it. With the gap now filled, you have that nice clean edge, no visible trim.
I hope that this helped anyone who wants to tackle this job. It is a lot of fun, and a lot of work. But the results if you do it right are amazing. My total costs for this including the vinyl was no more than $50 and a day off.
A retractable razor blade (make sure you have new blades)
1.5" wide Putty Knife
60, 80, 140 grit sand papers
Painters tape
Old Newspapers (for protecting from overspray)
3M High Strength 90 spray adhesive
Black Piping
Piping Roller (I'll explain these two later)
Now for the good stuff:
I will tell you there is nothing more unnerving, if you've never done this before, than taking a knive to your door panel... but away we go. I've written the comments about the photos, underneathe the photos themselves .
After making the cuts, I pulled all the fabric away. If your lucky some of the foam comes off with it.
Once you have it un covered, you can then take your putty knife and scrape all the foam off. This will be the most painstaking part of the process, I guarantee it. But take your time, be patient, and try to get as much as the foam and glue off as possible. It will make the sanding go ten times quicker. Also be sure to concentrate on the groove around the edge because when you do the tuck you don't want any material to interfere with promoting the adhesion. When removing the foam and glue from the groove, I actually removed a razor blade from the knive so I could get in there more accurately.
Now that you have scraped off all the foam, you can take the varying grits of sandpaper and remove the last little bits of foam and glue. Be sure to vacuum the area once the sanding is complete or wipe it down with a tack cloth so that there is no dust particles when you glue the new fabric onto the panel.
Whether or not you are using a brush on or a spray on adhesive it is definitely a good idea to cover the surrounding area so you don't get any overspray or drips on the rest of your door panel. I opted to use the 3M "90" because of the setup time and no temperature requirements. The "90"
acheives the proper tackiness in 1 to 2 min and gives you a 10 min window of worktime. The DAP Weldwood takes 30 to 40 min to set up proper tack, and requires the material and panel to be in at least a 65 degree environment 24 hours before and after application. Being that I live in WA and it is still technically "Winter" that wasn't gonna happen. LOL
Before you put any adhesive on the door or the fabric, try to get the piece of material the approximate size of the panel. I recommend at LEAST a 1/2" overlap. Once you have applied the adhesive (READ THE DIRECTIONS ON THE CONTAINER! Lol) you can then apply the fabric of your choice onto the door panel. Be sure that if you are working with a vinyl that you work out any bubbles. With the material on the panel you can start tucking the material into the grooves. I did have to use a fair amount of pressure because I used a vinyl, but with that being said, make sure that you work from the center out to the corners, and be careful not to actually puncture or tear the material.
With the material now in place, give it a while to set so when you trim the excess you don't end up removing any of the material that is supposed to stay on the door. I admittedly jumped the gun on the first panel and ended up having to redo the process. I gave the panels a good half hour to sit then trimmed the excess off.
And Tadah! Fabric applied. One thing you will notice is that with the foam removed, the gap around the edges becomes a lot more visible. I wanted to do something to fill that gap, just to clean it up and not leave the trimmed material visible (believe me, with a bright colored material it is extremely pronounced.)
Now some might think this is a bit tacky, but I thought it was brilliant. In trying to find a means to fill that gap, I wanted something that would be resistant to oils, heat, dirt, etc. etc. It just so happens that a perfect material is that rubber piping that is used to hold screens in windows. I got a 25' foot long piece of .0125" black piping for $5. The tool used to roll that piping in was another $5 but well worth it. With the gap now filled, you have that nice clean edge, no visible trim.
I hope that this helped anyone who wants to tackle this job. It is a lot of fun, and a lot of work. But the results if you do it right are amazing. My total costs for this including the vinyl was no more than $50 and a day off.
Member
SL Member
Joined: May 2010
Posts: 79
From: San Antonio, TX
Damn Dude, that posts rocks. Thanks for taking the time to instruct us. I like pictures. Mine is up on the chopping block next when I get my leather kit. They are finally selling 2011 leather complete interior kits on ebay. I found a "Katskinz" one for $699 and thinking of going for it.