Custom Paintwork started today


Thread Starter
Senior Member
SL Member
Joined: Nov 2006
Posts: 1,168
From: Atlanta, Georgia
Started the dissassembly and paint work for my Xb today. Final product will look similar to this rendering:

First I dissassembled the nose:

Lots of wires off and things moved ....Kinda Scary!!

More dissembly and cleaning.

Some spots will be hard to paint.

Masked. Sealer and base metallic coat applied.
AHHH Pretty colors Pics taken about 6 hours after the ones above.

Engine compartment painted. Now on to removing all the doors and fully dissassembling them for jamb painting.
Custom painting my Scion part 2.
Yesterday and today I disassembled all the doors and the rear bumper.

Doorless. The next step is to apply the sealer and the initial silver basecoat.

I also applied just a bit of color at some jamb edges where the exterior coats may not cover between panels.

Scion Parts here and there and�.

EVERYWHERE!!! I even have parts stashed above the john in the bathroom
The next step is to reinstall the doors and tailgate. I will also have to semi-reinstall the bumpers and all the skirts as well as the door handles. All these items must be sprayed very close to their installed position (within � inch) but can not be painted installed fully as the paint will try to fill the gaps between close panels. SO, I will make little mounting brackets, use wire etc., to hang the bumpers and skirts in place with a little gap between each piece.
After that comes the sanding and preparation of the exterior of the body for painting of basecoat silver and the 2 candy colors (Pagan Gold and Tangerine). You allow the overspray from painting the exterior to dust into the jambs and panel edges. Then once the outside is candied and cleared you again remove the doors and spray the candies on the jambs followed by clear coat on the jambs. The overspray in the edges is a guide to carrying the fading together candies color in thru the jambs even with the outside. The next pictures I post will be with color on the outside�..it will be a few days before that happens�.I hope by mid week next week tho
12/17/06 Update: Ready to Paint :D

12/18/06 update color coats applied.

Now on to matching the fade in the jambs, reclearing and sanding and buffing. Reassembly in a few days.
12/19/06 Outside for resanding and dissassembly.

12/20/06 after a long day the whole car is sanded inside and out again, Kandies applied to the jambs, and all subassemblys recleared. Now I must wait till Saturday (48 hours dry time) before I can resand the exterior for buffing. Whew!!! Almost done :D

12/23/06 Finally after a number of long days the box is back in one piece and ready for the road My Christmas present to me!! :o


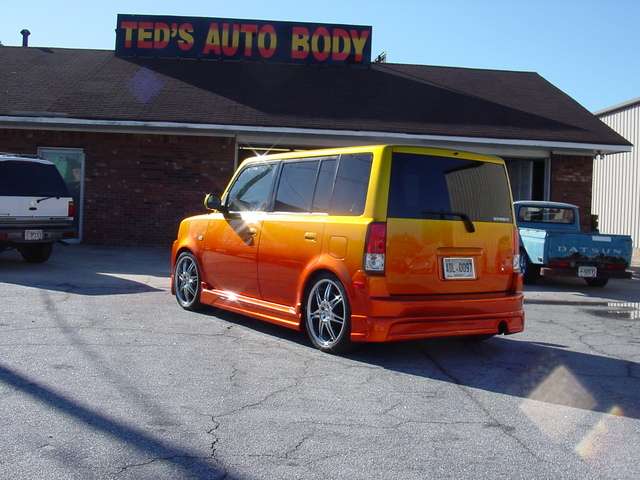
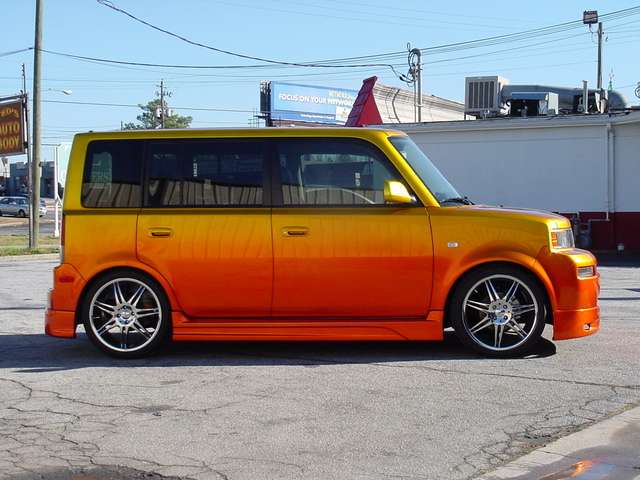

I still need to buff polish and clean some more. I also need to go underneath the car and Underseal and paint anything white on the floor and wheelhouses,But that can happen next week
First I dissassembled the nose:
Lots of wires off and things moved ....Kinda Scary!!
More dissembly and cleaning.
Some spots will be hard to paint.
Masked. Sealer and base metallic coat applied.
AHHH Pretty colors
Pics taken about 6 hours after the ones above.Engine compartment painted. Now on to removing all the doors and fully dissassembling them for jamb painting.
Custom painting my Scion part 2.
Yesterday and today I disassembled all the doors and the rear bumper.
Doorless. The next step is to apply the sealer and the initial silver basecoat.
I also applied just a bit of color at some jamb edges where the exterior coats may not cover between panels.
Scion Parts here and there and�.
EVERYWHERE!!! I even have parts stashed above the john in the bathroom
The next step is to reinstall the doors and tailgate. I will also have to semi-reinstall the bumpers and all the skirts as well as the door handles. All these items must be sprayed very close to their installed position (within � inch) but can not be painted installed fully as the paint will try to fill the gaps between close panels. SO, I will make little mounting brackets, use wire etc., to hang the bumpers and skirts in place with a little gap between each piece.
After that comes the sanding and preparation of the exterior of the body for painting of basecoat silver and the 2 candy colors (Pagan Gold and Tangerine). You allow the overspray from painting the exterior to dust into the jambs and panel edges. Then once the outside is candied and cleared you again remove the doors and spray the candies on the jambs followed by clear coat on the jambs. The overspray in the edges is a guide to carrying the fading together candies color in thru the jambs even with the outside. The next pictures I post will be with color on the outside�..it will be a few days before that happens�.I hope by mid week next week tho
12/17/06 Update: Ready to Paint :D
12/18/06 update color coats applied.
Now on to matching the fade in the jambs, reclearing and sanding and buffing. Reassembly in a few days.
12/19/06 Outside for resanding and dissassembly.
12/20/06 after a long day the whole car is sanded inside and out again, Kandies applied to the jambs, and all subassemblys recleared. Now I must wait till Saturday (48 hours dry time) before I can resand the exterior for buffing. Whew!!! Almost done :D
12/23/06 Finally after a number of long days the box is back in one piece and ready for the road
My Christmas present to me!! :o I still need to buff polish and clean some more. I also need to go underneath the car and Underseal and paint anything white on the floor and wheelhouses,But that can happen next week