
Camber Bolt Install (SPC)


So this is my half-a$$&%, after the fact DIY/How To on the SPC Camber Bolts install. There really isn't much to the install, but I'll cover what I think is relevant and answer any questions that I can.
I bought my camber kit from TRDSparks back in September and just finally installed it. I paid just over $50 shipped.... and they're roughly the same now. They're labeled as Progress Alignment Kit on their site, but they're very obviously from SPC when you get them.
Usual Disclaimer: I'm not responsible if you f up your car and crash or something. This is just a simple DIY... take all necessary safety precautions. And remember, it's not my problem if you do it wrong... so do your research and take your time if you're unsure.
First things first... you need certain tools to get this done. As an aside... I used 1/2" drive everything. I suppose 3/8" might be OK too. Up to you and what you have.
Necessary Equipment:
- Lug Wrench (I prefer my new toy there in yellow... but a Gorilla Wrench is an EXCELLENT investment)
- 21mm Socket for Lug Nuts (as needed)
- 2 x 22mm Sockets for OEM Bolts (I used a 13/16 socket with my Gorilla wrench as the second one)
--- Or also substitute a 22mm wrench for one of them? You will need TWO sides to wrench with.
- Breaker Bar
- 1/2" Drive Ratchet
- 18mm Socket for SPC Bolts
- 21mm DEEP Socket for other end of SPC Bolts
- Proper Torque Wrench
- SPC Camber Bolts, Part #81290

So... make sure you're on level ground, safety this, blah blah blah. You should know this part by now.
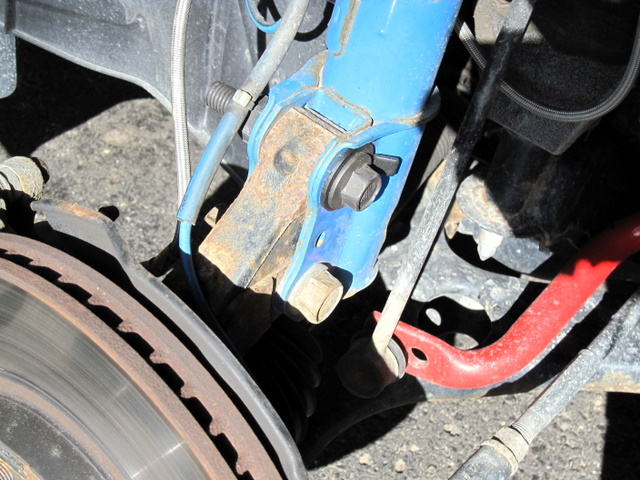
Jack up the car. Remove your wheel (remember, 21mm lug nuts). Observe both OEM bolts... and let's pretend in this picture, that top bolt is still the OEM one like the bottom one.

First thing you're going to do is take note of brake lines and the ABS line... my driver's side was OK, but I had to move the ABS line out of the way on the passenger side. Then use both of your 22mm wrenches/ratchets to remove the upper bolt. This is where the breaker bar or impact gun is helpful. They're probably going to be tight.
Once you remove that, time to grab your SPC bolt. Since mine were already on my car... here's a pic of them from SPC:

On the end with the head of the bolt is a washer with a big tab on the outside (the handle) and a little tab on the inside. The big tab on the outside needs to point in the direction of the camber you want - towards the car for negative camber and away from the car for positive. The small inner tab needs to fit into the mounting hole so that big washer sits flush as it should.

It might take a couple minutes to get that small tab to fit in the mounting hole. You need to rotate the bolt to get the tab to slip in behind the thicker section (NOTE: This will sound like English if you have the bolt in your hand, trust me). Then when you get started, give it a couple taps with your ratchet... I mean rubber mallet?
Then start threading the nut on the other end with your 18mm socket on the head end and the 21mm deep socket on the nut end. Tighten it down till it makes contact with the strut - but DO NOT tighten it.
Then loosen up the lower OEM bolt (both 22mm ends again - breaker bar or impact gun as needed). Just loosen, do not remove. Then you can rotate the new upper bolt and set desired camber. There's no way to know exactly what you're setting here... so I just tried to set them both at the maximum. SPC claims you can get up to an additional -1.75 degrees depending on the application. I don't know exactly what the tC gets, but I'm going to get it aligned later on and find out what exactly it's at and make sure everything is even.
Once you have the bolt rotated to the setting you want... be sure to HOLD the head end of the bolt steady and tighten from the nut end. SPC says 125 ft lbs for this model of bolt... so that's what I set it to. Then tighten the lower OEM bolt back up (these OEM ones are to be 177 ft lbs - thanks mich!).
TADA!
Reinstall wheel... lower car from jack... torque lug nuts to 76 ft lbs. Lather. Rinse. Repeat on other side.
So it's pretty simple, really. As long as you have all the right tools, you'll be fine. I would recommend getting it aligned at some point afterwards. I'm not going to do mine immediately, but probably in the next week or two. I don't think it should change anything else with the alignment, but I've never installed anything like this, so I can't be sure.
References:
- SPC Info Page
- SPC Install Instructions (not tC specific)
- SPC Install Video (again, not tC specific)
Questions?
I bought my camber kit from TRDSparks back in September and just finally installed it. I paid just over $50 shipped.... and they're roughly the same now. They're labeled as Progress Alignment Kit on their site, but they're very obviously from SPC when you get them.
Usual Disclaimer: I'm not responsible if you f up your car and crash or something. This is just a simple DIY... take all necessary safety precautions. And remember, it's not my problem if you do it wrong... so do your research and take your time if you're unsure.
First things first... you need certain tools to get this done. As an aside... I used 1/2" drive everything. I suppose 3/8" might be OK too. Up to you and what you have.
Necessary Equipment:
- Lug Wrench (I prefer my new toy there in yellow... but a Gorilla Wrench is an EXCELLENT investment)
- 21mm Socket for Lug Nuts (as needed)
- 2 x 22mm Sockets for OEM Bolts (I used a 13/16 socket with my Gorilla wrench as the second one)
--- Or also substitute a 22mm wrench for one of them? You will need TWO sides to wrench with.
- Breaker Bar
- 1/2" Drive Ratchet
- 18mm Socket for SPC Bolts
- 21mm DEEP Socket for other end of SPC Bolts
- Proper Torque Wrench
- SPC Camber Bolts, Part #81290
So... make sure you're on level ground, safety this, blah blah blah. You should know this part by now.
Jack up the car. Remove your wheel (remember, 21mm lug nuts). Observe both OEM bolts... and let's pretend in this picture, that top bolt is still the OEM one like the bottom one.
First thing you're going to do is take note of brake lines and the ABS line... my driver's side was OK, but I had to move the ABS line out of the way on the passenger side. Then use both of your 22mm wrenches/ratchets to remove the upper bolt. This is where the breaker bar or impact gun is helpful. They're probably going to be tight.
Once you remove that, time to grab your SPC bolt. Since mine were already on my car... here's a pic of them from SPC:
On the end with the head of the bolt is a washer with a big tab on the outside (the handle) and a little tab on the inside. The big tab on the outside needs to point in the direction of the camber you want - towards the car for negative camber and away from the car for positive. The small inner tab needs to fit into the mounting hole so that big washer sits flush as it should.
It might take a couple minutes to get that small tab to fit in the mounting hole. You need to rotate the bolt to get the tab to slip in behind the thicker section (NOTE: This will sound like English if you have the bolt in your hand, trust me). Then when you get started, give it a couple taps with your ratchet... I mean rubber mallet?
Then start threading the nut on the other end with your 18mm socket on the head end and the 21mm deep socket on the nut end. Tighten it down till it makes contact with the strut - but DO NOT tighten it.
Then loosen up the lower OEM bolt (both 22mm ends again - breaker bar or impact gun as needed). Just loosen, do not remove. Then you can rotate the new upper bolt and set desired camber. There's no way to know exactly what you're setting here... so I just tried to set them both at the maximum. SPC claims you can get up to an additional -1.75 degrees depending on the application. I don't know exactly what the tC gets, but I'm going to get it aligned later on and find out what exactly it's at and make sure everything is even.
Once you have the bolt rotated to the setting you want... be sure to HOLD the head end of the bolt steady and tighten from the nut end. SPC says 125 ft lbs for this model of bolt... so that's what I set it to. Then tighten the lower OEM bolt back up (these OEM ones are to be 177 ft lbs - thanks mich!).
TADA!
Reinstall wheel... lower car from jack... torque lug nuts to 76 ft lbs. Lather. Rinse. Repeat on other side.
So it's pretty simple, really. As long as you have all the right tools, you'll be fine. I would recommend getting it aligned at some point afterwards. I'm not going to do mine immediately, but probably in the next week or two. I don't think it should change anything else with the alignment, but I've never installed anything like this, so I can't be sure.
References:
- SPC Info Page
- SPC Install Instructions (not tC specific)
- SPC Install Video (again, not tC specific)
Questions?
Last edited by ack154; Feb 21, 2010 at 03:47 PM.

Senior Member
SL Member
Joined: Jul 2004
Posts: 3,900
From: Michigan
Originally Posted by ack154
Not a problem... It's not the most thorough... but you get the idea. 
gotta keep ya safe!good write up though, interested to know what the end camber will be with it maxed out.


Senior Member
SL Member
Joined: Nov 2005
Posts: 13,373
From: WORLD WIDE Flossin
Originally Posted by BlizZard
^what do you mean upgrade? They don't do anything performance wise....the only reason you'd need them is if you want to run more camber.
Senior Member
SL Member
Joined: Aug 2007
Posts: 2,332
From: Los Angeles
Originally Posted by TCpete
Originally Posted by BlizZard
^what do you mean upgrade? They don't do anything performance wise....the only reason you'd need them is if you want to run more camber.
I thought he just wanted to replace the bolts and leave it at that....there would be be NO difference performance wise unless you actually get an alignment with more negative camber.
