
Painting (Wheels)


Thread Starter
Senior Member
1UP Crew
SL Member
Joined: Oct 2005
Posts: 658
From: Elgin, IL
**Updated contact info below**
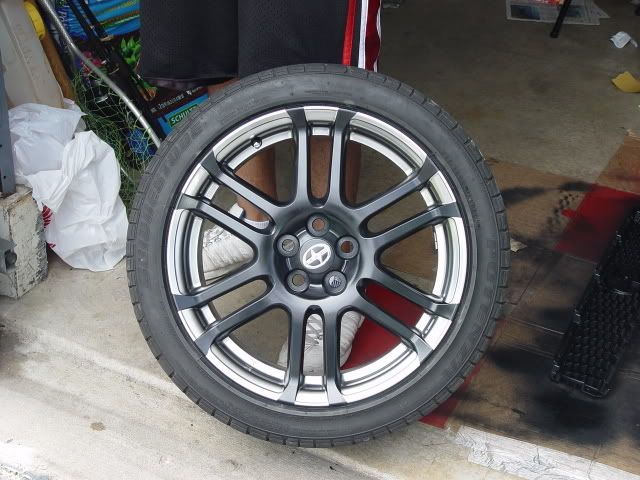
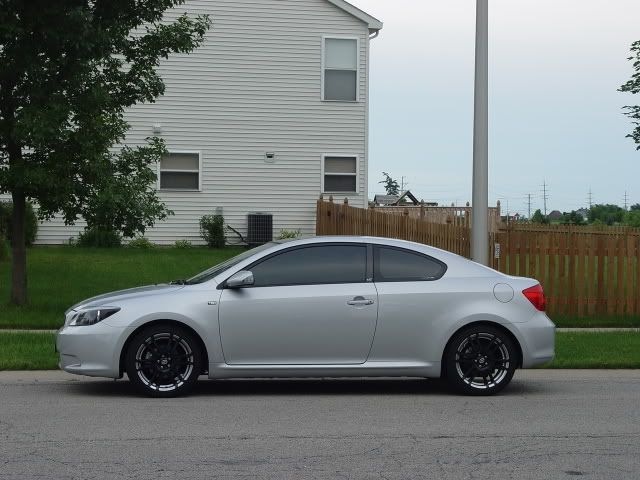
After recieveing multiple PM's about my wheels and not being smart enough to either save what I type nor make a thread, I've decided to bite the bullet and make a thread. In this thread, you'll learn how to go from this:
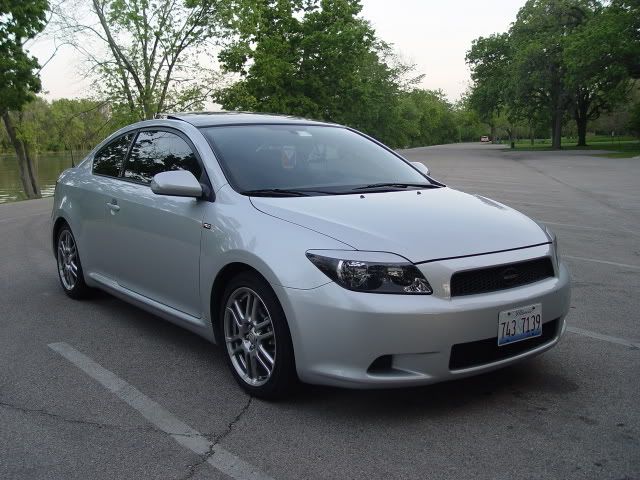
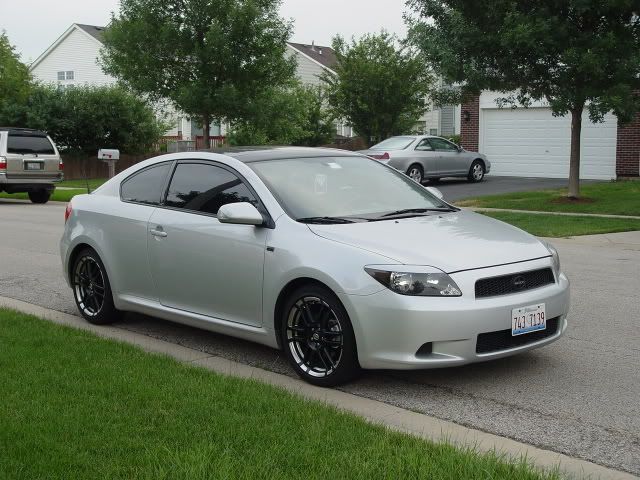
to this:

First, the Disclaimer (dum dum DUM!!)
This mod is performed at your own risk. You assume sole responsibility for the execution and outcome of this mod. I will not be held responsible if you are blind/dyslexic/a blithering idiot and your wheels come out ugly, runny, are different colors, smell funny, or cause small children to point at your wheels and commence dry-heaving.
That being said, if you follow my directions, you should be fine.
Anyway, here goes:
Materials:
Plenty of time (about 6 hours all total)
good weather (sunny, low humidity)
suitable painting area (room to work, well-ventilated)
jack
jackstands (at least 2)
lug wrench
wheel cleaner
clean towels/cloth
2 or 3 folding chairs
x-acto knife
masking tape
lots of newspaper
3 cans Dupli-Color high-performance wheel coating, black.
5 sheets 400-grit sandpaper
buddy to help you (optional, bvut helps a LOT)
food and drink to feed the buddy
Guiness (if you're of age, for later )
)
**Patience!**
Procedure:
-Clean the wheels very well. Make sure you use a cleaner that will strip off any brake dust/wheel wax/etc you micht have on the wheels. Basically you want to get the wheel as clean as possible down to the clearcoat finish. If you don't the paint won't stick.
-Jack up the car, remove the wheel.
-Remove the center cap. (It pops out from behind)
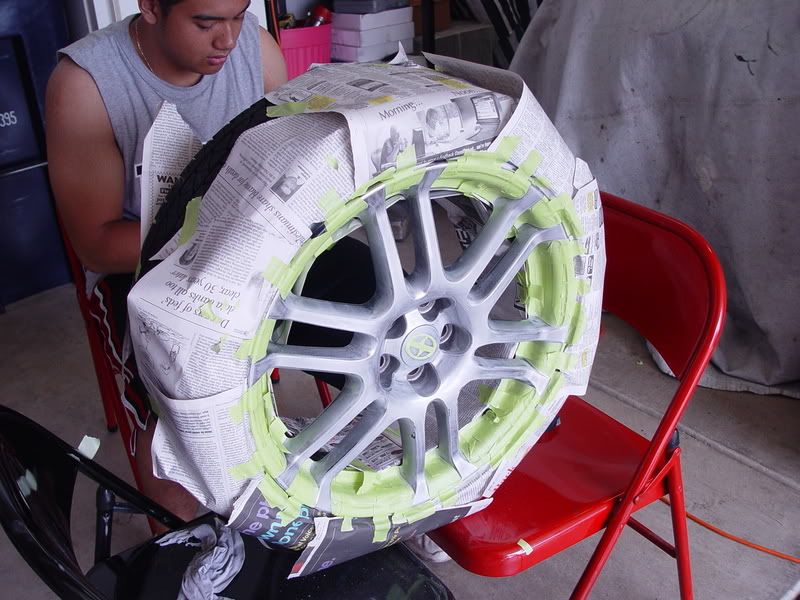
-Begin taping. For my wheels, I chose to 'extend' the spokes out to the edge of the rim. You can do any design you want. Some people leave the entire edge silver, some paint the entire wheel black. Basically tape over anything you still want silver. Also, cover the tire and the inside of the rim with newspaper. Don't forget to tape the valvestem! At this step, I found that it was easiest to stand the wheel up on a folding chair and rotate it like it's rolling as opposed to laying it flat and bending over it. Unfortunately, I only found this out after 3 wheels This is why you do as I say and not as I do!!
-Tape the centercap. Cover the entire centercap with tape, and use your finger to get it down flush with the centercap, to the point where you can see the curves and contours. Now with an x-acto knife, cut away everything but the scion logo itself. Peel back the tape you don't need and reinstall the centercap.
In this pic you can see how I taped the spokes and centercap, and also see my buddy Sam and his devilishly stylish cutoff t-shirt:
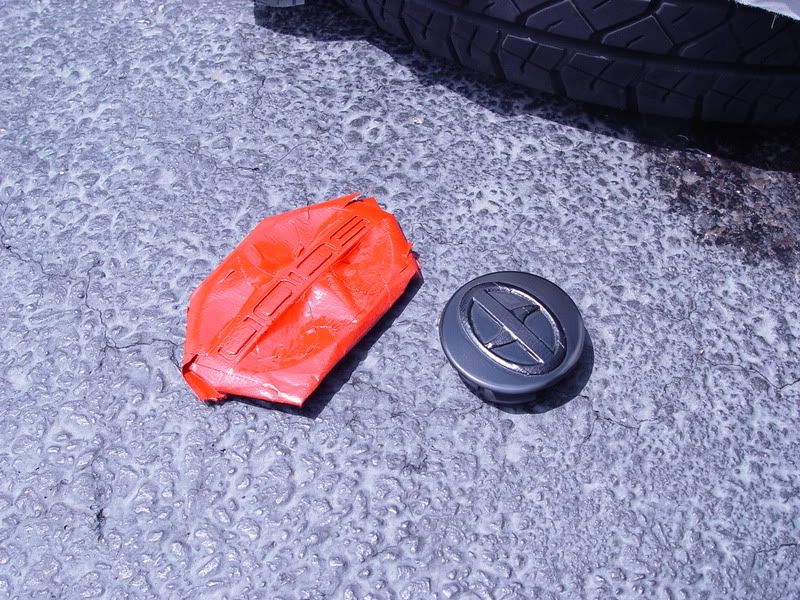
Here's a close-up of the centercap (and Sam's front emblem we were painting that day):
-Sand the wheel. This part hurts the most!! It's a weird feeling taking sandpaper to a perfectly good wheel, but you get over it after the first few spokes :D Make sure you sand everywhere, paying special attention to curved surfaces. Every few minutes take a few seconds to wipe off the wheel with a cloth. Don't forget to sand under the centercap and also inside the lugnut holes.
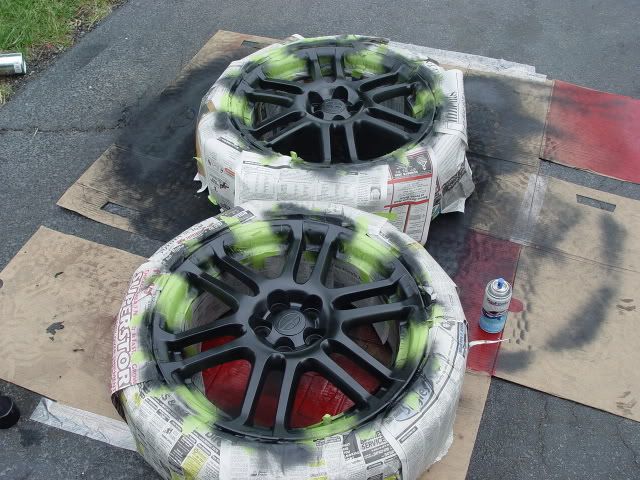
-Painting. Make SURE the wheel is clean. Now spray 1 medium coat of paint. The Dupli-Color wheel paint doesn't have the 'fanspray' nozzle that other Dupli-Color paints have, so be careful and make sure you are getting even coverage. If you don't you get small paint 'chunklets' that look like the rubber marbles at the edge of a racetrack, and you have to re-sand and repaint. (Don't ask me how I know this ) This is where the patience comes in!! DON'T try to rush it...the more you rush the worse this will look. Give it about 10 minutes to set, and spray a second medium coat.
At this point, you should have this:
Set the wheel aside where it won't get hit by dust, debris, flying leaves, etc. Preferably, under direct sunlight. (you can take this time to start on the other wheel) Wait an hour or so for it to dry, then start peeling back tape. Careful!! The paint has a nasty habit of sticking to the tape if it's not dry enough. You'll have this:
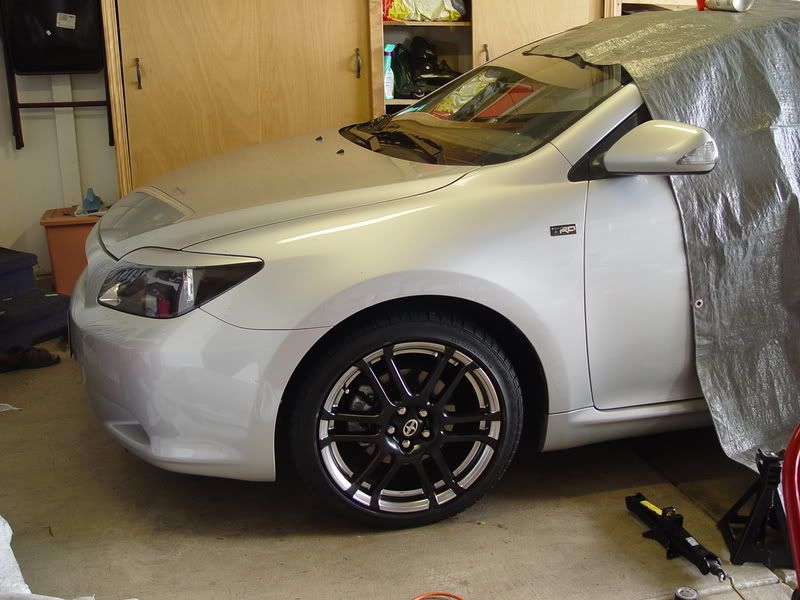
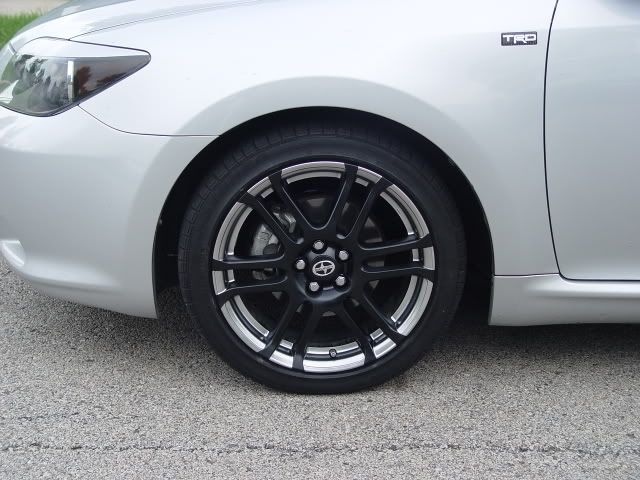
Reinstall the wheel. It'll look like this:
Repeat 3 more times, and you should have this:
A few hints:
* I reccomend having at least SOME experience with spray-painting before you try this. It's not difficult, but not exactly good for a first-or second-mod.
*DONT RUSH!! Rushing causes you to forget things and make small stupid mistakes. If you're like me, you're rediculously impatient to see what it will look like, and also an uncompromising perfectionist. These do not go well together. Take your time, think about what you're doing, have your buddy double-check your work, etc. This will prevent you from redoing a wheel 3 times like me.
*Make sure you have plenty of time. Taping takes about 20-30mins per wheel depending on the design you want. My taping took me about 45mins for the first wheel (because I had to figure everything out on the fly) and 20 mins for the other three wheels. Obviously if you want the wheel all black you don't have to budget very much time for taping. Instead use that time to check and recheck your prep work.
*make sure the weather is right. A sunny day with little or low humidity will make your life a LOT easier; it will shorten your drying times and let the paint stick faster.
*Make sure your coats are even. too much paint will cause runs and drips, which will mean that you have to resand and respray.
*Try not to get the wheels wet for a week; that's how long it takes for the paint to fully cure. After that, it's very resillient and holds up to brake dust, road salt, etc., very well.
**I'M NO LONGER ON THIS FORUM!!!** If you have any q's, the ONLY way to contact me is to email me:
robbdizzle@gmail.com
I'm more than happy to help you along or answer any questions. Just make sure you put "painting Scion wheels" or similar in the subject line so it doesn't get bounced to my junkmail folder!
All done! *whew* Now go grab a Guiness
After recieveing multiple PM's about my wheels and not being smart enough to either save what I type nor make a thread, I've decided to bite the bullet and make a thread. In this thread, you'll learn how to go from this:
to this:
First, the Disclaimer (dum dum DUM!!)
This mod is performed at your own risk. You assume sole responsibility for the execution and outcome of this mod. I will not be held responsible if you are blind/dyslexic/a blithering idiot and your wheels come out ugly, runny, are different colors, smell funny, or cause small children to point at your wheels and commence dry-heaving.
That being said, if you follow my directions, you should be fine.
Anyway, here goes:
Materials:
Plenty of time (about 6 hours all total)
good weather (sunny, low humidity)
suitable painting area (room to work, well-ventilated)
jack
jackstands (at least 2)
lug wrench
wheel cleaner
clean towels/cloth
2 or 3 folding chairs
x-acto knife
masking tape
lots of newspaper
3 cans Dupli-Color high-performance wheel coating, black.
5 sheets 400-grit sandpaper
buddy to help you (optional, bvut helps a LOT)
food and drink to feed the buddy
Guiness (if you're of age, for later
**Patience!**
Procedure:
-Clean the wheels very well. Make sure you use a cleaner that will strip off any brake dust/wheel wax/etc you micht have on the wheels. Basically you want to get the wheel as clean as possible down to the clearcoat finish. If you don't the paint won't stick.
-Jack up the car, remove the wheel.
-Remove the center cap. (It pops out from behind)
-Begin taping. For my wheels, I chose to 'extend' the spokes out to the edge of the rim. You can do any design you want. Some people leave the entire edge silver, some paint the entire wheel black. Basically tape over anything you still want silver. Also, cover the tire and the inside of the rim with newspaper. Don't forget to tape the valvestem! At this step, I found that it was easiest to stand the wheel up on a folding chair and rotate it like it's rolling as opposed to laying it flat and bending over it. Unfortunately, I only found this out after 3 wheels
-Tape the centercap. Cover the entire centercap with tape, and use your finger to get it down flush with the centercap, to the point where you can see the curves and contours. Now with an x-acto knife, cut away everything but the scion logo itself. Peel back the tape you don't need and reinstall the centercap.
In this pic you can see how I taped the spokes and centercap, and also see my buddy Sam and his devilishly stylish cutoff t-shirt:
Here's a close-up of the centercap (and Sam's front emblem we were painting that day):
-Sand the wheel. This part hurts the most!! It's a weird feeling taking sandpaper to a perfectly good wheel, but you get over it after the first few spokes :D Make sure you sand everywhere, paying special attention to curved surfaces. Every few minutes take a few seconds to wipe off the wheel with a cloth. Don't forget to sand under the centercap and also inside the lugnut holes.
-Painting. Make SURE the wheel is clean. Now spray 1 medium coat of paint. The Dupli-Color wheel paint doesn't have the 'fanspray' nozzle that other Dupli-Color paints have, so be careful and make sure you are getting even coverage. If you don't you get small paint 'chunklets' that look like the rubber marbles at the edge of a racetrack, and you have to re-sand and repaint. (Don't ask me how I know this
At this point, you should have this:
Set the wheel aside where it won't get hit by dust, debris, flying leaves, etc. Preferably, under direct sunlight. (you can take this time to start on the other wheel) Wait an hour or so for it to dry, then start peeling back tape. Careful!! The paint has a nasty habit of sticking to the tape if it's not dry enough. You'll have this:
Reinstall the wheel. It'll look like this:
Repeat 3 more times, and you should have this:
A few hints:
* I reccomend having at least SOME experience with spray-painting before you try this. It's not difficult, but not exactly good for a first-or second-mod.
*DONT RUSH!! Rushing causes you to forget things and make small stupid mistakes. If you're like me, you're rediculously impatient to see what it will look like, and also an uncompromising perfectionist. These do not go well together. Take your time, think about what you're doing, have your buddy double-check your work, etc. This will prevent you from redoing a wheel 3 times like me.
*Make sure you have plenty of time. Taping takes about 20-30mins per wheel depending on the design you want. My taping took me about 45mins for the first wheel (because I had to figure everything out on the fly) and 20 mins for the other three wheels. Obviously if you want the wheel all black you don't have to budget very much time for taping. Instead use that time to check and recheck your prep work.
*make sure the weather is right. A sunny day with little or low humidity will make your life a LOT easier; it will shorten your drying times and let the paint stick faster.
*Make sure your coats are even. too much paint will cause runs and drips, which will mean that you have to resand and respray.
*Try not to get the wheels wet for a week; that's how long it takes for the paint to fully cure. After that, it's very resillient and holds up to brake dust, road salt, etc., very well.
**I'M NO LONGER ON THIS FORUM!!!** If you have any q's, the ONLY way to contact me is to email me:
robbdizzle@gmail.com
I'm more than happy to help you along or answer any questions. Just make sure you put "painting Scion wheels" or similar in the subject line so it doesn't get bounced to my junkmail folder!
All done! *whew*

Senior Member
SL Member
Joined: Oct 2005
Posts: 530
From: Chino Hills, CA
in the picture it looks like you sprayed over the center scion logo in the middle of the wheel.. but when you finish its still silver.. could you please explain that little detail please? and thank you =]
also.. is it ok to put a few coats of clearcoat on the rims so they look glossy? if so would i put the coats after each coat of black or after i finish all the coats of blacks ?
also.. is it ok to put a few coats of clearcoat on the rims so they look glossy? if so would i put the coats after each coat of black or after i finish all the coats of blacks ?

Senior Member
Unique Scionikz
SL Member
Joined: Jan 2005
Posts: 3,360
From: Duarte, California
Originally Posted by snowbuddytC
in the picture it looks like you sprayed over the center scion logo in the middle of the wheel.. but when you finish its still silver.. could you please explain that little detail please? and thank you =]
also.. is it ok to put a few coats of clearcoat on the rims so they look glossy? if so would i put the coats after each coat of black or after i finish all the coats of blacks ?
also.. is it ok to put a few coats of clearcoat on the rims so they look glossy? if so would i put the coats after each coat of black or after i finish all the coats of blacks ?


Thread Starter
Senior Member
1UP Crew
SL Member
Joined: Oct 2005
Posts: 658
From: Elgin, IL
Originally Posted by snowbuddytC
in the picture it looks like you sprayed over the center scion logo in the middle of the wheel.. but when you finish its still silver.. could you please explain that little detail please? and thank you =]
also.. is it ok to put a few coats of clearcoat on the rims so they look glossy? if so would i put the coats after each coat of black or after i finish all the coats of blacks ?
also.. is it ok to put a few coats of clearcoat on the rims so they look glossy? if so would i put the coats after each coat of black or after i finish all the coats of blacks ?
For those that wanted to know about clearcoat: Dupli-Color does make a clearcoat, And originally I wanted glossy black. However, when I tried to apply the clearcoat, it left a nasty white film on the wheel. I figured that it might go away and dry clear, but it didn't. I had to sand down and redo the wheel. If you guys are going to do clearcoat, I'd recommend trying it on some other surface or on a practice wheel first.
In the end, I didn't do clearcoat and just left it flat black, which looks surprisingly good. It's not completely flat, but a kind of semi-gloss black that I'm perfectly happy with.
Thanks for the feedback guys


Senior Member
SL Member
Joined: Jun 2006
Posts: 7,862
From: Lurking Inside Your Garage!
Everyone that hasn't seen mine yet!!..GunMetal color!!!
https://www.scionlife.com/forums/vie...889&highlight=
https://www.scionlife.com/forums/vie...889&highlight=


Thread Starter
Senior Member
1UP Crew
SL Member
Joined: Oct 2005
Posts: 658
From: Elgin, IL
Originally Posted by _NeXuS_
Great wheels i dont have the ***** to paint my wheels I am afraid of the sanding part. Love the design you made. I want it 

Member
SL Member
Joined: Mar 2006
Posts: 52
Originally Posted by BeetC
Originally Posted by _NeXuS_
Great wheels i dont have the ***** to paint my wheels I am afraid of the sanding part. Love the design you made. I want it

Senior Member
1UP Crew
SL Member
Joined: Jul 2005
Posts: 2,150
From: Hialeah, FL
u did a fair job as far painting is concerned, but i hate the look of the stock wheel like that....if ur gonna paint it, paint the entire thing...that wheel doesnt have a lip to begin with so it makes it look rice.