
MikeC's tC Air Inlet for Short Ram Intake.


Thread Starter
Joined: Oct 2005
Posts: 1,263
From: Nor Cal Native in Okinawa
So I decided that I did'nt want the cold air intake, yet the engine bay becomes rather warm. My solution, add some cooler air from the "vent" in the driver's side of the bumper. I realize that this is not the first time someone has done this, but I could not find a write up already available. If it helps great.
Parts list:
Plastic 3" Air ducting tube (made by Spectre, sold at Pepboys/ Autozone) around $20.00
4"-3" Rubber coupler (from Lowes or Home Depot) about $8.00
Long black zip ties (optional, but recomended)
Tool list:
10mm socket wrench
Flat head screwdriver
Something to drill or poke holes in rubber (I used a drill with 3/16" bit)
Keep in mind that this is how I did it. When doing your's make it work for you.
First things first, pop out the grille fasteners, and remove enough screws from the wheel well area to let the front bumper hang and rest on the ground. Feel free to remove the entire front bumper, but it's more work for you.
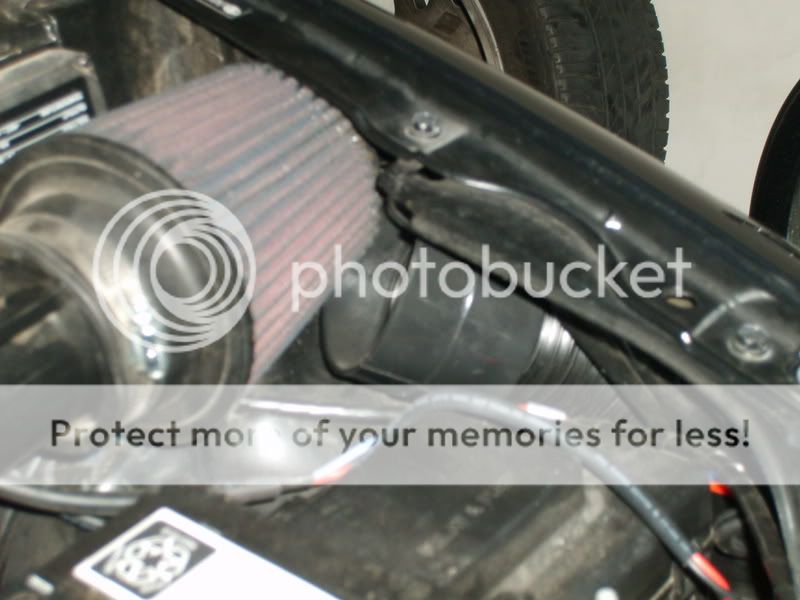
Next remove the intake so that you have access to the driver's side inner fender.
Now that that's done, get your 3" air ducting and run it through from where the air filter was, through the inner fender area, and into the area behind the bumper vent.
Now take your 4"-3" rubber adapter and place it onto the 3" air duct end.
At this point I would take the end of the air duct that is in the engine bay, and poke a hole in it, and use a zip tie to anchor it somewhere in there where it will aim at the filter. Don't poke a hole too close to the edge or it will just rip out over time.
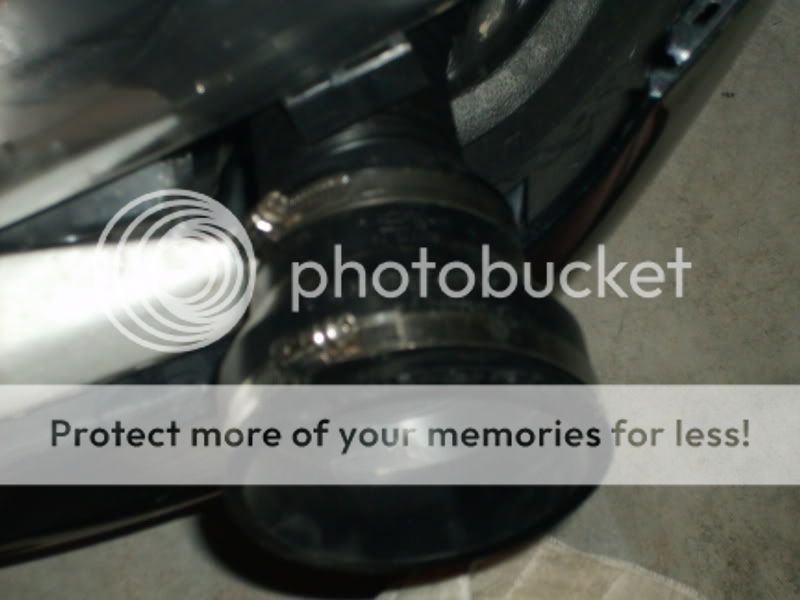
So that's done. Remove the vent cover that Scion placed in there, and place it in your glove box, yes in your glove box so if it rains rediculousley hard you can pop it back in real quick. Now lets take the other end (the one with the rubber adapter) and slide it over the back of the bumper vent dealymabob. Should look like this...

Here's the part where you will have to make a decision to either drill two small holes in the back of the vent, or not. If you don't drill the holes then all you have left to do is tighten the hose clamp over the 4" side of the adapter (it comes with hose clamps, you do not have to buy these also).
I did the hose clamp for a week and it still slid off.
So if you are going to drill holes here's what to do...
Get your drill and carefull drill two holes at the rear of the vent (don't worry, the vent cover hides these). One hole will be at the top of the vent, and one at the bottom. Here's the top of mine.

Now place your adapter back on the vent real snug. Take a paint pen, scribe, something that will leave a mark, and mark through the two holes you drilled through the vent and onto the rubber adapter.
Take the adapter back off the vent and drill, or poke those holes out. Place some zip ties through those holes and arond the outside of the adapter.
You might want a buddy for the next step. Take the adapter and get it close to the vent. Now take the ends of the zip ties that are sticking through the adapter (inside), there should be one female, and one male side, and pull them inside the vent through the holes you drilled.
Carefully get the adapter placed back on the vent, and tighten the zip ties.

Place thine bumper back on and wrap it up. Enjoy ;D

Parts list:
Plastic 3" Air ducting tube (made by Spectre, sold at Pepboys/ Autozone) around $20.00
4"-3" Rubber coupler (from Lowes or Home Depot) about $8.00
Long black zip ties (optional, but recomended)
Tool list:
10mm socket wrench
Flat head screwdriver
Something to drill or poke holes in rubber (I used a drill with 3/16" bit)
Keep in mind that this is how I did it. When doing your's make it work for you.
First things first, pop out the grille fasteners, and remove enough screws from the wheel well area to let the front bumper hang and rest on the ground. Feel free to remove the entire front bumper, but it's more work for you.
Next remove the intake so that you have access to the driver's side inner fender.
Now that that's done, get your 3" air ducting and run it through from where the air filter was, through the inner fender area, and into the area behind the bumper vent.
Now take your 4"-3" rubber adapter and place it onto the 3" air duct end.
At this point I would take the end of the air duct that is in the engine bay, and poke a hole in it, and use a zip tie to anchor it somewhere in there where it will aim at the filter. Don't poke a hole too close to the edge or it will just rip out over time.
So that's done. Remove the vent cover that Scion placed in there, and place it in your glove box, yes in your glove box so if it rains rediculousley hard you can pop it back in real quick. Now lets take the other end (the one with the rubber adapter) and slide it over the back of the bumper vent dealymabob. Should look like this...
Here's the part where you will have to make a decision to either drill two small holes in the back of the vent, or not. If you don't drill the holes then all you have left to do is tighten the hose clamp over the 4" side of the adapter (it comes with hose clamps, you do not have to buy these also).
I did the hose clamp for a week and it still slid off.
So if you are going to drill holes here's what to do...
Get your drill and carefull drill two holes at the rear of the vent (don't worry, the vent cover hides these). One hole will be at the top of the vent, and one at the bottom. Here's the top of mine.
Now place your adapter back on the vent real snug. Take a paint pen, scribe, something that will leave a mark, and mark through the two holes you drilled through the vent and onto the rubber adapter.
Take the adapter back off the vent and drill, or poke those holes out. Place some zip ties through those holes and arond the outside of the adapter.
You might want a buddy for the next step. Take the adapter and get it close to the vent. Now take the ends of the zip ties that are sticking through the adapter (inside), there should be one female, and one male side, and pull them inside the vent through the holes you drilled.
Carefully get the adapter placed back on the vent, and tighten the zip ties.
Place thine bumper back on and wrap it up. Enjoy ;D


Senior Member
Scikotics
SL Member
Joined: Nov 2004
Posts: 9,731
From: Minneapolis, MN
Pretty much.. only, since the air is going to come from the source of less restriction.. you are probably still getting mostly under hood air.. maybe cooler when driving since it may get forced into the engine bay.
I would just look up Docs writeup for the actual GFI and dump the SRI tube for something plastic. Half the issue with aftermarket intakes is the heatsoak from the metal tube.
I would just look up Docs writeup for the actual GFI and dump the SRI tube for something plastic. Half the issue with aftermarket intakes is the heatsoak from the metal tube.


Senior Member
SL Member
Joined: Sep 2006
Posts: 11,141
From: Maryland
if it rains while your driving...you just made a very nice path for the water to get up to your intake.
for that exact reason is why some people get short-ram intakes over cold air intakes, because they fear hydrolocking. so what you have done is taken a short-ram intake, and laid some tubing, and opened your intake to provide a path for cooler outside air to flow towards you intake, but other things just might end up there too, like water...
for that exact reason is why some people get short-ram intakes over cold air intakes, because they fear hydrolocking. so what you have done is taken a short-ram intake, and laid some tubing, and opened your intake to provide a path for cooler outside air to flow towards you intake, but other things just might end up there too, like water...
Senior Member
SL Member
Joined: Jan 2008
Posts: 310
From: Bellevue, WA
^^ your joking right? you seriously think that he is going to hydrolock his car if he's driving in the rain with that?  not only would an extreamly small amount of water ever make it up the tube (it's going up, afterall) but then it would have to go through the filter, and finally survive the heatsoak from the engine itself. lets put it this way, unless he is driving through 8" or deeper of standing water, I nor anyone else who actually knows what it takes to hydrolock an engine, would think twice.
Senior Member
Scikotics
SL Member
Joined: Nov 2004
Posts: 9,731
From: Minneapolis, MN
The reason it wont is because it is not directly connected and sealed to the filter tube. If it were, it could certainly pull water up, although you are much less likely to with the restriction (the filter) up there rather than down at the water source. The heatsoak, though, has no effect on keeping water off. It is not going to boil off before it gets there...
But again, the GFI is still a better setup (and MUCH better than any metal tube $200 aftermarket CAI for sure).
But again, the GFI is still a better setup (and MUCH better than any metal tube $200 aftermarket CAI for sure).

Thread Starter
Joined: Oct 2005
Posts: 1,263
From: Nor Cal Native in Okinawa
Well, when I posted this thread https://www.scionlife.com/forums/vie...574&highlight= I did'nt know what the GFI setup was, and I still don't. But I do know that $30 for a little more cooler fresh air won't hurt anything. And allthough it aint rocket science, it was $30. So if this "mod" helps someone, great. If not, please move along because your "Greatness" is probably needed elsewhere in this suffering universe.


Thread
Thread Starter
Forum
Replies
Last Post
Scionic
Scion xA/xB 1st-Gen Drivetrain & Power
199
Jan 8, 2006 11:09 AM
arinvolvo
Scion xA/xB 1st-Gen Drivetrain & Power
1
Jan 21, 2004 11:40 PM