
black headlights


Thread Starter
Member
Joined: Apr 2007
Posts: 34
ok, this post is broke into 2 questions. where can i find a good tutorial for baking headlights? i want to open it up and paint the inside some. all these newfangled clear headlights confuse me. i want alot of black inside, but i dont want to mess it up by painting the wrong thing. so what can i get away with? trust me guys, this is going to be tight.


Senior Member
SL Member
Joined: Oct 2006
Posts: 217
I've done it a couple times on celica headlights, but i'm guessing since they are toyota, they should all be the same.
remove any metal screws you can to start with on the outside of the headlight, also any of the rubber fittings that are on the back.
preheat the oven to 350 degrees then turn it OFF. insert headlight for 13 minutes, but keep an eye on it just in case. take it out, it will be super hot, so i suggest using mechanics gloves, and pry it apart using a sturdy tool. be very careful with the black tabs that connect to the clear part. any good cleaner/solvent can clean up the excess silicone, I use PPG's DX330.

Senior Member

Scikotics
SL Member
Joined: Oct 2005
Posts: 7,514
From: Orlando, FL (UCF)
I prefer doing them at a lower temp, 250 @ 12 minutes worked fine for me, and there's absolutely no risk of melting anything.
Also, use a piece of cardboard to insulate the light itself from the pan in the oven.
Also, use a piece of cardboard to insulate the light itself from the pan in the oven.
Thread Starter
Member
Joined: Apr 2007
Posts: 34
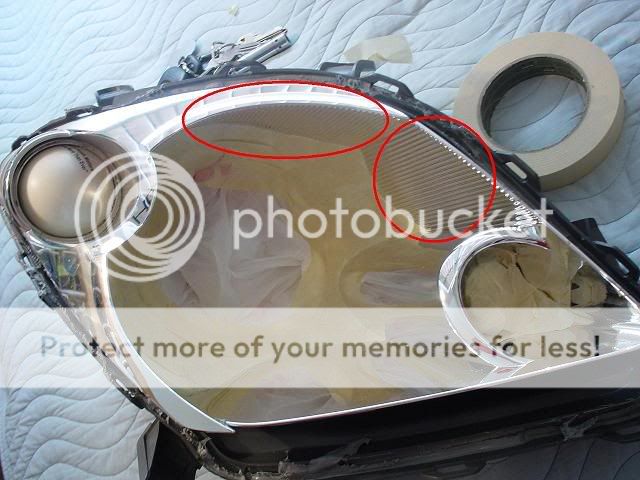
all of these tuts are great for baking, but how much of the chrome can i paint in the middle? or does the chrome inside need to be there for enhancing the light? also, do i use high temp paint because of the heat?
I suggest just painting the piece that wraps around thhe outisde. It will pop right off of the regular bucket. You'll just need to mask off the turn signal bucket.
Scuff it with steel wool, mask off the turn signal, clean it with rubbing alcohol to remove oils, and spray 2-3 light coats of Duplicolor sandable filler primer on it. After that, lay 3-4 coats of Duplicolor acrylic matte-black automotive paint.
Scuff it with steel wool, mask off the turn signal, clean it with rubbing alcohol to remove oils, and spray 2-3 light coats of Duplicolor sandable filler primer on it. After that, lay 3-4 coats of Duplicolor acrylic matte-black automotive paint.


Senior Member
SL Member
Joined: Mar 2006
Posts: 219
From: Guam
heres mine.
it wasnt hard as i thought it would be.
i also reccomend to take the orange plastic corver thing for the turn signal.
you can pop it from the back.


and for the painting, do not paint the reflactor.
i saw someone painted the whole thing and ended buying a whole new headlight
cuz the light output was so low after painting.
this is another thread
https://www.scionlife.com/forums/vie...109&highlight=
and video of my headlight
http://www.youtube.com/watch?v=_hEtZ2ljMe0[/img]
it wasnt hard as i thought it would be.
i also reccomend to take the orange plastic corver thing for the turn signal.
you can pop it from the back.
and for the painting, do not paint the reflactor.
i saw someone painted the whole thing and ended buying a whole new headlight
cuz the light output was so low after painting.
this is another thread
https://www.scionlife.com/forums/vie...109&highlight=
and video of my headlight
http://www.youtube.com/watch?v=_hEtZ2ljMe0[/img]


Thread
Thread Starter
Forum
Replies
Last Post
Inazuma
Scion xA/xB 1st-Gen ICE & Interior
20
May 3, 2023 01:58 AM
mischman
PPC: Exterior / Styling
5
Mar 31, 2015 03:16 AM
umnitza
Exclusive Sponsored Sales
3
Dec 1, 2014 06:26 PM