
Got my Katzkin Leather Kit!! " HOW TO ADDED" 56K s


Thread Starter
Senior Member
SL Member
Joined: Sep 2005
Posts: 157
Here's the link, the reason i went with them besides the free shipping is that the premium leather content is only $85 bucks add'l as opposed to $199. Ordered them 1 week ago today. So turn around isn't bad, that's including shipping from west coast to east coast. They are dropped shipped from Katzkins.
http://www.shopsar.com/ProductDetail...ductCode=BTO66<<click here
http://www.shopsar.com/ProductDetail...ductCode=BTO66<<click here
Thread Starter
Senior Member
SL Member
Joined: Sep 2005
Posts: 157
Originally Posted by RMS
I have to see this
Thread Starter
Senior Member
SL Member
Joined: Sep 2005
Posts: 157
Most guys just put up a few pics and a little "here are the hog rings""here's the seat with no cover" "Here's the seat installed back in the car"nothing too detailed. I figured that a very detailed A to Z would be good for that reason.
Senior Member
SL Member
Joined: Jun 2005
Posts: 2,838
From: City of Champs, MA
Originally Posted by Pitman
Originally Posted by RMS
I have to see this
would be very interested in seeing this. appreciate your willingness to make DIY


Senior Member
SL Member
Joined: Jul 2004
Posts: 1,813
From: San Diego, CA (El Cajon)
You can use some quotes from here, we've got the topic pretty much outlined here.
https://www.scionlife.com/forums/vie...ht=leather+hog
https://www.scionlife.com/forums/vie...ht=leather+hog

Senior Member
SL Member
Scinergy
Joined: Oct 2005
Posts: 6,157
From: ScinergyCO
Originally Posted by Pitman
Originally Posted by RMS
I have to see this


Thread Starter
Senior Member
SL Member
Joined: Sep 2005
Posts: 157
OK lets start off with the usuals: I am not responsible for you screwing up your interior if you attempt this and it doesn't work out. Do this at your own risk!! and any other legal mumbo jumbo i forgot.
Install time: 6 - 10 hrs depending on your skill. Took me 8hrs from removal to back installed. This is not a hard deal just need to be detailed an patient.
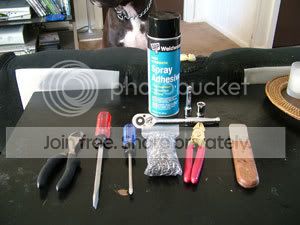
Tools Needed:
Side Cutter, Flat head & Philips head screw driver. hog rings, hog ring pliers, spray glue, Tuck tool, 14mm wrench, 14mm socket, 12mm socket. razor blades
There are plenty of threads that tell you how to take out your interior. Here's one: https://www.scionlife.com/forums/viewtopic.php?t=149357
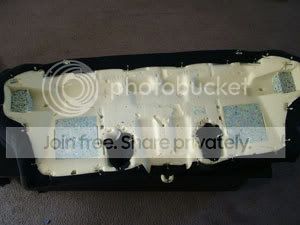
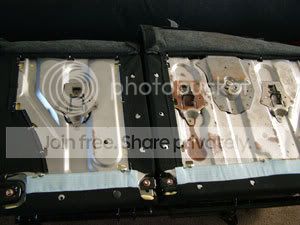
OK now you have your interior out start with the back seats.
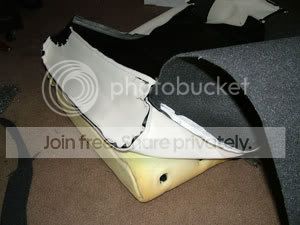
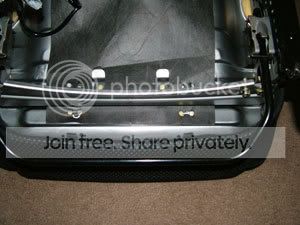
First rear seat bench flip over and you'll see this:
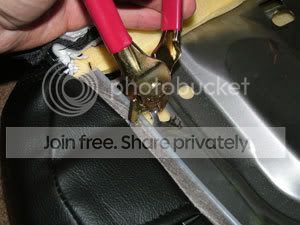
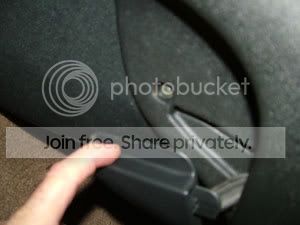
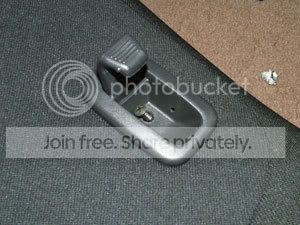
Look for the Hog rings they look like this:
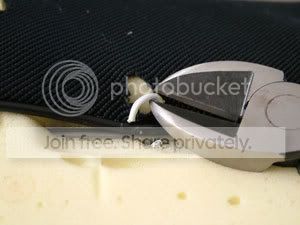
Take them all off, a quick flip of the rist with your side cutters will do the trick.
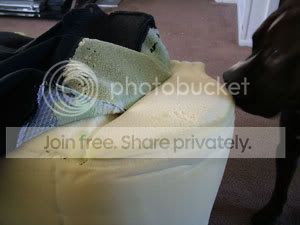
Now flip back over and slowly take off fabric.
Now get new cover flip it inside out. Spray glue liberally on the foam and the back of new leather. Let tack up then starting in the middle line up the seams and smooth down wroking to sides.
Then pull around the corners flip back over and pull tight making sure no creases and hog ring back into place.
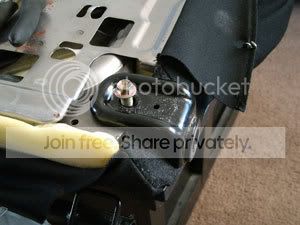
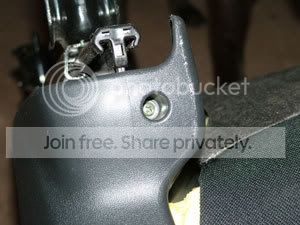
Ok now the backseat backs, flip over and remove all of these clips.
Then remove the mounting bracket there are 4 bolts like this:
Flip back and expose the hog rings and remove all hog rings.
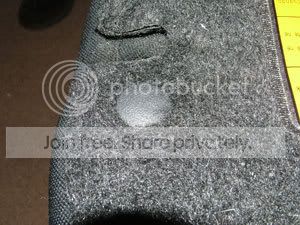
Take off the foam and remove the headrest mounts and release pull. The release pull unscrews and the headrest mounts have squeeze tabs. Pay attention to how these come off, so you put them back on correctly. The center headrest has smaller holes also the placement of the ones with the adjustment lock.
Now the rear seat backs are gluded on very well you will pull off foam if you try to remove, so take a razor blade and cut the seams around the side and on the seat leaving it looking like this:

You just need to leave the front portion of the fabric on (where it's glued). Cut out the seams on the front of the seat so the new cover seams can get in to the seat.
Now same procedure you used on the bench. Turn cover inside out spray let tack etc. etc. by now you'll start getting a hang of how these go on.
Put the mounting bracket back on and your reeady to reinstal the back seat. I did the headrests last after they were back in the car. Your gonna have to cut holes in your brand new leather to reinstal the head rests. Just cut enough to expose the metal shaft that the plugs go into like this:

Now for the front seats:
Take off the plastic on the sides and hanger thing on the back.
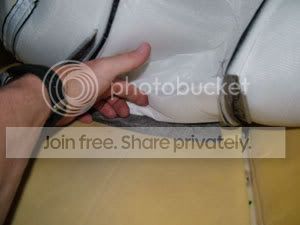
Flip seat over and remove all hog rings on bottom.
Then pull throughthe back and pull off the front of the cover from the underside, watch out this metal is SHARP!! The cover is attached kinda like weather striping ini the front. Now just pull cover up and remove hog rings.
Now get you rnew cover and do this in reverse. Flip inside out start at the back and hog ring into place etc. etc. NO GLUE!!
Now the back: same thing flip over remove hog rings etc etc.
These blue rubber cables need to be sliped into your new covers.

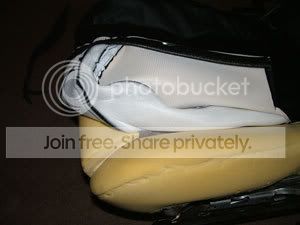
Now heres the seat with now cover.
Now get new cover do in reverse. NO GLUE!! Start at top:
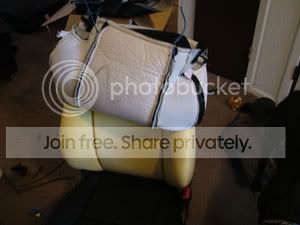
Hog ring etc etc make sure when you hod ring the front is smooth not pinching or gathered.
Seat is done. put plastic pieces back on. and your ready to go. Reinstall everything.
Headrests. GO SLOW!!! Squeeze foam in as your pulling cover down. *****Be aware the front and rear headrests are different sizes***** Make sure your putting the right covers on the right ones. The fabric is left on.
I didn't have time to do the panels yet as since it's raining today probably won't do them today either. But I think there are threads on here explaining those.
Well hope this has helped if you have any questions just ask!!
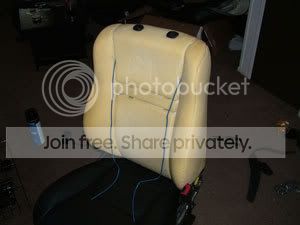
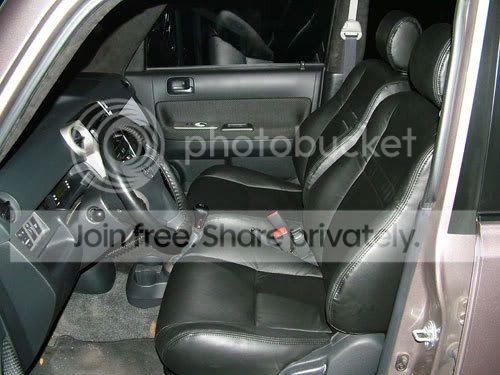
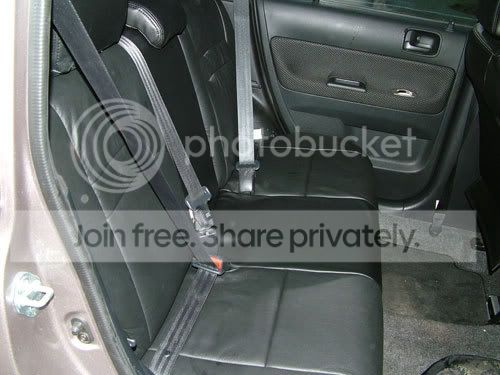
Finished Product:
Install time: 6 - 10 hrs depending on your skill. Took me 8hrs from removal to back installed. This is not a hard deal just need to be detailed an patient.
Tools Needed:
Side Cutter, Flat head & Philips head screw driver. hog rings, hog ring pliers, spray glue, Tuck tool, 14mm wrench, 14mm socket, 12mm socket. razor blades
There are plenty of threads that tell you how to take out your interior. Here's one: https://www.scionlife.com/forums/viewtopic.php?t=149357
OK now you have your interior out start with the back seats.
First rear seat bench flip over and you'll see this:
Look for the Hog rings they look like this:
Take them all off, a quick flip of the rist with your side cutters will do the trick.
Now flip back over and slowly take off fabric.
Now get new cover flip it inside out. Spray glue liberally on the foam and the back of new leather. Let tack up then starting in the middle line up the seams and smooth down wroking to sides.
Then pull around the corners flip back over and pull tight making sure no creases and hog ring back into place.
Ok now the backseat backs, flip over and remove all of these clips.
Then remove the mounting bracket there are 4 bolts like this:
Flip back and expose the hog rings and remove all hog rings.
Take off the foam and remove the headrest mounts and release pull. The release pull unscrews and the headrest mounts have squeeze tabs. Pay attention to how these come off, so you put them back on correctly. The center headrest has smaller holes also the placement of the ones with the adjustment lock.
Now the rear seat backs are gluded on very well you will pull off foam if you try to remove, so take a razor blade and cut the seams around the side and on the seat leaving it looking like this:
You just need to leave the front portion of the fabric on (where it's glued). Cut out the seams on the front of the seat so the new cover seams can get in to the seat.
Now same procedure you used on the bench. Turn cover inside out spray let tack etc. etc. by now you'll start getting a hang of how these go on.
Put the mounting bracket back on and your reeady to reinstal the back seat. I did the headrests last after they were back in the car. Your gonna have to cut holes in your brand new leather to reinstal the head rests. Just cut enough to expose the metal shaft that the plugs go into like this:
Now for the front seats:
Take off the plastic on the sides and hanger thing on the back.
Flip seat over and remove all hog rings on bottom.
Then pull throughthe back and pull off the front of the cover from the underside, watch out this metal is SHARP!! The cover is attached kinda like weather striping ini the front. Now just pull cover up and remove hog rings.
Now get you rnew cover and do this in reverse. Flip inside out start at the back and hog ring into place etc. etc. NO GLUE!!
Now the back: same thing flip over remove hog rings etc etc.
These blue rubber cables need to be sliped into your new covers.
Now heres the seat with now cover.
Now get new cover do in reverse. NO GLUE!! Start at top:
Hog ring etc etc make sure when you hod ring the front is smooth not pinching or gathered.
Seat is done. put plastic pieces back on. and your ready to go. Reinstall everything.
Headrests. GO SLOW!!! Squeeze foam in as your pulling cover down. *****Be aware the front and rear headrests are different sizes***** Make sure your putting the right covers on the right ones. The fabric is left on.
I didn't have time to do the panels yet as since it's raining today probably won't do them today either. But I think there are threads on here explaining those.
Well hope this has helped if you have any questions just ask!!
Finished Product:

