
Radar Install and under the dash pics


Thread Starter
Member
Joined: Jun 2006
Posts: 40
From: Timonium, MD USA
Hey folks,
I finally got around to installing my radar detector, an Escort Passport x50, the proper way, so that all the wires are hidden. I read a number of helpful posts on the forums about how to take out the dash and I got to work. You can look at the pictures below if you're curious about what is under the dash and don't want to do it yourself. I have some macro shots of some things I found interesting. Looking back I wish I'd taken more pictures.
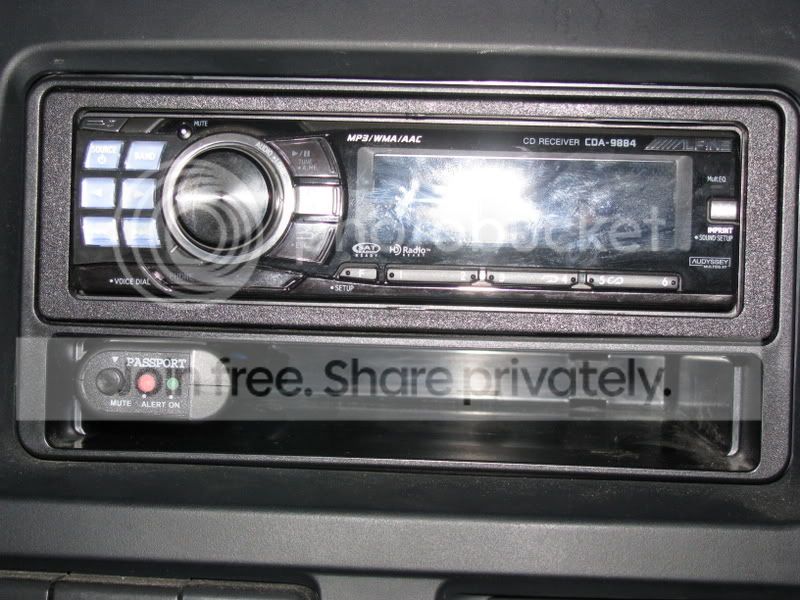
So I bought the accesory that allows you to hardwire your detector without loosing the functionality of the remote mute button/alert light. You can buy it here and see it here:


So as you can see above, I ran the wire under the ceiling foam, and then down behind the A pillar, across the dash (see A), around the duct (B), and down to the back of the lighter socket for power (C).
A:

B:

C:

Note the little spec of blue at the bottom of the pic. That is the splicer that was supplied with the kit, clamped to the hot wire to the lighter plug.
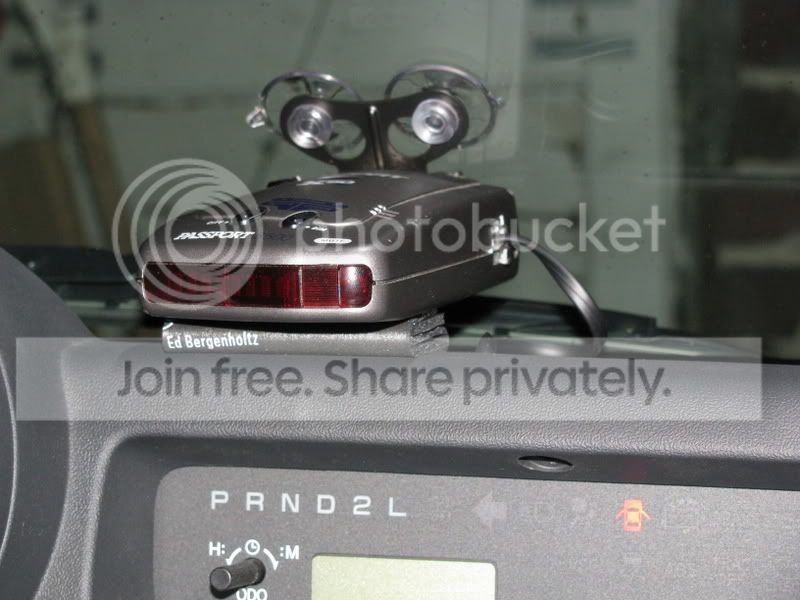
Now in C you can see the finished placement I chose. I used about three inches of Velcro so I could move the little thing around.
Before I could turn it on I had to ground it and I picked a screw near the driver's side corner under the windshield:

I turned the key and this is what I got:


That's it.
Now, while I had the dash open I took some pictures of the innards that you might find interesting. You can check out the gallery on flickr at:
/
Here they are as well:


That's it. There are so more on flickr, and you can see a whole slideshow
/.
I took all the pictures with my Nikon D80 and any flash shots utilized the built in. The lens is the stock 18-55mm AF.
I finally got around to installing my radar detector, an Escort Passport x50, the proper way, so that all the wires are hidden. I read a number of helpful posts on the forums about how to take out the dash and I got to work. You can look at the pictures below if you're curious about what is under the dash and don't want to do it yourself. I have some macro shots of some things I found interesting. Looking back I wish I'd taken more pictures.
So I bought the accesory that allows you to hardwire your detector without loosing the functionality of the remote mute button/alert light. You can buy it here and see it here:
So as you can see above, I ran the wire under the ceiling foam, and then down behind the A pillar, across the dash (see A), around the duct (B), and down to the back of the lighter socket for power (C).
A:
B:
C:
Note the little spec of blue at the bottom of the pic. That is the splicer that was supplied with the kit, clamped to the hot wire to the lighter plug.
Now in C you can see the finished placement I chose. I used about three inches of Velcro so I could move the little thing around.
Before I could turn it on I had to ground it and I picked a screw near the driver's side corner under the windshield:
I turned the key and this is what I got:
That's it.
Now, while I had the dash open I took some pictures of the innards that you might find interesting. You can check out the gallery on flickr at:
Here they are as well:
That's it. There are so more on flickr, and you can see a whole slideshow
I took all the pictures with my Nikon D80 and any flash shots utilized the built in. The lens is the stock 18-55mm AF.


Senior Member
Fail, INC
SL Member
Joined: Oct 2006
Posts: 11,312
From: Forest Park, IL
I actually did something very similar. But I didn't wanna take out the whole dash.
Wires behind the HU to the cigarette lighter, cut a small hole in the back of my dash kit, and... there you go.
Wires behind the HU to the cigarette lighter, cut a small hole in the back of my dash kit, and... there you go.

Thread
Thread Starter
Forum
Replies
Last Post
SkillFreeJake
Scion tC 2G Aero & Exterior
17
Jul 27, 2015 12:34 AM
Green_rino
Scion FR-S ICE & Interior
1
Jan 20, 2015 01:41 AM
randode
Scion xA/xB 1st-Gen ICE & Interior
44
Jun 29, 2004 04:19 PM