
How-to: Black Headlight Mod


Thread Starter
Senior Member
SL Member
Joined: Jun 2008
Posts: 168
From: Corona, CA
Just thought i would make a simple writeup with a few pics so that everything about doing the BHLM is much clearer.
Tools needed:
10mm socket
flat screwdriver
phillips screwdriver
oven
Materials used:
1 can of Krylon Fusion paint (your choice of color)
*optional* black or clear silicone
step 1:
Remove the clips holding on the heat plate(piece above grille and connected to radiator support). This is dont by pushing in the center of the black clips. After they are all unclipped, simply remove the shield and set it aside.
Step 2:
Remove upper grille.
this is done by removing the 10mm bolts and some clips on the top part of the grille. These clips need to be removed with a flat screwdriver by prying lightly on the clip to unclip them. The grille will need a slight tug forward to pull out of the bumper.
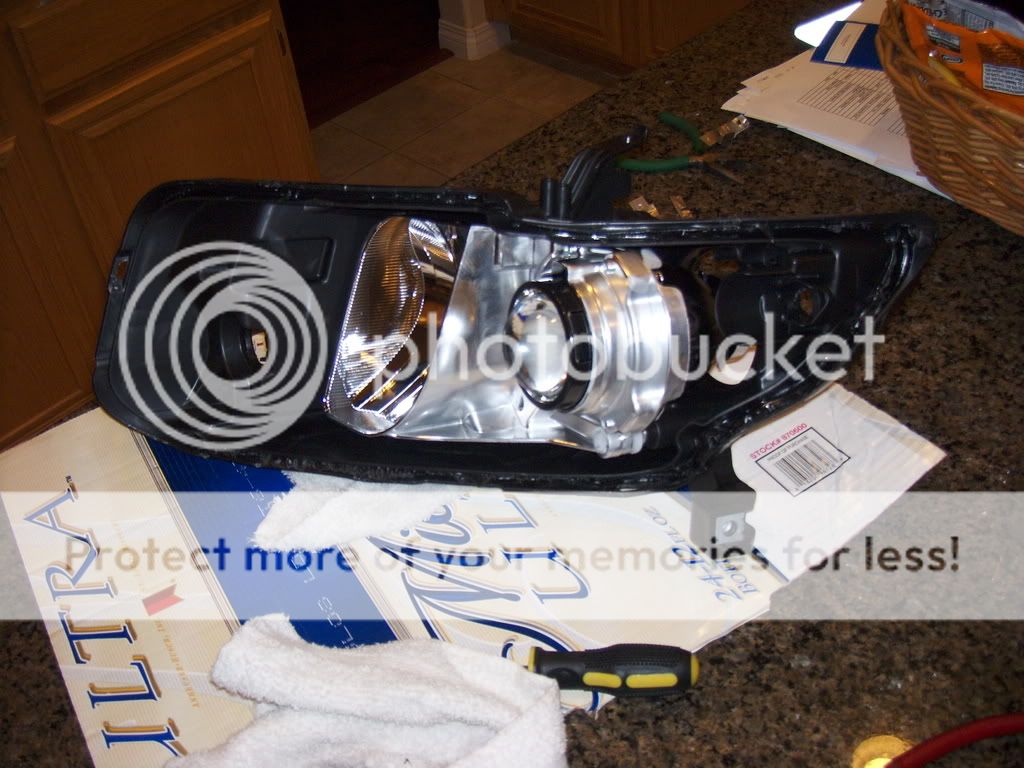
here is a picture of the head plate and an idea of what needs to be taken off.

-RED circle is a clip that you push the center in.
-Blue circle is a clip that needs to center popped out using a flat screwdriver.
-FULL Red circle is where the 10mm bolt that holds the headlight on is located under the bumper.
Green circle is a 10mm bolt that needs to be removed to pull the bumper away so you can access the bolt holding the headlight.
Step 3:
Remove 10mm front bumper bolt inside of the wheelwell holding the bumper to the bracket.
There is also a 1/2 turn plastic screw further down the bumper that needs to be taken off. This is done by using a flat screw driver and turning the clip 1/2 turn then pulling on it to get it completely out of the piece holding it.
step 4:
Tug on the front bumper from the wheel well. You will hear some snapping. DO NOT PANIC! this is just the bumper bracket uncliping from the bumper.
step 5:
After the bumper is moved away from the fender, you will se a bolt recessed in the black bracket that was holding the bumper on. Remove that 10mm bolt.
Step 6:
Remove the bolt that was shown in the picture as a FULL Red circle. Then remove the bolt holding the top of the headlight to the fender(in the engine bay).
Your headlight should now be free to move around. Gently work with the light and be careful to not scratch the lens on any parts of the car.
After the headlight is out of the "pocket" unclip all of your lights along with the white clip that holds all the wires nicely to the back of the headlight body.
Repeat steps 3-6 for the other side of the car.
after the headlight is out of the car, do whatever you need to do to get any sort of contaminants off the lens.
I used clay from a clay bar kit and it worked very very well.
Step 7:
Preheat your oven to 305*
while the oven is preheating, go ahead and remove the rubber seals on the back of the headlight and take out the 3 phillips screws that are along the back edge of the light. There are 2 brackets on the bottom of the light that the bumper clips into. These are removed by a single phillips screw.
Step 8:
Once the headlight has been "stripped" of all the loose parts, you are now ready to bake them.
Get a piece of cardboard that will fit inside your oven and that the headlight can safely rest on without touching the rack in the oven.
***TURN OFF YOUR OVEN***
once the oven has been turned off, place the headlight in ontop of your piece of cardboard.
Leave the headlight in the oven for 8-9 minutes.
Step 9:
After your timer goes off, get some oven mits or towels to handle the headlight with as it will be warm.
Have someone hold the light for you while your use a flat screwdriver to slowly pry the light apart. Make sure you concentrate on the clips that are holding the lens on. Start at the part closest to the signal light and work your way out.
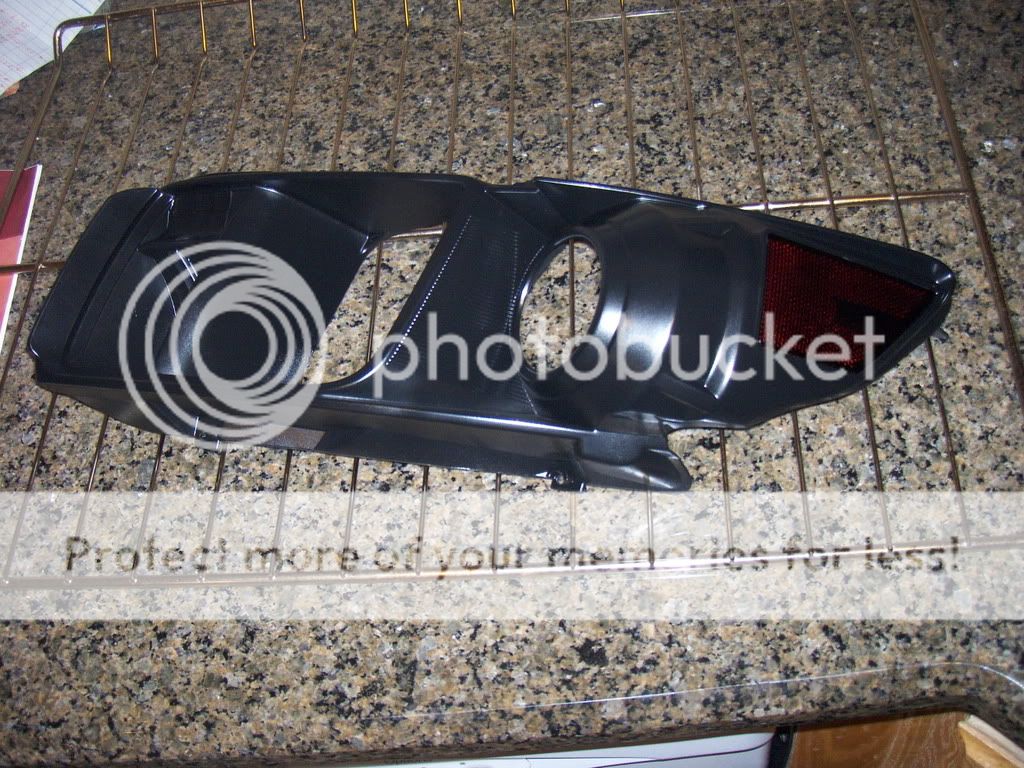
Once the lights are apart you should have this..
This is the back part of the light. Lens and center section are removed.
Repeat this step for the other light.
Step 10:
Remove the 2 phillips screws that are holding the chrome center piece to the lens. Then lightly pull the chrome piece out of the lens.
Remove the reflector using a flat screwdriver and pressing on the "tab" that is holding it in.
Set the lens aside here it can not get any damage done to it and noone will touch the inside of it.
Be careful to keep your hand off the actual chrome part of the light. This is where you will be painting and if there is finger prints on it, the paint wont stick.
Step 11:
Paint the center section of the light. You should make sure you coat both of them evenly and be sure to get every area that is chrome.
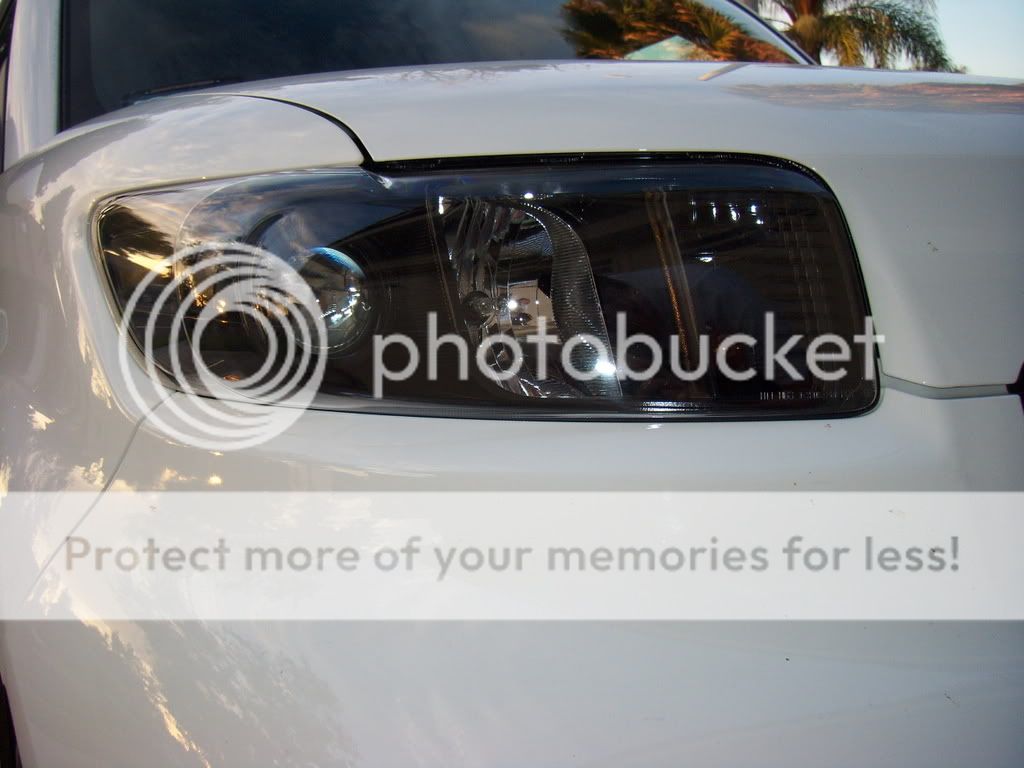
When the painting is done, you should have something like this:
In that picture, i had tinted the reflector. You can leave it amber, tint it, black it out, or leave it out.
Step 12:
Once the paint has cured, put the reflector back in and carefully slide the newly black(of whatever color you choose) back into the lens.
Once it is seated correctly, put the 2 phillips screws back in.
Step 13:
Set the lens and back piece together making sure they are lined up and lightly press them together. Before putting them together, if you would like, you can run a small bead of silicone in the groove where the lens sits just so you can be sure they wont get condensation inside.
Preheat your oven to 305* again
once preheated TURN IT OFF and set the light inside for 5 minutes. This gives the silicone a chance to soften up and make it easier to reseal the lights.
After pulling them out of the oven push them together (this might take some muscle). Make sure that all of the clips are clipped from the lens to the back housing.
Repeat this step for the other light.
Step 14:
Its time to wrap it up!!
Reinstall all of the seals and screws that you removed from the light to get it apart.
Put the headlight back in and put all of your clips and 10mm bolts back in their places.
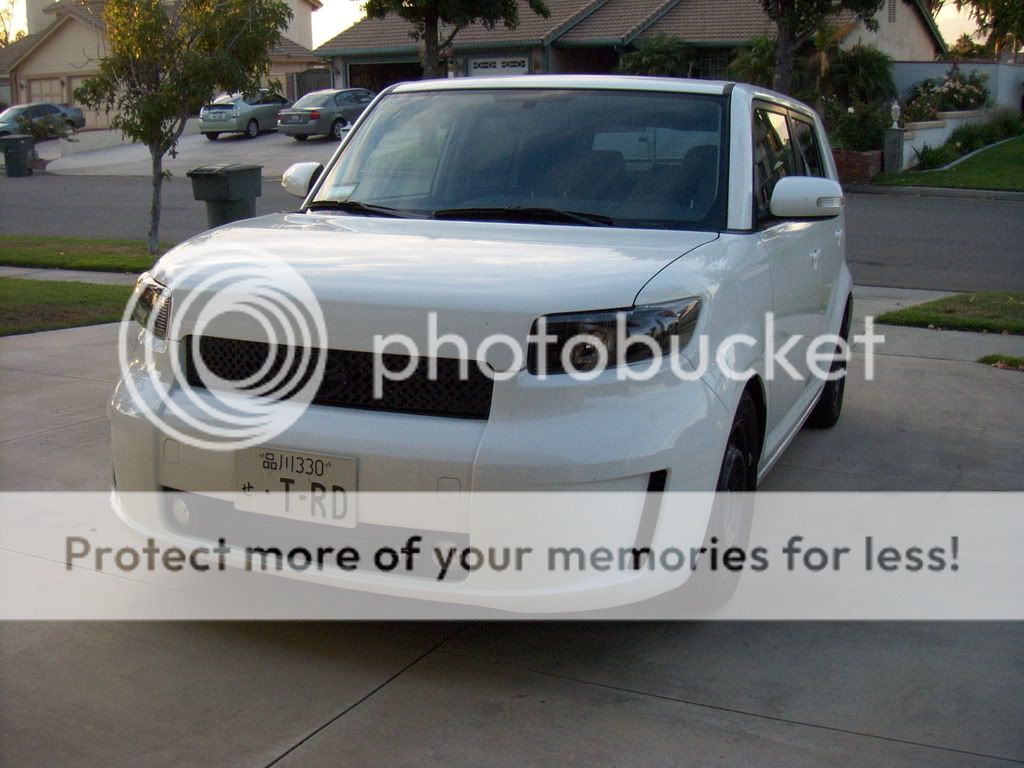
Here are some pics of the finished product on a Super white xB2 and a BSP xB2.. day pics of the BSP coming soon...


Tools needed:
10mm socket
flat screwdriver
phillips screwdriver
oven
Materials used:
1 can of Krylon Fusion paint (your choice of color)
*optional* black or clear silicone
step 1:
Remove the clips holding on the heat plate(piece above grille and connected to radiator support). This is dont by pushing in the center of the black clips. After they are all unclipped, simply remove the shield and set it aside.
Step 2:
Remove upper grille.
this is done by removing the 10mm bolts and some clips on the top part of the grille. These clips need to be removed with a flat screwdriver by prying lightly on the clip to unclip them. The grille will need a slight tug forward to pull out of the bumper.
here is a picture of the head plate and an idea of what needs to be taken off.
-RED circle is a clip that you push the center in.
-Blue circle is a clip that needs to center popped out using a flat screwdriver.
-FULL Red circle is where the 10mm bolt that holds the headlight on is located under the bumper.
Green circle is a 10mm bolt that needs to be removed to pull the bumper away so you can access the bolt holding the headlight.
Step 3:
Remove 10mm front bumper bolt inside of the wheelwell holding the bumper to the bracket.
There is also a 1/2 turn plastic screw further down the bumper that needs to be taken off. This is done by using a flat screw driver and turning the clip 1/2 turn then pulling on it to get it completely out of the piece holding it.
step 4:
Tug on the front bumper from the wheel well. You will hear some snapping. DO NOT PANIC! this is just the bumper bracket uncliping from the bumper.
step 5:
After the bumper is moved away from the fender, you will se a bolt recessed in the black bracket that was holding the bumper on. Remove that 10mm bolt.
Step 6:
Remove the bolt that was shown in the picture as a FULL Red circle. Then remove the bolt holding the top of the headlight to the fender(in the engine bay).
Your headlight should now be free to move around. Gently work with the light and be careful to not scratch the lens on any parts of the car.
After the headlight is out of the "pocket" unclip all of your lights along with the white clip that holds all the wires nicely to the back of the headlight body.
Repeat steps 3-6 for the other side of the car.
after the headlight is out of the car, do whatever you need to do to get any sort of contaminants off the lens.
I used clay from a clay bar kit and it worked very very well.
Step 7:
Preheat your oven to 305*
while the oven is preheating, go ahead and remove the rubber seals on the back of the headlight and take out the 3 phillips screws that are along the back edge of the light. There are 2 brackets on the bottom of the light that the bumper clips into. These are removed by a single phillips screw.
Step 8:
Once the headlight has been "stripped" of all the loose parts, you are now ready to bake them.
Get a piece of cardboard that will fit inside your oven and that the headlight can safely rest on without touching the rack in the oven.
***TURN OFF YOUR OVEN***
once the oven has been turned off, place the headlight in ontop of your piece of cardboard.
Leave the headlight in the oven for 8-9 minutes.
Step 9:
After your timer goes off, get some oven mits or towels to handle the headlight with as it will be warm.
Have someone hold the light for you while your use a flat screwdriver to slowly pry the light apart. Make sure you concentrate on the clips that are holding the lens on. Start at the part closest to the signal light and work your way out.
Once the lights are apart you should have this..
This is the back part of the light. Lens and center section are removed.
Repeat this step for the other light.
Step 10:
Remove the 2 phillips screws that are holding the chrome center piece to the lens. Then lightly pull the chrome piece out of the lens.
Remove the reflector using a flat screwdriver and pressing on the "tab" that is holding it in.
Set the lens aside here it can not get any damage done to it and noone will touch the inside of it.
Be careful to keep your hand off the actual chrome part of the light. This is where you will be painting and if there is finger prints on it, the paint wont stick.
Step 11:
Paint the center section of the light. You should make sure you coat both of them evenly and be sure to get every area that is chrome.
When the painting is done, you should have something like this:
In that picture, i had tinted the reflector. You can leave it amber, tint it, black it out, or leave it out.
Step 12:
Once the paint has cured, put the reflector back in and carefully slide the newly black(of whatever color you choose) back into the lens.
Once it is seated correctly, put the 2 phillips screws back in.
Step 13:
Set the lens and back piece together making sure they are lined up and lightly press them together. Before putting them together, if you would like, you can run a small bead of silicone in the groove where the lens sits just so you can be sure they wont get condensation inside.
Preheat your oven to 305* again
once preheated TURN IT OFF and set the light inside for 5 minutes. This gives the silicone a chance to soften up and make it easier to reseal the lights.
After pulling them out of the oven push them together (this might take some muscle). Make sure that all of the clips are clipped from the lens to the back housing.
Repeat this step for the other light.
Step 14:
Its time to wrap it up!!
Reinstall all of the seals and screws that you removed from the light to get it apart.
Put the headlight back in and put all of your clips and 10mm bolts back in their places.
Here are some pics of the finished product on a Super white xB2 and a BSP xB2.. day pics of the BSP coming soon...

Senior Member
SL Member
Joined: Sep 2007
Posts: 1,303
From: Millbrae|SF|SJSU, CA
good job with posting this up.. i actually used a guide i found on a rsx forum.. it worked but when i did the rsx one i found that their clear lens total ____. it discolored on its own after i threw it in the oven.. WEAKKK


Member
SL Member
Joined: Oct 2007
Posts: 93
From: Pico Rivera, CA
i wanted to go. i usually work nights and for sure weekends unless i ask ahead. so youre from corona. i used to stay with my aunt right by the spectrum and ayala in chino hills. thats kinda close right?


Originally Posted by xbean
Also can you buy a reflector piece that isn't amber? Like a clear one or something?
http://www.customxbgauges.com/index....7d26ae356da1b8