'S'-Pipe upgrade to complement my new header
 05-11-2011, 06:24 PM
#41

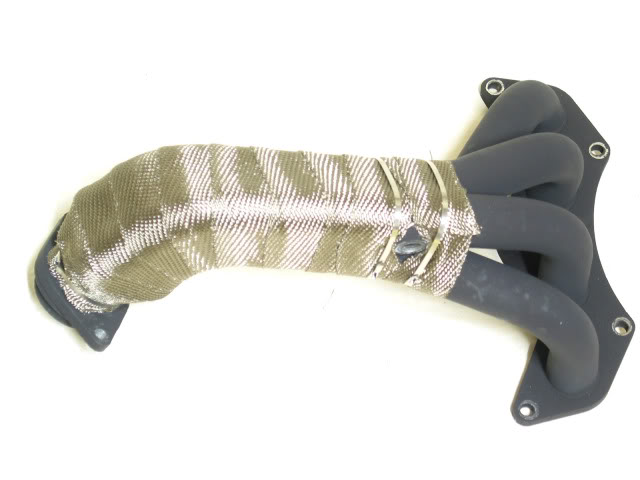
Wrap arrived today and so I pulled the header and installed it. The shape of the collector area made it impossible to wrap tightly, but everywhere else was fine. The paint is well cured by now and there's about ten coats on the exposed pipes, so although wrap would be better, they shouldn't be doing too bad. There's plenty of room for air to circulate between the wrapped pipes and so I'm hoping the combination of that plus paint will prevent corrosion.

 05-12-2011, 12:15 AM
#42
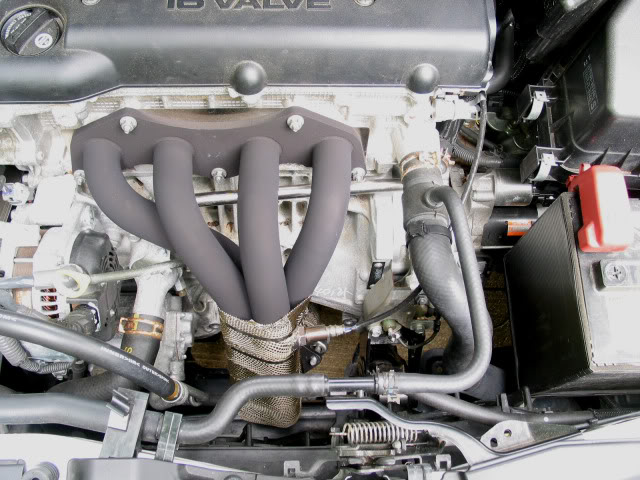
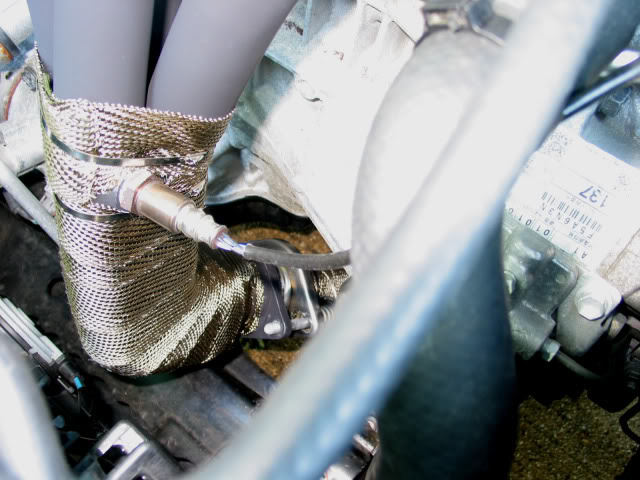
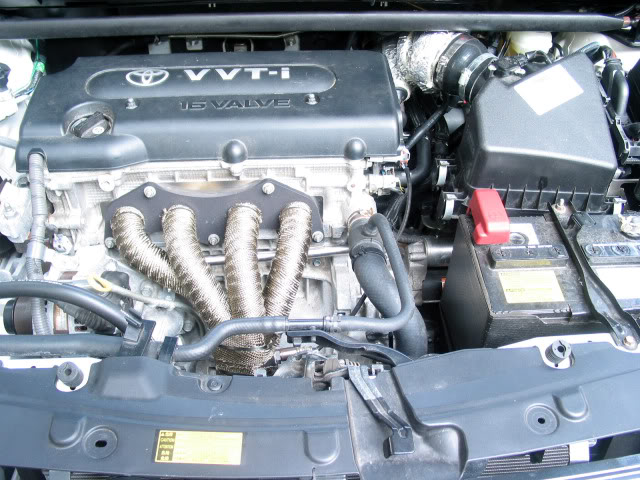
Took a couple runs with it today and when I chose to hop into a just starting line at a fresh green light, the xB2 moved out almost as spryly as my AWD Eclipse (FWD just doesn't have the same traction)! Initial impressions are the header wrap did exactly what I was hoping, it extended the mid-range gains of the 'S'-Pipe wrap. Pipe temperature has definitely climbed, the O2 sensor cylindrical base has begun to discolor after only some 12 or so miles, something it previously didn't do in over 8K miles. Here are a couple final photos.
The wrap has also changed the sound. The header associated "rasp" (for want of a better word) at the front of the car is much more damped, and overall engine noise seems a little lower. I like that ! I'll drive it a couple more days like this, and then I'll revisit my old intake manifold gasket-grill mod
  .
.
PS. I bumped up the spring bolt tension from 2-1/2 to 4 rotations.
PPS. Forgot to mention, I celebrated by giving it a good wash -- well deserved!
The wrap has also changed the sound. The header associated "rasp" (for want of a better word) at the front of the car is much more damped, and overall engine noise seems a little lower. I like that
! I'll drive it a couple more days like this, and then I'll revisit my old intake manifold gasket-grill mod PS. I bumped up the spring bolt tension from 2-1/2 to 4 rotations.
PPS. Forgot to mention, I celebrated by giving it a good wash -- well deserved
!
05-12-2011, 04:54 AM
#44
Senior Member
SL Member

Join Date: Aug 2007
Location: SoCalifornia
Posts: 372
Trevor, you think too much; though I'd say it's a good thing ... Thanks for sharing this valuable info on your trial-and-error.
Q- Have you considered thermal/ceramic coatings on those pipes?
Q- Have you considered thermal/ceramic coatings on those pipes?
05-12-2011, 04:46 PM
#45
Thanks -- it really was a pretty good B-day! Not only did the wrap arrive, but also some items for an ICUP mod I'm working on for the Eclipse  !
!
It was certainly a good learning experience for me. All things considered, judicious wrapping seems a pretty inexpensive way to make gains.
Wrap is probably as far I'll go with this, though higher temp coatings would probably be better. Logically, there's a point where the cylinders are being over-scavenged with resulting loss of charge during valve overlap -- don't know if thermal coatings alone are enough to reach that point, may require back pressure reduction via piping/resonator/cat changes as well. The only clear drawback to more effective coatings is the pipe interior needs to be coated as well to protect the steel. When just wrapping, limiting overlap to a 1/4" on the header is apparently enough to protect non-coated steel.
I'm pushing things a bit by wrapping painted steel. Hopefully, limiting the wrap to the O2 bung down where there's a sizable inner air gap and the temp has dropped a little will get me by. Lots of contraction pinging when I got home yesterday and popped the hood.
Last edited by TrevorS; 05-13-2011 at 05:58 AM.
05-14-2011, 08:17 PM
#46
Just a quick follow up. I noticed an exhaust odor after awhile Friday with the windows up and fresh air vent open. So, when I got home I further tightened all the bolts, Eliminator, both O2 sensors, and raised the spring bolt tension to a total of 6 rotations beyond slack removal (1.25 pitch). Took a good run today with windows closed and vent open and no more odor.
It was also time for a fill up and it came in at 25.9 mpg over 300mi (no highway). Given that includes three bouts of header paint curing (30 minutes of idling each) plus me trying to evaluate any performance gains, plus the usual somewhat heavy traffic and growing stop light count college town driving around here, that probably isn't all that bad.
It was also time for a fill up and it came in at 25.9 mpg over 300mi (no highway). Given that includes three bouts of header paint curing (30 minutes of idling each) plus me trying to evaluate any performance gains, plus the usual somewhat heavy traffic and growing stop light count college town driving around here, that probably isn't all that bad
05-24-2011, 12:07 AM
#48
Another quick update, I was smelling a little exhaust fumes with the windows cracked and my best guess was it's the passing-air vacuum effect pulling fumes through the fresh air vent. I added another two full rotations to the spring bolts (total of eight beyond slack removal -- again, pitch is 1.25). That was a few days ago and I'll continue to keep an eye on it. By the way, 3-3/4" is definitely sufficient for the spring bolts as long as you don't make my mistake of installing a flat washer between the spring and the Weapon-R flange.
Also, should probably mention again this set of mods was triggered by Roller_Toaster and his eBay upgrade thread and also ScionFred's header and CEL Eliminator suggestions, I much appreciate their contributions to my driving enjoyment!
Also, should probably mention again this set of mods was triggered by Roller_Toaster and his eBay upgrade thread and also ScionFred's header and CEL Eliminator suggestions, I much appreciate their contributions to my driving enjoyment
!
06-19-2011, 12:29 AM
#49
Back again! I've concluded the OE bolt springs aren't strong enough to reliably seal the 2.5" Weapon-R donut gasket. Although the wire gauge appears the same, the temper is apparently different and so the supplied springs have to be used. The problem is that it doesn't take a lot of bolt rotations to completely compress those springs, so it's necessary to be especially careful the springs still have adequate room to give. For the last three days, I've been running the Weapon-R springs with three full bolt rotations (1.25 pitch) beyond taking up the slack by hand. Seems OK so far.
06-19-2011, 05:44 AM
#50

Trevor, this may or may not help but applying very-hi-temp RTV to the gasket/header junction fixed my leak.
I also owe you an apology for my previous low-ball hp estiimate for your mods. I should not have attempted to goad you into dyno testing it. I remain skeptical about your perceived gains from the TBS but concede that you're probably much closer to +20 hp than +10 hp.
I also owe you an apology for my previous low-ball hp estiimate for your mods. I should not have attempted to goad you into dyno testing it. I remain skeptical about your perceived gains from the TBS but concede that you're probably much closer to +20 hp than +10 hp.
06-19-2011, 11:02 PM
#51
! I consider the main gain to be with torque, not HP. I fully realize it's not optimized for max flow (significantly improved flow, but not max), but I'm satisfied torque directly benefits from my mods and there's no apparent movement of the peak up the band, it just seems taller and broader (torque doesn't require max flow). That's all I was trying for !I find it really interesting when having to get a move on (such as a quick merge from stop or near stop to say 50-55 mph). It very quickly hits the torque band, accelerating strongly (N/A remember
), and then hits the power band and the acceleration reasserts. You can easily tell them apart, but not as though there's a substantial slack off between them, just a slight easing. And that's all staying well below red-line. Of course, I'm not suggesting it could take any of the speedier cars that are often mentioned on these pages, but in a typical traffic situation, it's great -- beats the pants off my previous N/A cars !
06-20-2011, 03:17 AM
#52

ok ok. so i tried to read through most of this. and heres what i got. spipe seemed nice if you got the extra money for it. and this wrap stuff you say improved things? im not sure how placing what looks like aluminium foil around the spipe and header improved anything...obv i have no idea what it does. enlighten a young lad?
06-20-2011, 04:18 AM
#53
ok ok. so i tried to read through most of this. and heres what i got. spipe seemed nice if you got the extra money for it. and this wrap stuff you say improved things? im not sure how placing what looks like aluminium foil around the spipe and header improved anything...obv i have no idea what it does. enlighten a young lad?
Last edited by TrevorS; 06-20-2011 at 04:32 AM.
06-20-2011, 04:30 AM
#54
^^^ works for me haha. its way to late for me to think hard haha. however i do enjoy watching you work same with fred. i was merely shooting for the tldr folks that lurk about. please continue on in the name of science.!
09-11-2011, 11:10 PM
#56
Since my header partial wrap, I've experienced two CELs on the third coil-pack and given the conditions under which they occurred (idling at a stop on warm days). I'm pretty much satisfied it's due to high engine compartment heat aggravated by the header vertical pipe heat column being pretty much aligned with coil-pack three. Consequently, I just wrapped the rest of the header and it's definitely dropped the engine compartment temp. Hopefully, there'll be no further problems -- to be seen, I guess.

The small aluminum bracket at the bottom of the top photo is a relocation spacer for the oil dip stick tube. It moves it 1/4" further forward than the previous to increase install clearance for the wrapped Ebay sourced header (1" total). I also rotated the tube a little further to the left so as to maintain convenient handle position.
I applied five full spring-bolt rotations (1.25 mm thread) following slack removal. Visually, this still preserves reasonable open space in the Weapon-R supplied springs.
Last edited by TrevorS; 09-12-2011 at 07:05 PM.

Thread
Thread Starter
Forum
Replies
Last Post
halosinfire
Scion tC 2G Forced Induction
4
06-10-2015 05:21 PM
anti_virus347
PPC: Misc and Lots
1
05-28-2015 06:01 AM
anti_virus347
PPC: Engine / Drivetrain
8
04-03-2015 05:17 PM
hotroddelux
Scion xA/xB 1st-Gen Drivetrain & Power
2
12-03-2014 11:33 PM