
DIY-Under Seat Subwoofer Install: what I did (pic heavy)


Thread Starter
Senior Member
SL Member
Joined: Sep 2009
Posts: 116
From: Atlanta, GA
This is simply a post of what I did to install a powered subwoofer under the front passenger seat. I don't have anywhere near the know-how to make my own amp/box/woofer setup so I decixded to go with a pre-assembled unit. I did some measuring and research and it appeared that either the Boss Bass1500 (10-inch) or the Bass900(8-inch) would fit the bill. I pre-ordered both from Amazon (since I accidentally bought free 2-day shipping for a year through amazon prime) with the idea of sending back the unit that didn't fit the best. As it turned out, Boss was several months behind on releasing the Bass1500 so I ordered a Bass1200 (last year's 10-inch model) instead. Here's what they look like:
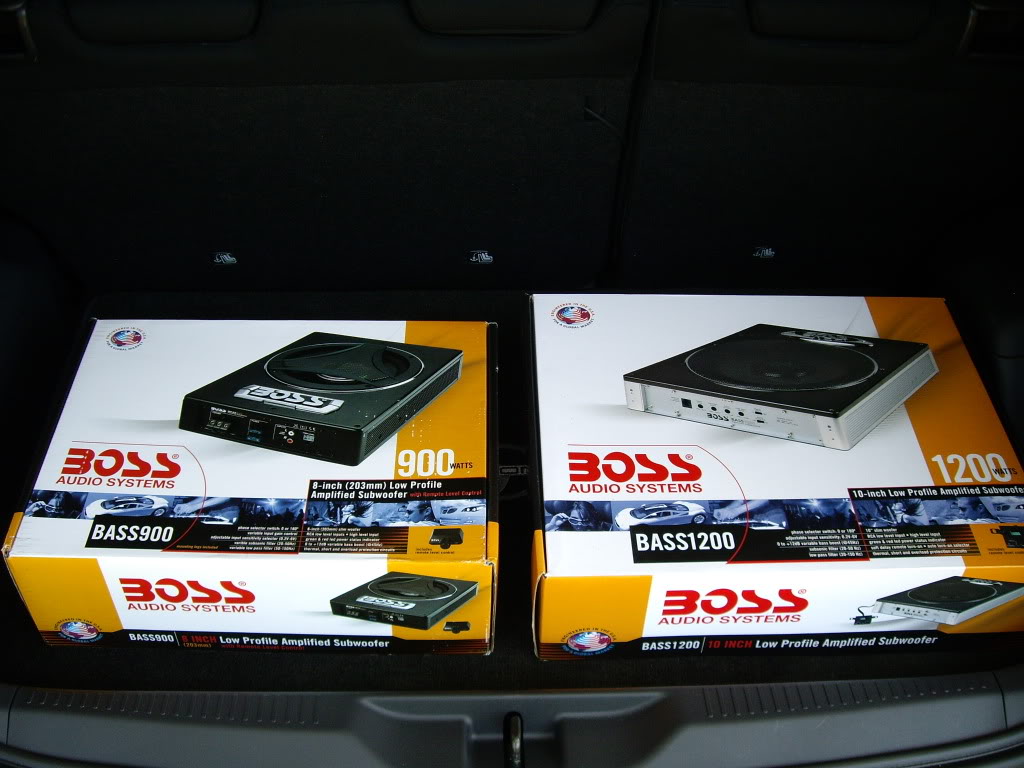
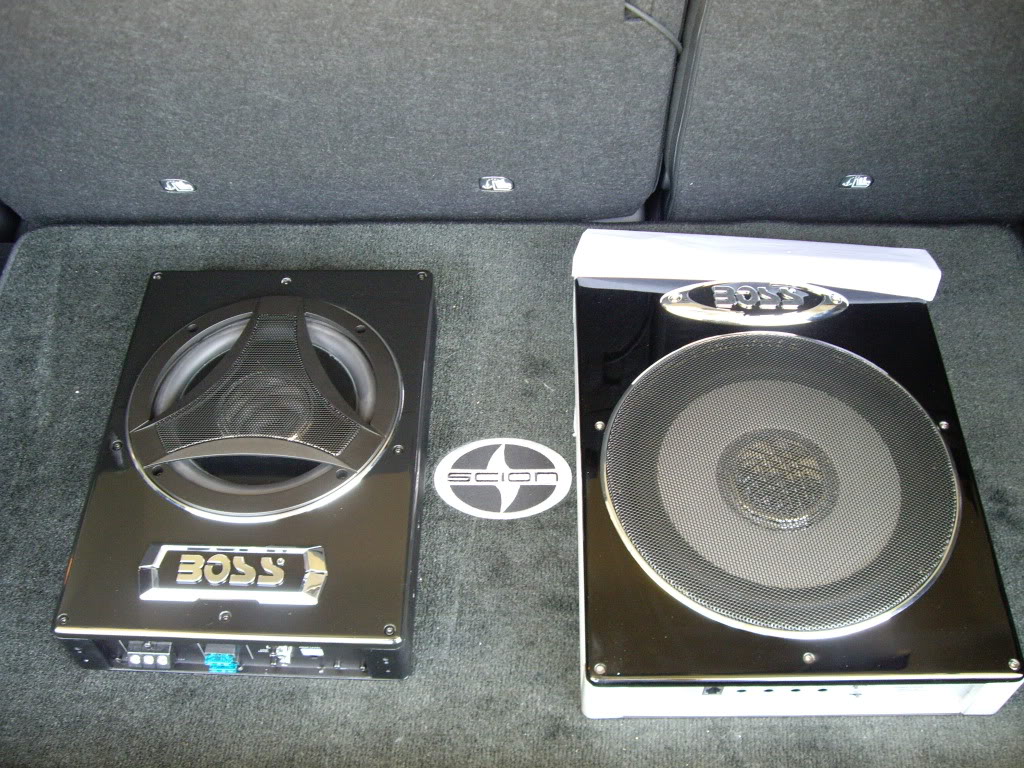
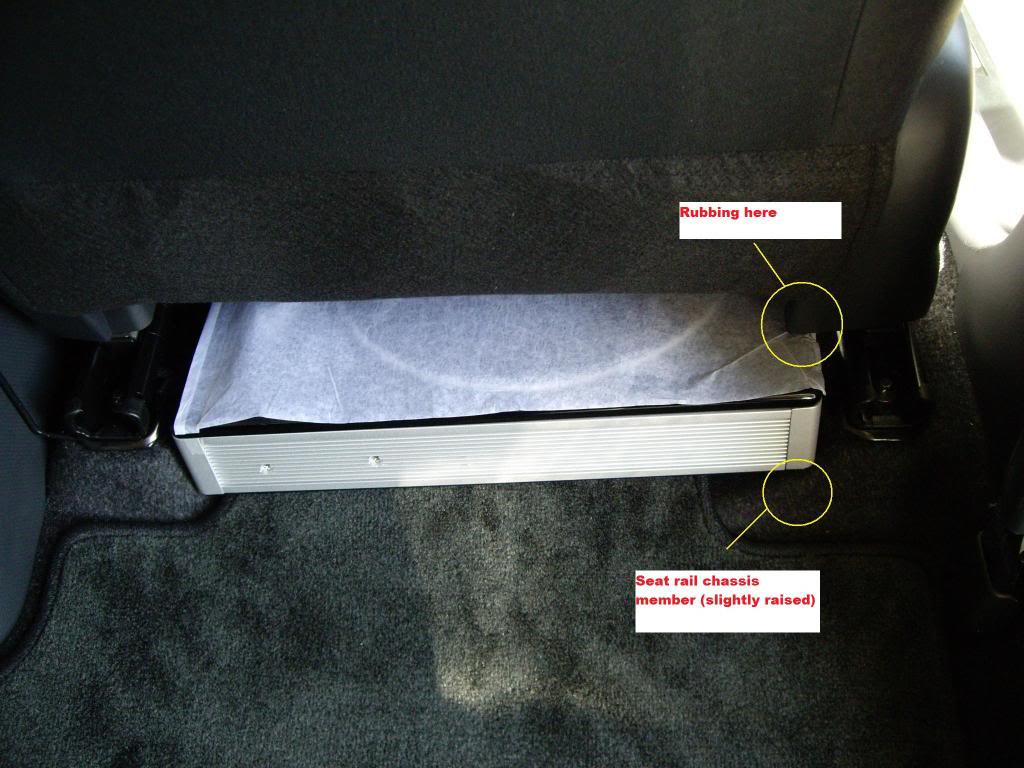
FWIW, this year's Bass900/1500 series appear to be far much better made than last year's Bass600/1200 series. I did some quick test fitting, and the Bass1200 was just a little bit too wide to fit lengthwise
across the seat rails without being wedged up by the seat rail chassis member. This caused a great deal of rubbing and prevented the seat from being moved easily fore and aft. (left the packing tissue on b/c I figured I'd be sending it back)
The Bass900 test fit perfectly with hardly any leg/foot room sacrificed. You'll see the finished product in a bit.
I started this install by first running the amp power wire from the battery to the cabin. I feel that the best way to do this is to remove the upper dash to gain access to the pre-existing firewall grommet behind the steering wheel.
I suggest following cobaltbravo's dash removal thread.
You will also want to remove the upper and lower wiper cowls, wiper motor assembly, and main battery for access to the same grommet from the engine compartment side. Here's how to do this:
https://www.scionlife.com/forums/sho...d.php?t=185726
The installation instructions recommend an 8AWG power wire kit so I purchased a . This kit comes with a power wire, ground wire, remote turn on wire, and fuse.
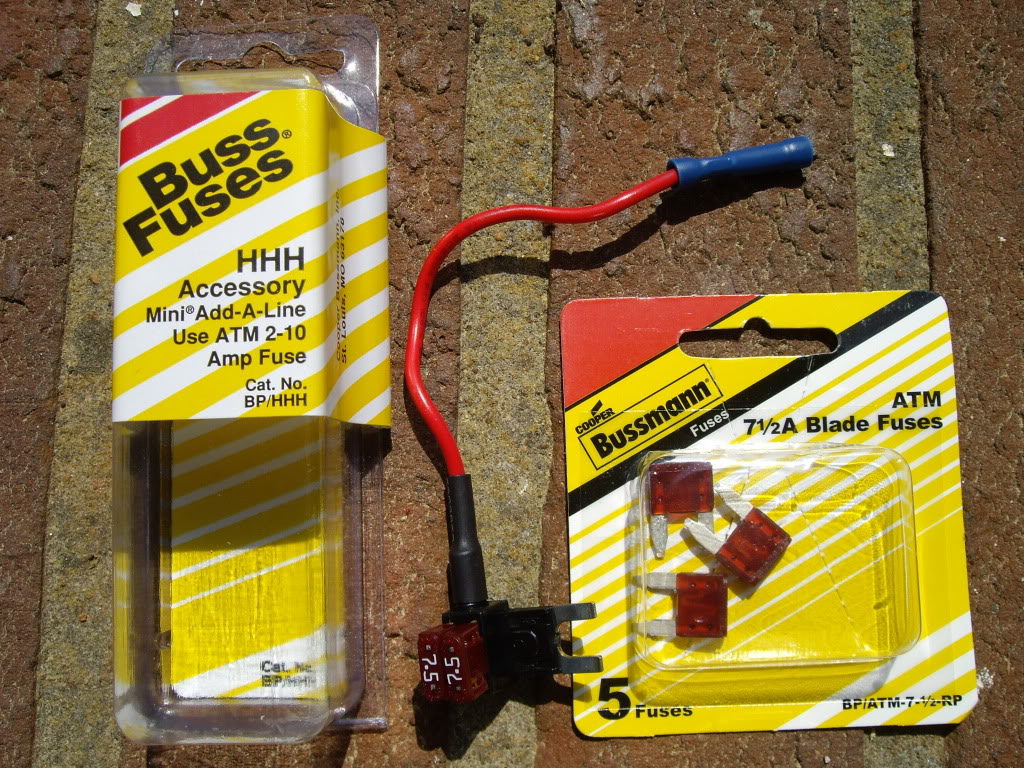
Since the Bass900 is already fused at the unit with a 15A automotive fuse I decided to forgo the use of the hefty fuse included in the kit. Here's what it looks like up close:

You will see that the power and ground wires already have connectors(circled) attached. Since this was the case, I decided to run the wire from the engine compartment side into the cabin, leaving the connector side in the engine compartment.
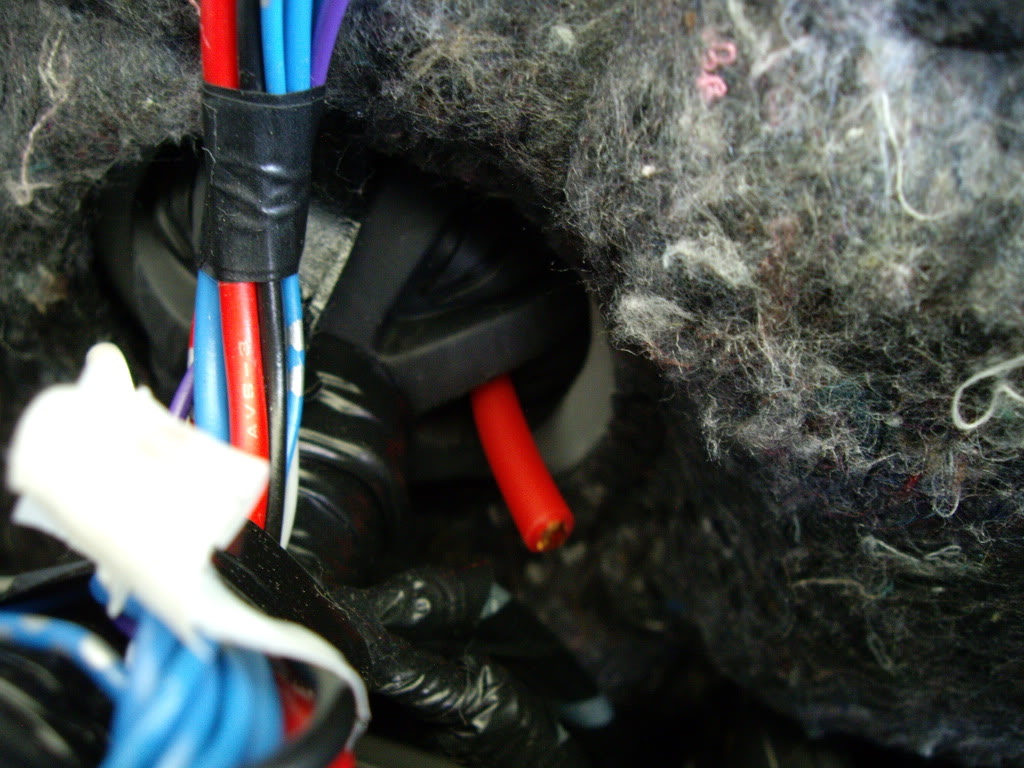
Once you have the wiper cowls and battery removed you will see the grommet behind where the battery was. On my grommet there were 2 hollow nipples on each side of the main harness that can be used to run a wire through.
I used the one on the passenger side, cutting it at a slight angle to prevent water from leaking in from above. An 8AWG wire fits through perfectly.
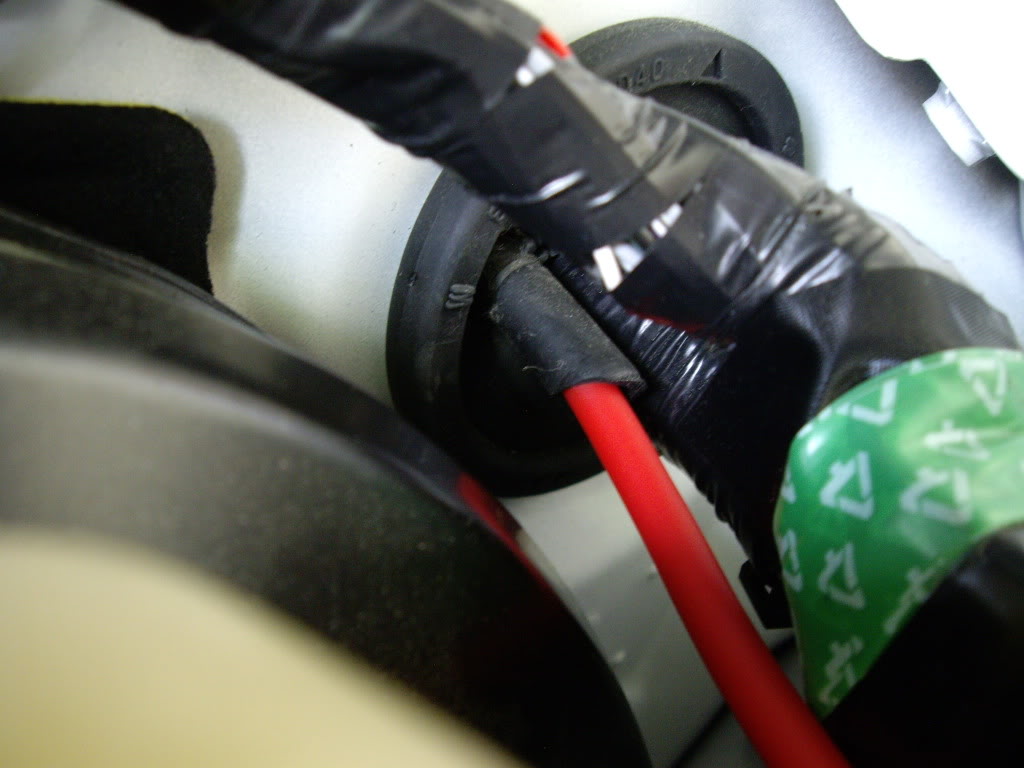
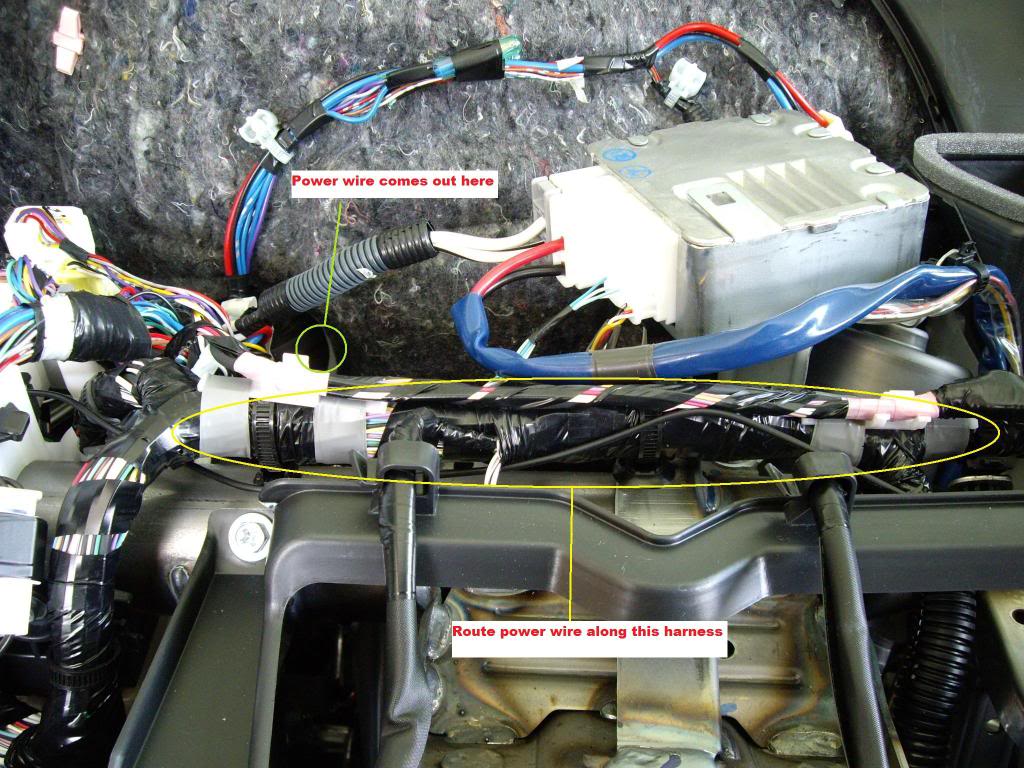
Here's what it looks like coming through on the cabin side:
Once I had the wire fed through the firewall, I routed it along the main wiring harness towards the center pedestal where the radio is mounted:
While I had the dash out, I also ran the remote turn-on wire. For those of you who don't know(like me), the remote turn-on lead functions as a source of 12V current routed usually from a key-on/off accessory circuit that signals the amplifier to turn on. Key on= accessory circuit powered= amplifier turns on and draws power from battery. Key off=accessory circuit not powered= amplifier off and not drawing power from the battery.
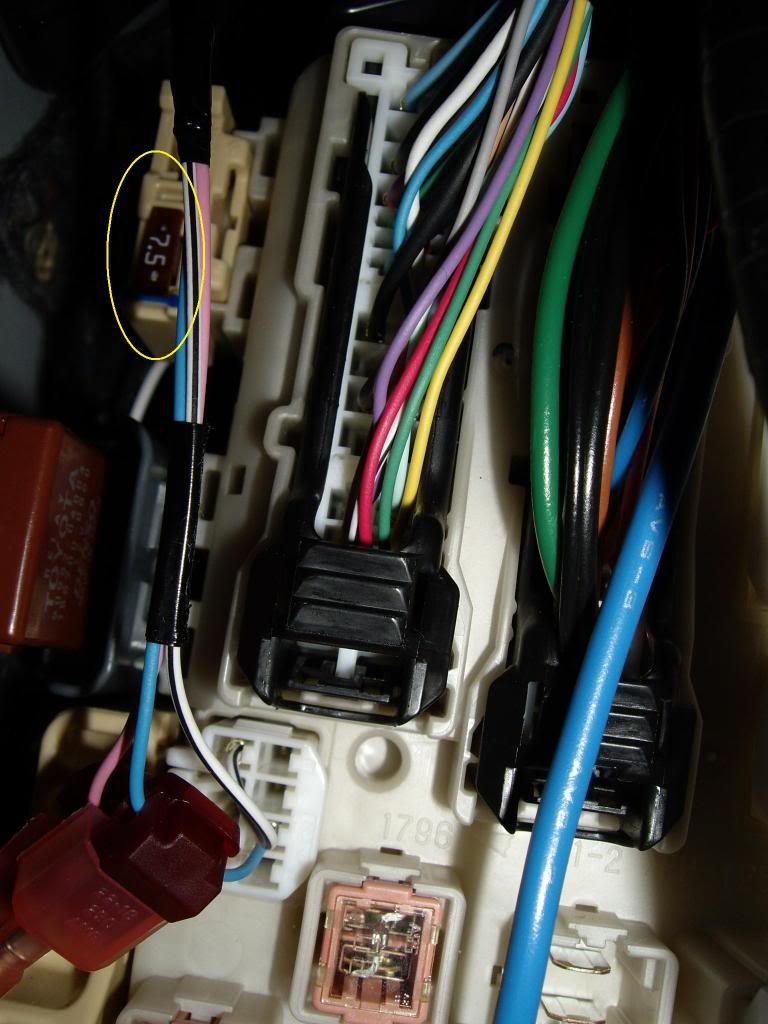
In keeping with the general principle of neatness in installation, I decided to use a bussman add-a-line(available at the auto parts store for ~$6) for my remote wire. The general principle of these units is to allow you to tap a circuit already in use and provide fuse protection for both the original circuit and your added accessory hence the 2 fuses. Since we have low-profile mini fuses, I made sure to get the one made for mini fuse blocks. Note that the fuses you will use in the unit are the standard ATM mini type and NOT low-profile mini fuses. Since the original fuse location I used was 7.5A, I just bought the same kind in ATM. For our remote turn on purposes it doesn't really matter what rated fuse is used since there isn't any real current ever being drawn. (I believe that the package suggests no more than 10A per slot however)
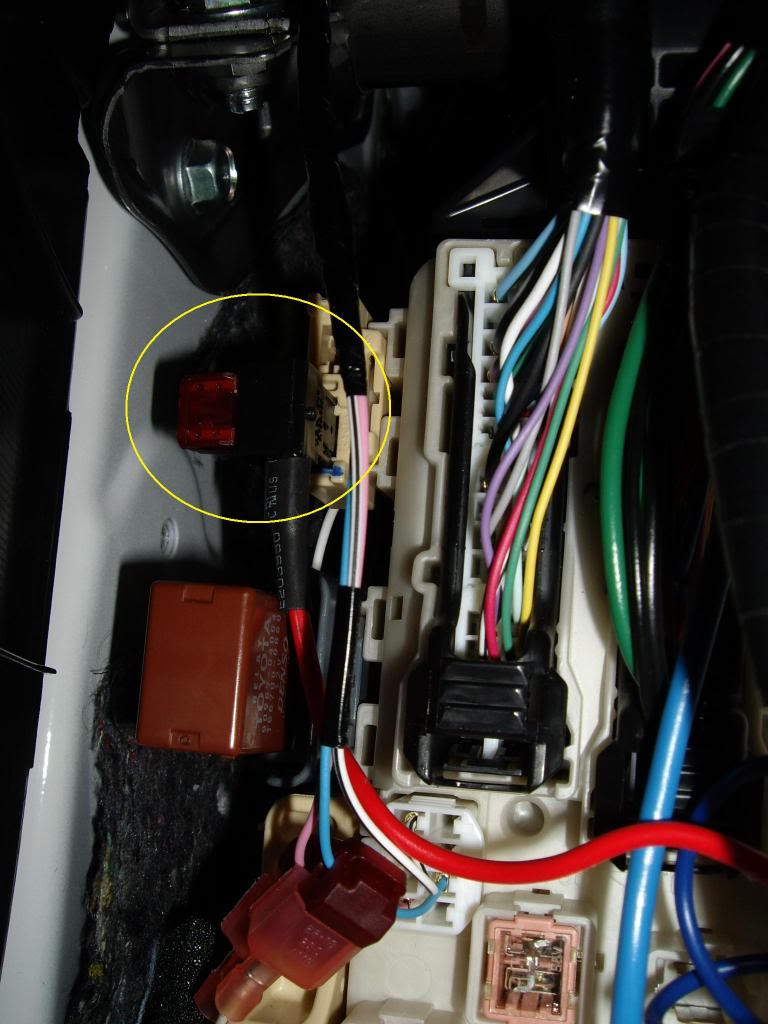
I elected to use fuse location 49 which is located on the fuse panel behind the driver side wallet/sunglasses compartment. I used this location for 2 reasons: 1) it will accommodate the added bulk of the add-a-circuit fuse and 2) in the 2010 owner's manual it is listed as 'no circuit.' As far as I can tell, this means that for whatever reason, toyota used this particular fuse panel in our cars, protected the circuit with a fuse, and then didn't use it for anything in production. Go figure. What it means to me is that If I want, I can also run a second low power accessory off the back of the add-a-line on this same circuit sometime in the future (e.g. hardwired GPS, radar detector, etc...)
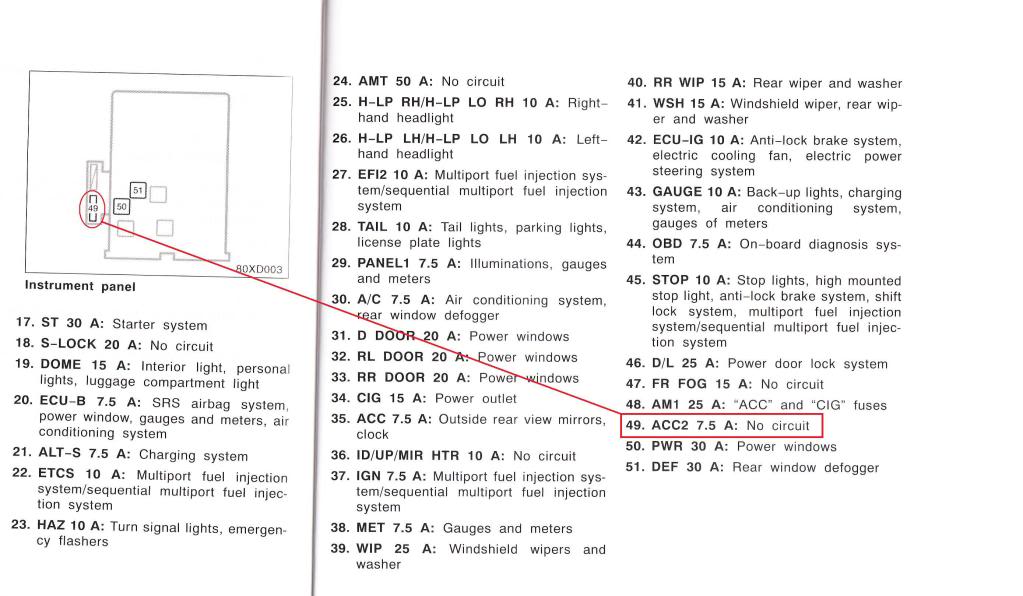
Here's the location in real life:
NOTE: If you're running out of daylight as I was, and need to use the car again, this is a good place to pause. Route the remote wire along the small wiring harness below the steering wheel, and out the radio hole along with the power wire from earlier.
Simply bundle the rest of the remote wire and put it in the wallet cubby. You can now re-assemble the dash (leaving the radio out), wiper assemblies and re-install the battery. Make sure to tuck the power wire up out of the way in the engine compartment.
DAY TWO (be sure to disconnect the battery again before you start work):
I used a wire stripping and crimping tool to strip and attach the remote wire to the included add-a-line wire connector. Not knowing exactly how well this whole fuse source was going to work, I left myself some extra service loop in the remote wire
just in case I needed to find a different location.
Using the fuse puller from the engine compartment fuse box, I removed the original fuse located at position 49, and installed the add-a-line in its place. This takes a little patience unless you have the hands of an 8-year old.
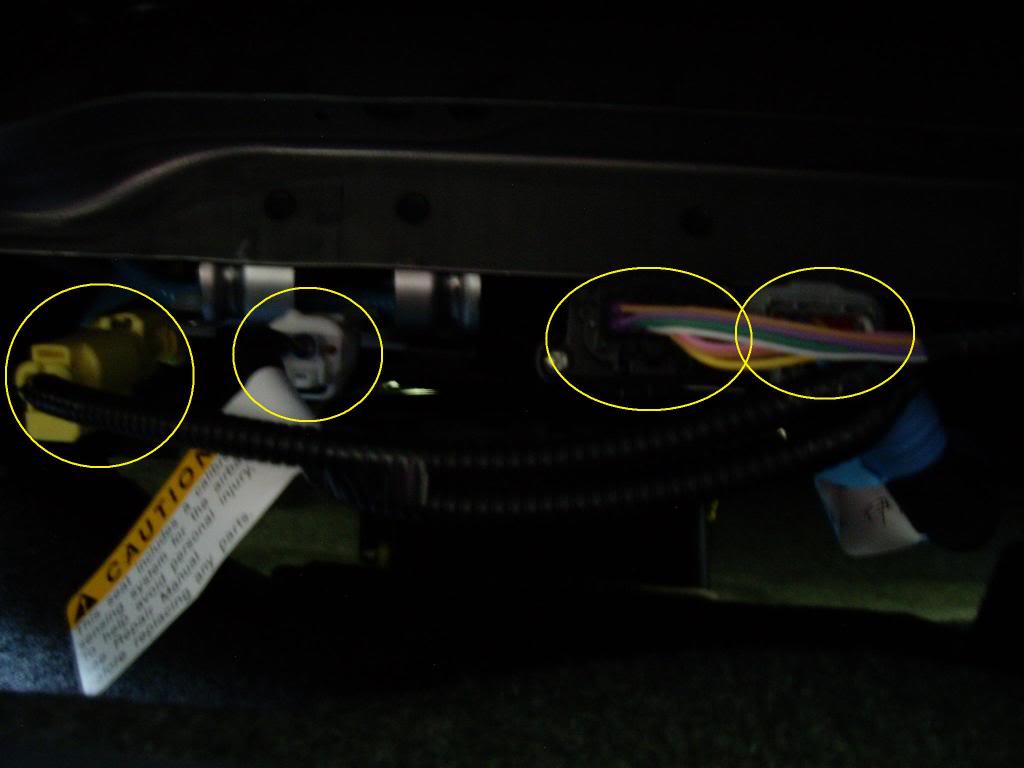
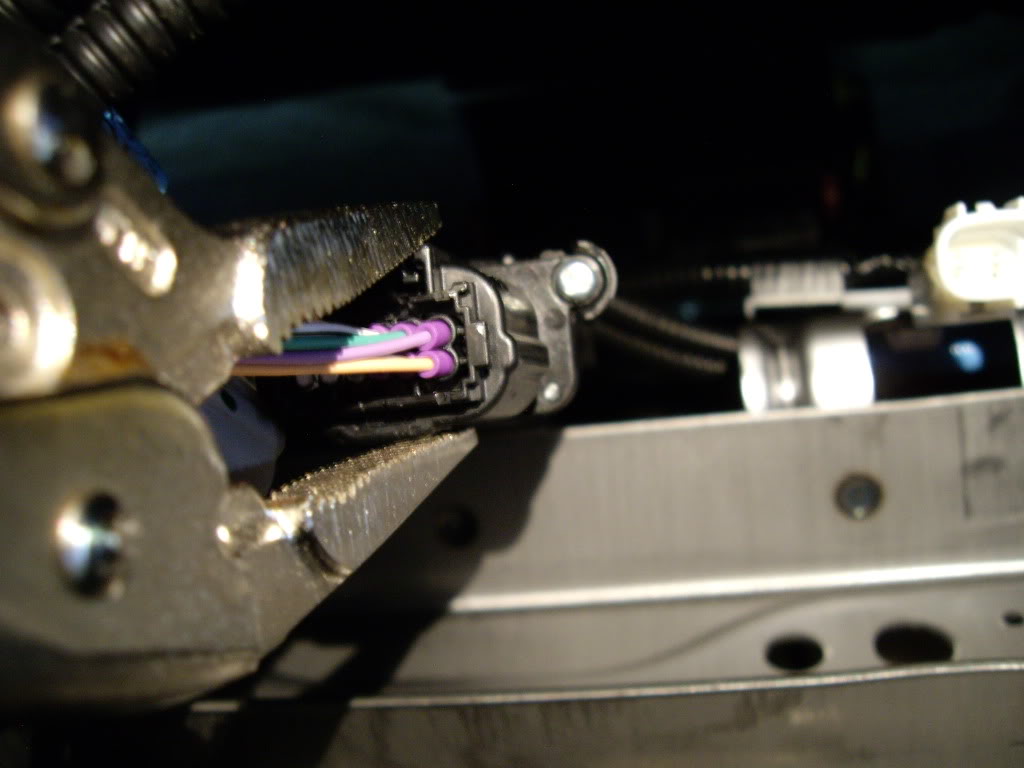
Next, I removed the passenger seat. Start by removing the 4 wire harness plugs(airbag weight and seat belt sensors) located below the front side of the seat. You will also need to remove the 1 wire harness elbow clip from the bottom of the seat.
These clips were horribly stiff so I gently squeezed them with a pair of needle-nose vise grips and they came right out. Note: the airbag (yellow) plug is a special kind of plug that requires you to move a little lever before its release.
Next, I removed the 4 8mm seat rail bolts and lifted the seat out of the car. The seat will come out easiest if the headrest is all the way down, and the seat-back is slightly reclined.
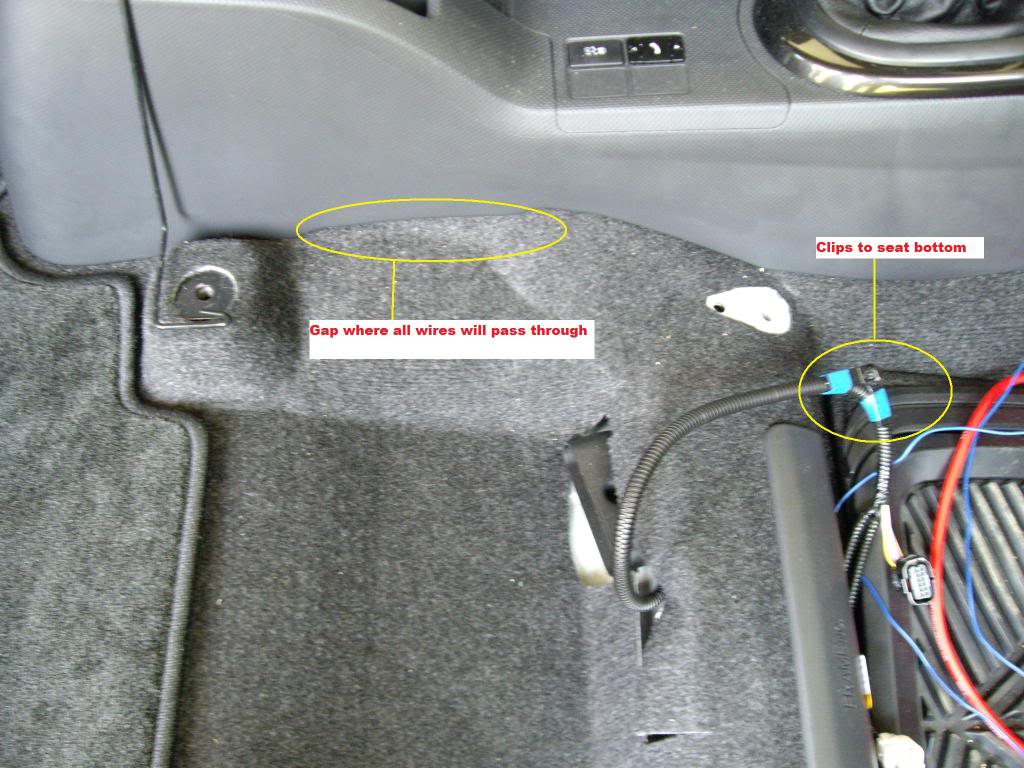
Once the seat is removed, you can see a small space below the back of the center console. This is where I will be routing the power, ground, remote and RCA cables through. Also visible, is the elbow clip I mentioned above.
For RCA cables, I bought a set of 4ft Monster RCA's from BestBuy because I had a gift card I needed to finish off. You can probably find an equal set for a far better price elsewhere.
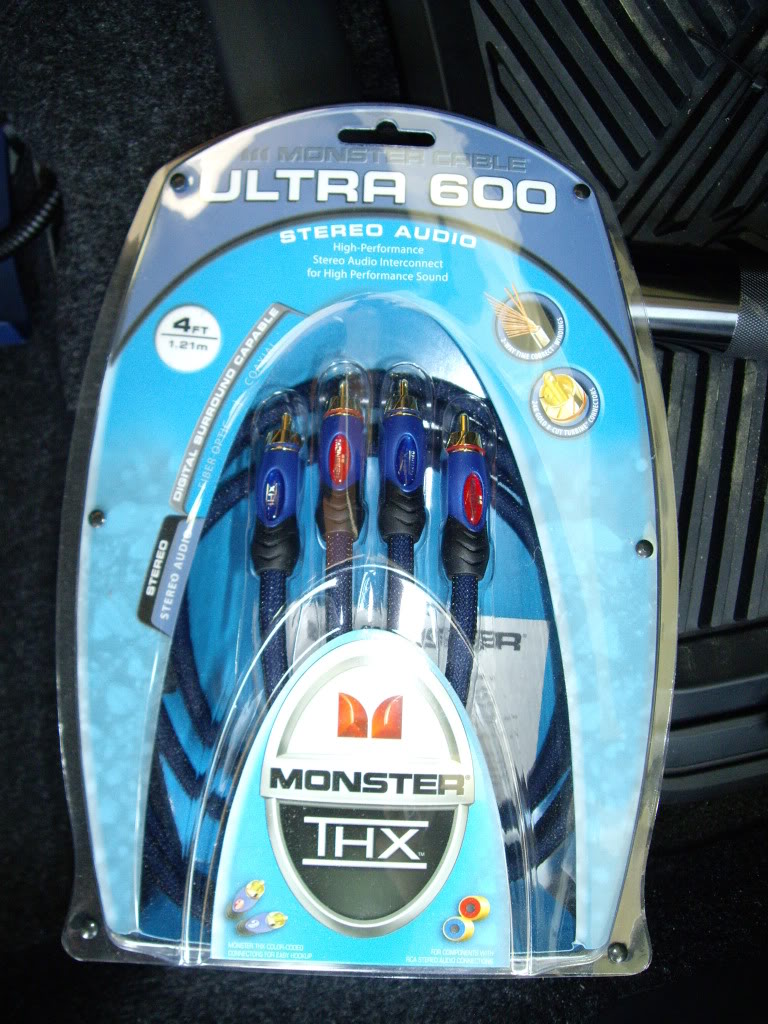
Let me be perfectly clear about the length however: 4ft was JUST BARELY enough for my install. If you're using the exact same woofer as me, you couldn't ask for a more perfect (though pretty tight) fit.
If you're unsure, just go with 6ft and coil it up somewhere behind the dash.
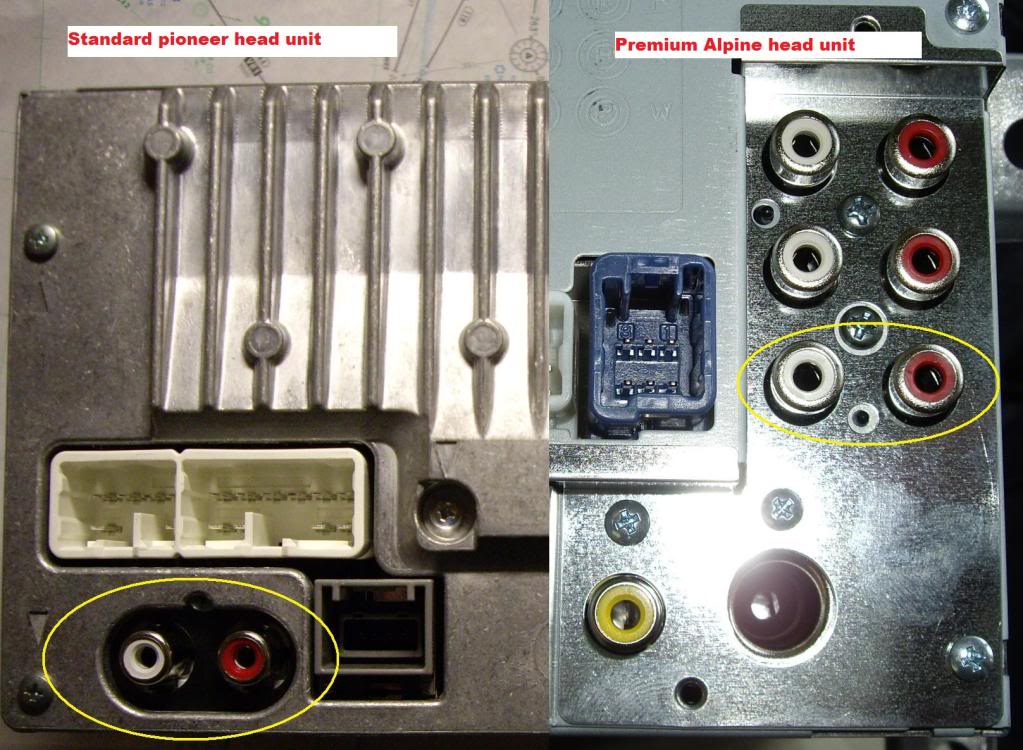
The RCA cables will go from the RCA low level inputs on the back of the amplifier to the outputs on the head unit. If you're using the standard Pioneer head unit, there is only one set of RCA outputs and they are for a subwoofer.
If you have the premium Alpine unit the bottom RCA pair is for the sub.
Next, I removed the center console. An excellent resource for this step is A1binoA11igat0r's Redlinegoods Shift boot install thread.
At this point, I ran my power and remote wires down and out from under the climate controls and connected the RCA cables to the back of my head unit and routed them in the same manner. I then re-installed the Head unit.
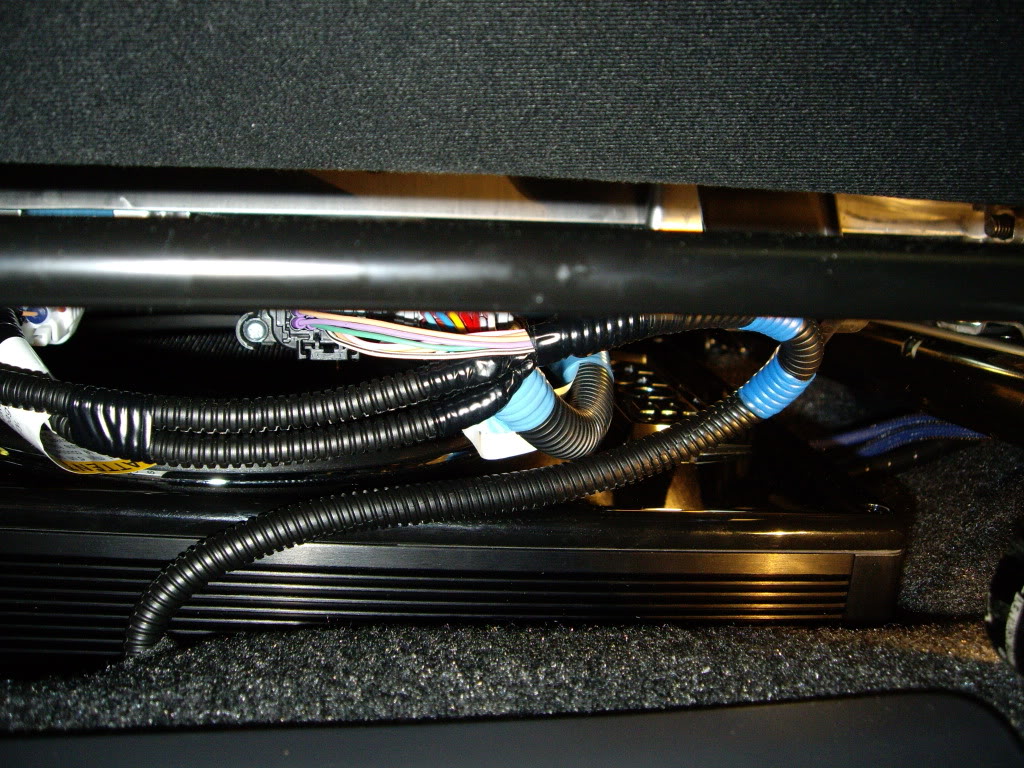
Here we have the center console removed and I've routed my RCA cables, power, and remote wires along the existing wire harness under the center console.
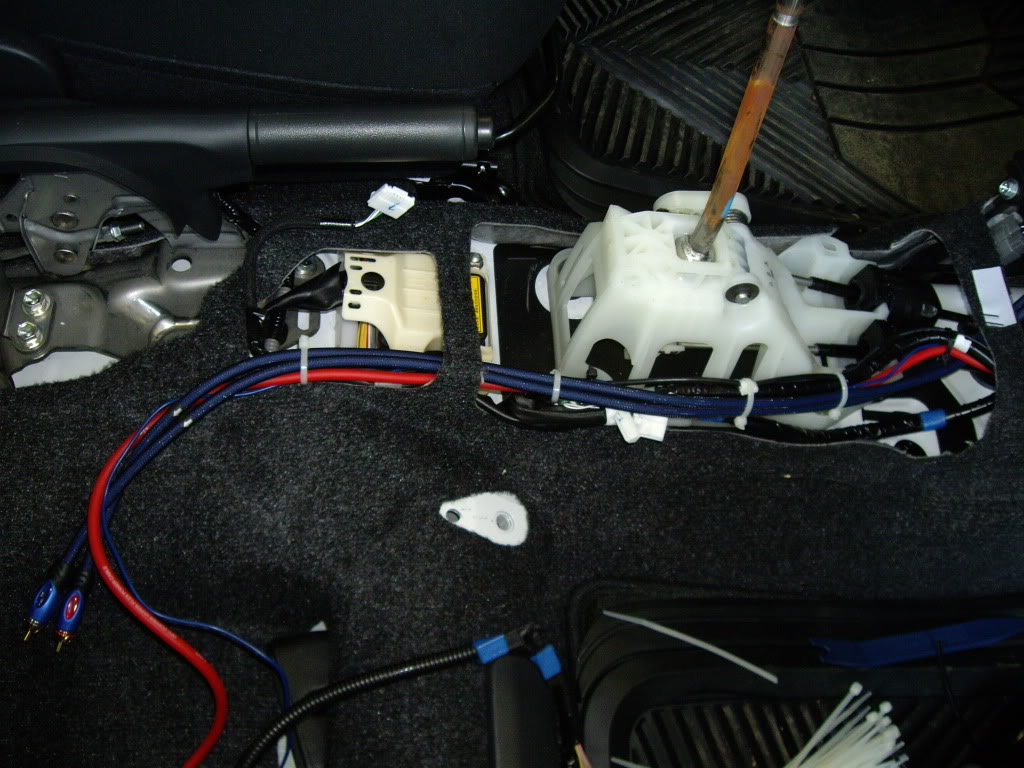
Notice all of the surface rust on the shifter rod? Apparently the Redlinegoods boot isn't a very effective moisture barrier, or there's something in the leather that reacts with the metal.
The rust was flaking off and dropping down into the pivots of the shifter so I cleaned it up with a scotchbrite pad and wrapped it in electrical tape before I reinstalled everything.
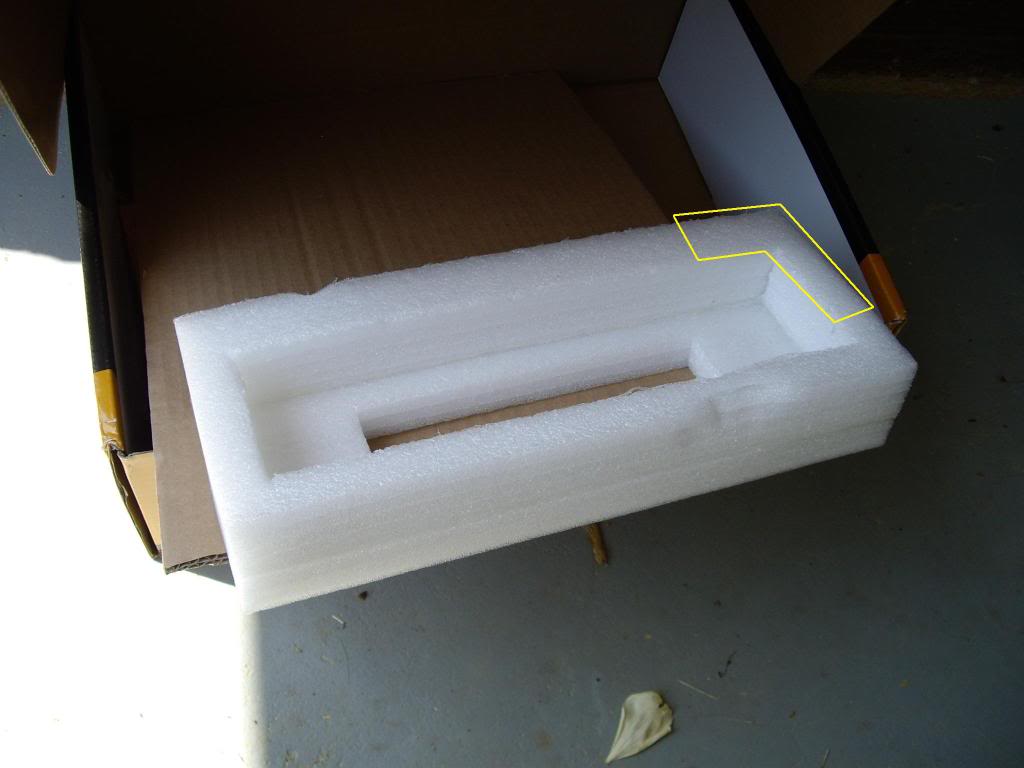
Now on to prepping the woofer for installation. As some of you have probably noticed, the area beneath the passenger seat is far from level and there's a deep valley in the forward area. In order to facilitate a level mounting,
I used an L-shaped section of the woofer packaging as a 'foot' for the front right part of the unit and secured it with some of the velcro included with the installation hardware.

For the left front side I used some more velcro on the air duct. Since our interior naturally adheres to the loop(stiff) side of velcro I used a small strip of it to secure the bottom back side of the unit to the floor.
I also used the loops side on the air duct as well to hold the carpet out of the way.
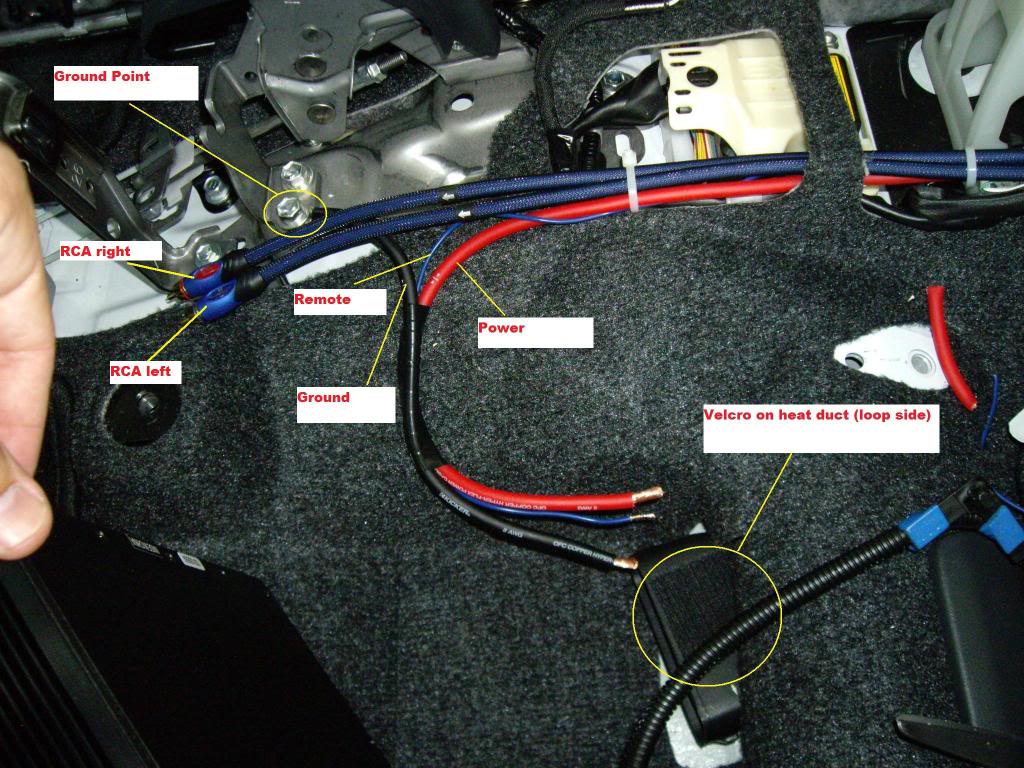
Next, I sized my remote, and power wires. I secured the ground wire to a bolt on the e-brake mount and sized it as well. Once all of my lengths were correct, I stripped about 1/4 inch of insulation off of each wire and bundled them with electrical tape.
Next, I connected the RCA cables and power/ground/remote wires to their respective terminals on the side of the unit. Since our head units have integrated subwoofer controls, I elected to not install the included remote gain level ****.
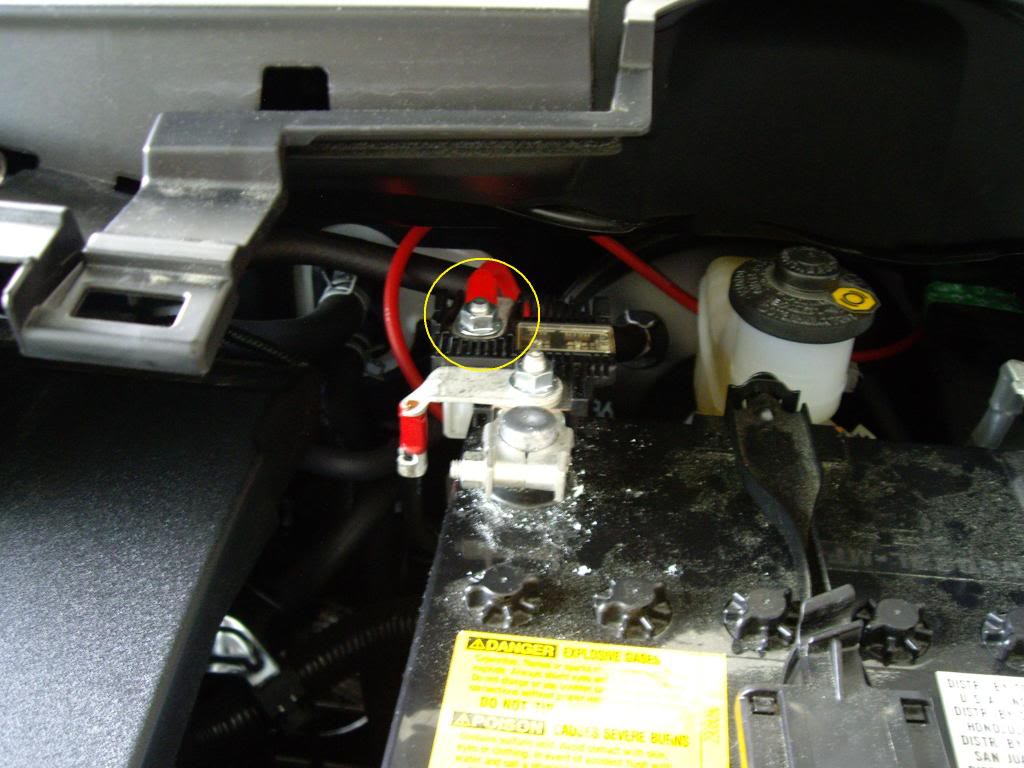
Once all of this was complete, I connected the power wire to the aft most bolt on the positive terminal harness of the battery.
Next, I momentarily reconnected the battery and turned on the radio to make sure I had wired correctly before I re-installed the seat. You'll have to dive into the radio menus a little to find the woofer controls. If you have wired everything correctly,
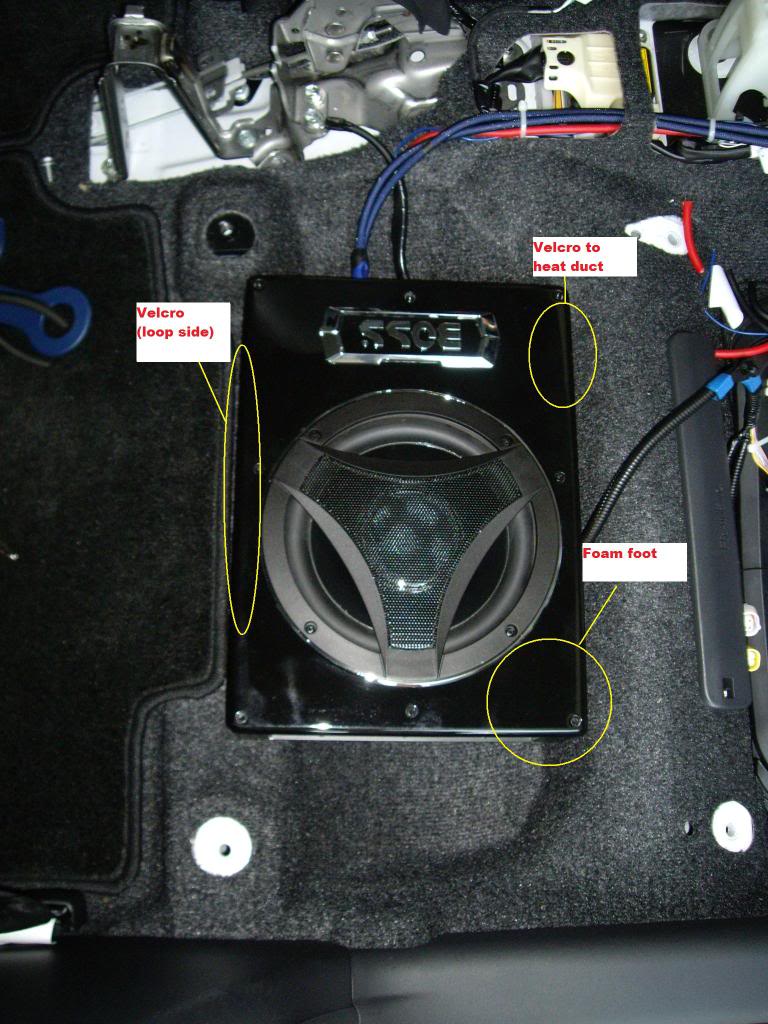
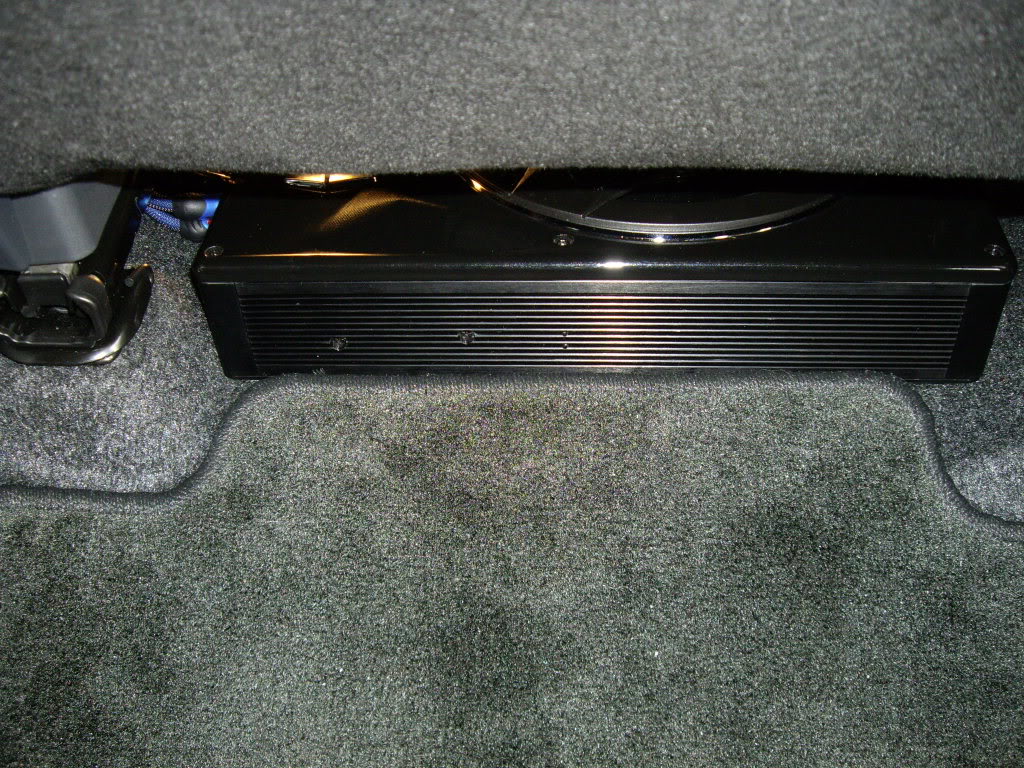
you should be able to select the woofer control to 'ON.' Once I verified operation, I turned off the radio disconnected the battery again. Here is the finished product without the seat (this is also a better description of where to install the velcro):
Next, I reinstalled the seat and re-secured its associated electrical plugs. Here are some final pictures to show the general clearance of the seat, and available leg room.
Front:
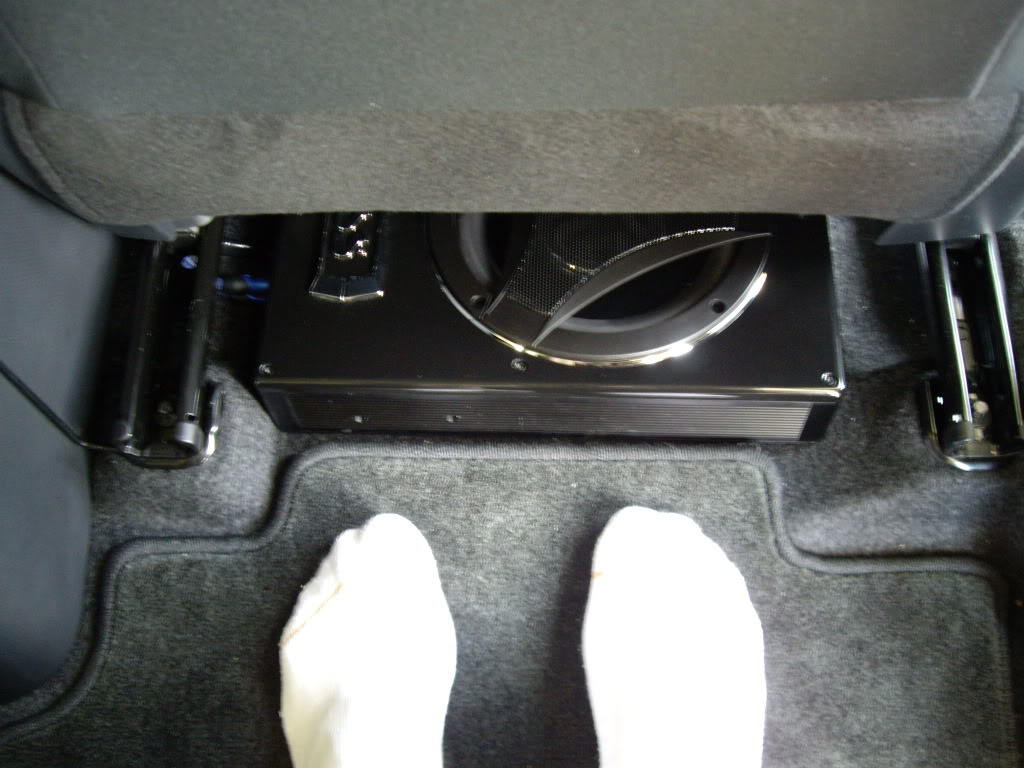
Rear:
Foot room. Seat is all the way forward in this picture (please pardon my stocking feet. I didn't want to track Georgia pollen all over my new car interior):
As far as how the unit sounds? Awesome! It's everything I expected and more. You certainly can't rock the block with this unit but it has more than enough power (Boss claims 600W RMS and 900W max.) for what I need.
I intend this post to be of a very basic nature and easy enough for a person of similar shade-tree mechanic ability as myself to understand. To those of you who post your insane custom amp/sub/box, video monitor etc...
installations on a daily basis I extend my sincere thanks as I have learned most of what I did here from your previous posts.
FWIW, this year's Bass900/1500 series appear to be far much better made than last year's Bass600/1200 series. I did some quick test fitting, and the Bass1200 was just a little bit too wide to fit lengthwise
across the seat rails without being wedged up by the seat rail chassis member. This caused a great deal of rubbing and prevented the seat from being moved easily fore and aft. (left the packing tissue on b/c I figured I'd be sending it back)
The Bass900 test fit perfectly with hardly any leg/foot room sacrificed. You'll see the finished product in a bit.
I started this install by first running the amp power wire from the battery to the cabin. I feel that the best way to do this is to remove the upper dash to gain access to the pre-existing firewall grommet behind the steering wheel.
I suggest following cobaltbravo's dash removal thread.
You will also want to remove the upper and lower wiper cowls, wiper motor assembly, and main battery for access to the same grommet from the engine compartment side. Here's how to do this:
https://www.scionlife.com/forums/sho...d.php?t=185726
The installation instructions recommend an 8AWG power wire kit so I purchased a . This kit comes with a power wire, ground wire, remote turn on wire, and fuse.
Since the Bass900 is already fused at the unit with a 15A automotive fuse I decided to forgo the use of the hefty fuse included in the kit. Here's what it looks like up close:
You will see that the power and ground wires already have connectors(circled) attached. Since this was the case, I decided to run the wire from the engine compartment side into the cabin, leaving the connector side in the engine compartment.
Once you have the wiper cowls and battery removed you will see the grommet behind where the battery was. On my grommet there were 2 hollow nipples on each side of the main harness that can be used to run a wire through.
I used the one on the passenger side, cutting it at a slight angle to prevent water from leaking in from above. An 8AWG wire fits through perfectly.
Here's what it looks like coming through on the cabin side:
Once I had the wire fed through the firewall, I routed it along the main wiring harness towards the center pedestal where the radio is mounted:
While I had the dash out, I also ran the remote turn-on wire. For those of you who don't know(like me), the remote turn-on lead functions as a source of 12V current routed usually from a key-on/off accessory circuit that signals the amplifier to turn on. Key on= accessory circuit powered= amplifier turns on and draws power from battery. Key off=accessory circuit not powered= amplifier off and not drawing power from the battery.
In keeping with the general principle of neatness in installation, I decided to use a bussman add-a-line(available at the auto parts store for ~$6) for my remote wire. The general principle of these units is to allow you to tap a circuit already in use and provide fuse protection for both the original circuit and your added accessory hence the 2 fuses. Since we have low-profile mini fuses, I made sure to get the one made for mini fuse blocks. Note that the fuses you will use in the unit are the standard ATM mini type and NOT low-profile mini fuses. Since the original fuse location I used was 7.5A, I just bought the same kind in ATM. For our remote turn on purposes it doesn't really matter what rated fuse is used since there isn't any real current ever being drawn. (I believe that the package suggests no more than 10A per slot however)
I elected to use fuse location 49 which is located on the fuse panel behind the driver side wallet/sunglasses compartment. I used this location for 2 reasons: 1) it will accommodate the added bulk of the add-a-circuit fuse and 2) in the 2010 owner's manual it is listed as 'no circuit.' As far as I can tell, this means that for whatever reason, toyota used this particular fuse panel in our cars, protected the circuit with a fuse, and then didn't use it for anything in production. Go figure. What it means to me is that If I want, I can also run a second low power accessory off the back of the add-a-line on this same circuit sometime in the future (e.g. hardwired GPS, radar detector, etc...)
Here's the location in real life:
NOTE: If you're running out of daylight as I was, and need to use the car again, this is a good place to pause. Route the remote wire along the small wiring harness below the steering wheel, and out the radio hole along with the power wire from earlier.
Simply bundle the rest of the remote wire and put it in the wallet cubby. You can now re-assemble the dash (leaving the radio out), wiper assemblies and re-install the battery. Make sure to tuck the power wire up out of the way in the engine compartment.
DAY TWO (be sure to disconnect the battery again before you start work):
I used a wire stripping and crimping tool to strip and attach the remote wire to the included add-a-line wire connector. Not knowing exactly how well this whole fuse source was going to work, I left myself some extra service loop in the remote wire
just in case I needed to find a different location.
Using the fuse puller from the engine compartment fuse box, I removed the original fuse located at position 49, and installed the add-a-line in its place. This takes a little patience unless you have the hands of an 8-year old.
Next, I removed the passenger seat. Start by removing the 4 wire harness plugs(airbag weight and seat belt sensors) located below the front side of the seat. You will also need to remove the 1 wire harness elbow clip from the bottom of the seat.
These clips were horribly stiff so I gently squeezed them with a pair of needle-nose vise grips and they came right out. Note: the airbag (yellow) plug is a special kind of plug that requires you to move a little lever before its release.
Next, I removed the 4 8mm seat rail bolts and lifted the seat out of the car. The seat will come out easiest if the headrest is all the way down, and the seat-back is slightly reclined.
Once the seat is removed, you can see a small space below the back of the center console. This is where I will be routing the power, ground, remote and RCA cables through. Also visible, is the elbow clip I mentioned above.
For RCA cables, I bought a set of 4ft Monster RCA's from BestBuy because I had a gift card I needed to finish off. You can probably find an equal set for a far better price elsewhere.
Let me be perfectly clear about the length however: 4ft was JUST BARELY enough for my install. If you're using the exact same woofer as me, you couldn't ask for a more perfect (though pretty tight) fit.
If you're unsure, just go with 6ft and coil it up somewhere behind the dash.
The RCA cables will go from the RCA low level inputs on the back of the amplifier to the outputs on the head unit. If you're using the standard Pioneer head unit, there is only one set of RCA outputs and they are for a subwoofer.
If you have the premium Alpine unit the bottom RCA pair is for the sub.
Next, I removed the center console. An excellent resource for this step is A1binoA11igat0r's Redlinegoods Shift boot install thread.
At this point, I ran my power and remote wires down and out from under the climate controls and connected the RCA cables to the back of my head unit and routed them in the same manner. I then re-installed the Head unit.
Here we have the center console removed and I've routed my RCA cables, power, and remote wires along the existing wire harness under the center console.
Notice all of the surface rust on the shifter rod? Apparently the Redlinegoods boot isn't a very effective moisture barrier, or there's something in the leather that reacts with the metal.
The rust was flaking off and dropping down into the pivots of the shifter so I cleaned it up with a scotchbrite pad and wrapped it in electrical tape before I reinstalled everything.
Now on to prepping the woofer for installation. As some of you have probably noticed, the area beneath the passenger seat is far from level and there's a deep valley in the forward area. In order to facilitate a level mounting,
I used an L-shaped section of the woofer packaging as a 'foot' for the front right part of the unit and secured it with some of the velcro included with the installation hardware.
For the left front side I used some more velcro on the air duct. Since our interior naturally adheres to the loop(stiff) side of velcro I used a small strip of it to secure the bottom back side of the unit to the floor.
I also used the loops side on the air duct as well to hold the carpet out of the way.
Next, I sized my remote, and power wires. I secured the ground wire to a bolt on the e-brake mount and sized it as well. Once all of my lengths were correct, I stripped about 1/4 inch of insulation off of each wire and bundled them with electrical tape.
Next, I connected the RCA cables and power/ground/remote wires to their respective terminals on the side of the unit. Since our head units have integrated subwoofer controls, I elected to not install the included remote gain level ****.
Once all of this was complete, I connected the power wire to the aft most bolt on the positive terminal harness of the battery.
Next, I momentarily reconnected the battery and turned on the radio to make sure I had wired correctly before I re-installed the seat. You'll have to dive into the radio menus a little to find the woofer controls. If you have wired everything correctly,
you should be able to select the woofer control to 'ON.' Once I verified operation, I turned off the radio disconnected the battery again. Here is the finished product without the seat (this is also a better description of where to install the velcro):
Next, I reinstalled the seat and re-secured its associated electrical plugs. Here are some final pictures to show the general clearance of the seat, and available leg room.
Front:
Rear:
Foot room. Seat is all the way forward in this picture (please pardon my stocking feet. I didn't want to track Georgia pollen all over my new car interior):
As far as how the unit sounds? Awesome! It's everything I expected and more. You certainly can't rock the block with this unit but it has more than enough power (Boss claims 600W RMS and 900W max.) for what I need.
I intend this post to be of a very basic nature and easy enough for a person of similar shade-tree mechanic ability as myself to understand. To those of you who post your insane custom amp/sub/box, video monitor etc...
installations on a daily basis I extend my sincere thanks as I have learned most of what I did here from your previous posts.
Last edited by MR_LUV; Oct 23, 2017 at 01:26 AM. Reason: updated


Senior Member

SL Member
Joined: Jun 2008
Posts: 1,285
From: Delaware
Very nice job. If you decide to run the remote gain ****, I recommend placing it in the upper glove box closest to the drivers side. I put my infinity basslink powered sub gain **** there for easy access. Trying to go thru menus in your headunit to adjust your bass while driving isn't recommended. I hope you sound deadend under the dash while you were in there. The center air ducts can rattle something fierce if they get loose.
Sent from my Droid using Tapatalk
Sent from my Droid using Tapatalk

Senior Member
SL Member
Joined: Jun 2008
Posts: 237
From: TN
Looks very good, though I HIGHLY recommend you add the inline fuse to the power wire. You need a fuse near the battery just in case something shorts out near it. The fuse in the amp is only for protecting your amp. That fuse near the battery can prevent your car from burning up.
Senior Member
SL Member
Joined: Sep 2008
Posts: 1,265
From: Cranberry Township, PA
totally awesome, as i was looking at the same thing for when i sell my 12" dual coil that's taking up half my trunk. I only put it in and tuned it WAY down to just amplify the lower end of songs (enough to feel and hear it, but not enough to shake the windows of a car next to me). although there are times i wig out and just bust out the slamming bass. LOL
awesome write-up. thanks!
awesome write-up. thanks!

Senior Member
SL Member
Joined: Jun 2008
Posts: 1,285
From: Delaware
Whats the "purpose" or advantage of having a Sub under your seat?..LoL...
Just Curious!....
Just Curious!....
Great place to put a Sub. I thought about selling my Basslink and buying something for under the seat.
Sent from my Droid using Tapatalk
Last edited by MR_LUV; Oct 23, 2017 at 03:27 AM.

Senior Member
SL Member
Joined: Feb 2009
Posts: 512
From: Lafayette, LA
Some people prefer the acoustic, quality sound , or a little bit more than whats offered to them through the realms of standard 2-4 way door speakers and at the same time enjoy having the extra cargo capacity that you lose when you drop even the smaller 8-10" systems in. Its all personal taste, and this setup really adds a nice quality sound without taking up an ounce of extra space.
Senior Member
SL Member
Joined: Sep 2008
Posts: 1,265
From: Cranberry Township, PA
Senior Member
SL Member
Joined: Jun 2008
Posts: 1,285
From: Delaware
Yea, my wife loves my sub and something heavy like 50cent or ludacris. Little thump in the trunk leads to a little bump in the front...
Sent from my Droid using Tapatalk
Sent from my Droid using Tapatalk

Joined: Mar 2007
Posts: 16,638
From: Parsippany, NJ
Thread Starter
Senior Member
SL Member
Joined: Sep 2009
Posts: 116
From: Atlanta, GA
Looks very good, though I HIGHLY recommend you add the inline fuse to the power wire. You need a fuse near the battery just in case something shorts out near it. The fuse in the amp is only for protecting your amp. That fuse near the battery can prevent your car from burning up.
The added "advantage" is that my GF totally digs having the woofer under her seat
Senior Member
SL Member
Joined: Jun 2008
Posts: 237
From: TN
You know, I was initially only concerned with protecting my amp from the vehicle electrical system and vice versa which the built in amplifier fuse and included overload circuit protection provided. The fact that the power wire could possibly short out someplace between the battery and the amp hadn't even occurred to me. Thanks for pointing that out. I'll be installing TRD springs soon so I'll have all the wiper hardware out again (for the 3rd time....) and I'll put the kicker fuse someplace on the firewall. Should I provide any additional moisture protection to the fuse? I was thinking I might need to add some heat shrink to each end of the inline fuse where the wire attaches.
Still a really nice and clean looking install, very nicely done!


Administrator

SL Member
Administrator
Joined: Dec 2007
Posts: 2,583
From: State of Confusion: CA
DIY guides for xDs do exist like this one. There are some members with cars that are 7 years old or less and can use this information.
SL is the Largest Scion Library Resource on the Internet. As We Speak, hundreds of Members and Guests are perusing and mining it's Past Threads just for this type of information.
Information contain is Timeless. The basic tips outline in this OP's DIY can be use by xB, xB2, tC, tC2 and other owners to gather useful information on whether they want to tackle
a Project like this and Save some $$. Threads can be made Stickys at any time to Inform people regardless to age of content.
Not everyone is as astute and knowledgeable about car electronics and audio installations as you portend to be. That's Why this Thread has over 39,000 views!
Knowledge is Power. And because People want to Know
Administrator
____________
Last edited by MR_LUV; Apr 6, 2020 at 07:51 PM.

Junior Member
Joined: Sep 2023
Posts: 1
From: Earth at the moment.
As I read through this, I got to say this is the most ridiculously.. perfect walk-through, especially being something that takes a little bit of technical know-how to do, that I have ever seen in my life. I have no doubt that anybody, even if they have zero experience and/or knowledge of any part of this process, that if they were intending to do the exact same thing you did.. I don't see any way that anybody could fail. Very well done! I don't know what you're day job is, but you can probably make a good living writing brilliant manuals or giving DIY instructions..or setting up your own YouTube channel because, I would absolutely subscribe. I'm tossing around ideas in putting a system in my car, 2010 tC, and I was, ya know.. I've never done this before, I never really paid attention or read anything about it or tried to learn about the best way to do that but after reading what you wrote I have 100% absolutely confidence in doing the whole install myself. Granted, I would have gotten through it, but.. not with the confidence I have now. Like.. I have no doubt..ZERO..that I'm going to screw anything up! Although I'm not doing the same setup you did.. well, not exactly.. I actually didn't really intend on putting anything specifically and directly under the seats themselves, but you inspired me. I think I plan on putting some Subwooferage under all 4 seats. (hell yeah that's a real word.. 🤣 I just added it to my dictionary so..boom!). And why under all four seats? ..cuz why? Because I want to make sure everyone gets a proper an "Australian Giggle!" ... And how do they get that mate? They get it from a very friendly .. tickle from down under...and hey, who does not like a booty massage right? Right! Yep, there we go.. Perfetto! Magnifico! 😚🤌🏻.. ciaoooo!! oh, I know I talk a lot 😆 I've heard that from literally everybody I know. 😆
brain never shuts off.. so, at times I have to force myself to stop talking.. like I'm going to do right now .. and hit that little button.... 😱🫣..💥💨🕳️✌🏻
brain never shuts off.. so, at times I have to force myself to stop talking.. like I'm going to do right now .. and hit that little button.... 😱🫣..💥💨🕳️✌🏻
Last edited by iCNoSpdLmtScionTheRd; Sep 22, 2023 at 10:06 AM.

Thread
Thread Starter
Forum
Replies
Last Post
crush02342002
Scion tC 1G Forced Induction
158
Oct 31, 2017 05:15 AM
x_Batman_x
Scion tC 1G Aero & Exterior
18
Jul 7, 2011 12:31 AM