
Pics of where you ran your power wire?

Thread Starter
Member
SL Member
Joined: Mar 2009
Posts: 66
From: United States
Can someone post pics of where you ran power wire through the firewall?
I am ready to order a system for my XD but want to find out how hard it will be to get the power wire ran.
Thanks for any replies.
I am ready to order a system for my XD but want to find out how hard it will be to get the power wire ran.
Thanks for any replies.

Senior Member
SL Member
Joined: Oct 2004
Posts: 128
From: Irvine, CA
Originally Posted by ScionXD08
Can someone post pics of where you ran power wire through the firewall?
I am ready to order a system for my XD but want to find out how hard it will be to get the power wire ran.
Thanks for any replies.
I am ready to order a system for my XD but want to find out how hard it will be to get the power wire ran.
Thanks for any replies.
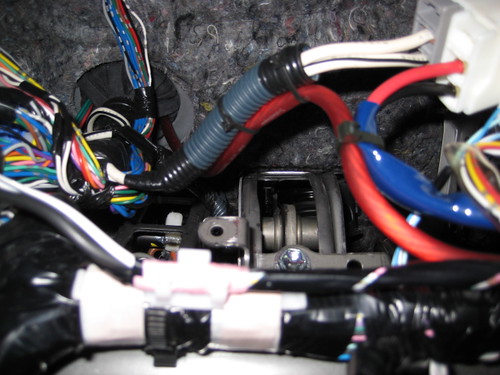
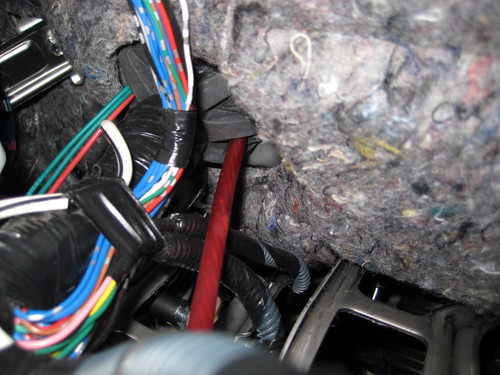
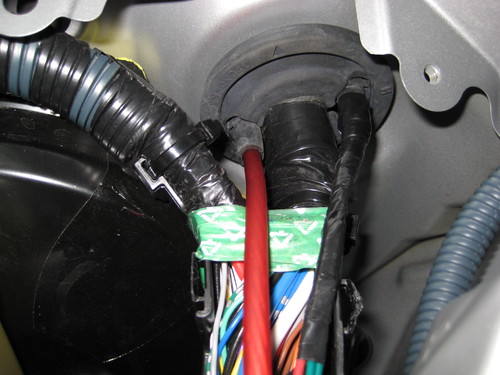
http://www.flickr.com/photos/deanspictures/2221138733/
http://www.flickr.com/photos/deanspictures/2221930340/
http://www.flickr.com/photos/deanspictures/2221929640/

Senior Member
SL Member
Joined: Oct 2004
Posts: 128
From: Irvine, CA
Originally Posted by mcbrew
Just put bracketIMGbracket before the URL for the pic, then bracket/IMGbracket after the URL. By bracket, I mean [ and ].
Thread Starter
Member
SL Member
Joined: Mar 2009
Posts: 66
From: United States
Thanks for the reply... What size power wire was that?
Any suggestions on how to take the dash top off? What steps did you take?
Thanks again, that gives me a good idea of what its going to take.
Any suggestions on how to take the dash top off? What steps did you take?
Thanks again, that gives me a good idea of what its going to take.

Senior Member

SL Member
Joined: Jun 2008
Posts: 1,285
From: Delaware
i know there was a post quite a ways back on the dash/wiper cowl removal (i know cause its what i looked at to do mine), i think either Andy or zefoxe did the post. from what i remember; the radio bezel/waterfall comes off. then the trim around the gage pod pops out, two wiring harnesses behind it-unplug them. the a pillars are tricky. pull them away just enough that they're about an inch away, then reach behind with a pair of pliers that you find will reach, i had some long handled bent tipped needle nose pliers. there's these little clips behind the panel that you have to rotate 90 degrees to get the panel off, be careful or you will break them. pull out the lower glove compt-remove it. theres....this is gonna take to long, ill just find the damn link for you.....
here, use this- prof. tmrepp will explain all. some one should do a formal removal/install with pics and sticky it.
https://www.scionlife.com/forums/vie...047&highlight=
hope that helps. when uncertain, unplug the battery and and just start taking things apart. its the best way to learn. maybe if it doesn't rain this weekend ill do a step by step with pics.
Thread Starter
Member
SL Member
Joined: Mar 2009
Posts: 66
From: United States
Is it as much work as it sounds like?
Another member in a different post said something about a grommet on the passenger side that he put his power wire through in under 10 minutes. Anyone know where that would be or have pics? I planned to mount the amp under the passenger seat so running it on the passenger side would probably be the best choice for me. Also sub will be on passenger side as well.
Thanks for the help!!
Senior Member
SL Member
Joined: Oct 2004
Posts: 128
From: Irvine, CA
Originally Posted by ScionXD08
Is it as much work as it sounds like?
Another member in a different post said something about a grommet on the passenger side that he put his power wire through in under 10 minutes. Anyone know where that would be or have pics? I planned to mount the amp under the passenger seat so running it on the passenger side would probably be the best choice for me. Also sub will be on passenger side as well.
Thanks for the help!!
Another member in a different post said something about a grommet on the passenger side that he put his power wire through in under 10 minutes. Anyone know where that would be or have pics? I planned to mount the amp under the passenger seat so running it on the passenger side would probably be the best choice for me. Also sub will be on passenger side as well.
Thanks for the help!!
Pull the radio out with the 4 screws, then you will also see two smaller screws attaching the dash when the radio is removed. One on each side of the opening where the radio is. Remove those. Now remove the meter assembly by pulling the bezel off, disconnecting the two wire connectors, and removing two screws. The meter just snaps out. Now, remove the glove box. After you remove the glove box, you will see a yellow airbag connector. It is spring loaded for locking, just disconnect it and NOTE how it is routed down in the dash. You will need to know this when reinstalling the top of the dash. Now there are two bolts locking the passenger airbag onto the center pipe support. One in the front, just behind the glove box on right, and one on the left in the back. You may need an extension to get to it. I think they were 12MM. Take the bolts out. Now just pull up the dash on the left and right sides where the outer vents are. There is also a clip just above where the knockout for the push button start would be. After you pop the dash up on the front, pull up and back towards you to unlatch it from the defroster vent. That's it.
You now have full access to under the dash. Now, when reinstalling, please note that the front of the dash where the windshild and defroster are, has hooks. These hooks need to lock into the defroster and metal from around the windshield. You'll see it when you remove the dash. The key is to get these hooks under the metal frame and defroster vent when reinstalling. When I first did this, I didn't see that and the hooks were on top of the frame and defroster, which caused the top of the dash to be raised at the windshield. When reinstalling, just push down at the front of the dash while pushing it forward. This will lock it down.
I ran my amp wire from the drivers side, accross the metal support tube under the dash, and then down the right side to under the passenger seat. I removed the passenger seat as well. You'll need an E10 reverse torx socket to remove the seat, you can get one at Sears. If you click on my original link above, you can look in my album and see a lot more pictures of what I did.
Good luck!
Senior Member
Scikotics
SL Member
Joined: Apr 2007
Posts: 1,643
From: Clearwater, FL
... just drill a new hole... there is a part of the insulation under the carpet that it already cut out where you are ment to drill holes.... 3/4" for 0awg... make sure to use a grommet!

Senior Member
Scikotics
SL Member
Joined: Jul 2008
Posts: 304
From: Jacksonville, FL
Luci thats what I did, and I told someone that in another post and was flamed for it...
"Drilling holes is the wrong thing to do!!"
Besides, I've got 0awg in mine too and there's no way its going thru that middle grommet.
"Drilling holes is the wrong thing to do!!"
Besides, I've got 0awg in mine too and there's no way its going thru that middle grommet.

Thread Starter
Member
SL Member
Joined: Mar 2009
Posts: 66
From: United States
I've drilled through firewalls on cars before, but they were old cars, and really modified anyway so I didn't care. Since this is new I wanted to avoid drilling a hole. Plus I didn't want it to mess with my warranty. I only need 4-8 awg so nothing big.
I ordered the sub and amp, got it here. I have to find a used factory upgrade radio for cheap that has the RCA outputs on the back before I can install it. I plan to put components in the doors as well. Should sound pretty good. Nothing huge.
I ordered the sub and amp, got it here. I have to find a used factory upgrade radio for cheap that has the RCA outputs on the back before I can install it. I plan to put components in the doors as well. Should sound pretty good. Nothing huge.
Senior Member
Scikotics
SL Member
Joined: Apr 2007
Posts: 1,643
From: Clearwater, FL
drilling a hole will not effect your warranty anymore then the stereo would... how would a hole in your firewall cause a problem to the car? only way it would, would be if you dont use a grommet or a fuse and burn down your car... in which case you are at fault anyway....

Thread Starter
Member
SL Member
Joined: Mar 2009
Posts: 66
From: United States
I guess its more of a preference than anything. Like I said I drilled in my old car with 0awg, and never had a problem in probably 6 years of having a stereo in it.
The dealership I go to are pretty much a-holes so I don't really want to give them a reason to say the warranty isn't effective. They have given me problems in the past. I am going to get it in writing that the stereo won't affect the warranty before I install it though, so I should be fine.
Thanks for the tips guys.
Senior Member
Scikotics
SL Member
Joined: Jul 2008
Posts: 304
From: Jacksonville, FL
Originally Posted by ScionXD08
The dealership I go to are pretty much a-holes so I don't really want to give them a reason to say the warranty isn't effective. They have given me problems in the past. I am going to get it in writing that the stereo won't affect the warranty before I install it though, so I should be fine.
Magnuson-Moss Warranty Act
This is a subject thats been brought up a hundred million times on this forum and MANY others. If you don't know anything about it, the you need to. Its there so that you don't get jerked around by your dealer. That way they can't say things like a stereo will void your warranty.
Thread Starter
Member
SL Member
Joined: Mar 2009
Posts: 66
From: United States
Cool I didn't know about that. Probably a good thing to know about.
Yeah, I have had some problems in the past. My 2005 XB had the vsc and traction control light come on for no reason. I took it in and they said they had to charge me $40-50 to hook it up to the scan... even though it was under bumper to bumper warranty. Then nothing was wrong. I complained and they told me nothing was wrong with it so nothing was covered under the warranty, and I had to pay the money to find out if there was something wrong. But if there was, it would have been covered under warranty. Pretty stupid.
I also had some problems with the radio not ejecting cds on the XB... they said that the radio would have to be sent out, repaired, then go with a big hole in the dash till it was repaired and sent back, then reinstalled. Which would probably have taken a few weeks... They wouldn't just put a new radio in it... So I don't like to give them any chances.

Senior Member
SL Member
Joined: Jan 2006
Posts: 2,338
From: San Diego (Mira Mesa), CA
Originally Posted by Luc1f3r
how would a hole in your firewall cause a problem to the car?
Shouldn't be a problem on Scion's, but it's always good to research before drilling.


Thread
Thread Starter
Forum
Replies
Last Post
SkillFreeJake
Scion tC 2G Aero & Exterior
17
Jul 27, 2015 12:34 AM
TheSilencerTC
Scion tC 2G ICE & Interior
4
Feb 24, 2015 04:56 PM
Green_rino
Scion FR-S ICE & Interior
1
Jan 20, 2015 01:41 AM
randode
Scion xA/xB 1st-Gen ICE & Interior
44
Jun 29, 2004 04:19 PM