
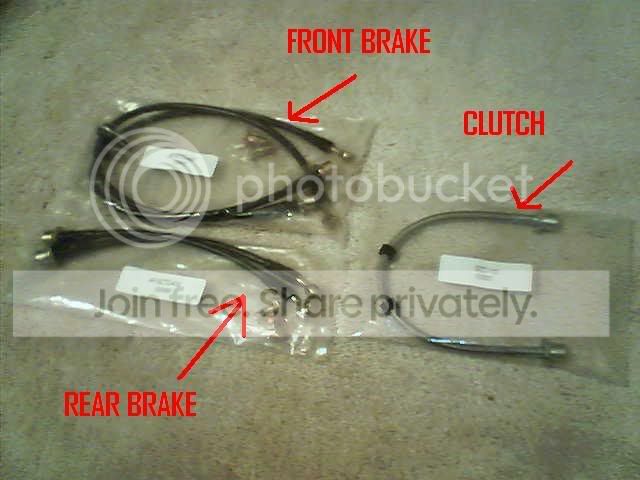
Stainless Steel Brake / Clutch Line Install


Thread Starter
Senior Member
SL Member
Joined: Jul 2006
Posts: 2,338
From: Central Maryland
Ok, well, as I stated in another thread...the DIY does not have too many pictures simply because it was drizzling outside and I wanted to hurry and get it all done.
But, the one thing I can say is that SS brake lines give you a more firm pedal feel as well as a little less effort upon stopping. The clutch line takes away any sponginess that you may have had and make the pedal feel very precise.
My little cheat was my brake pressure bleeder but this can be done without one as well. Whatever way you bleed your brakes normally, you can do that instead.
Things you need:
-Sockets (12mm, 14mm, wheel lug socket..too many different sizes to name for different setups so whatever your lug nut size is)
-ratchet
-Flat head screw driver...doesn't matter size but long shank is easier for leverage
-8mm open ended wrench
-brake fluid (your choice)
-jack and jack stands
-bucket
WARNING: DO NOT ATTEMPT DOING THIS IF YOU HAVE NO AUTOMOTIVE KNOWLEDGE OR DO NOT HAVE SOMEONE AROUND WITH THE KNOWLEDGE. ANY DAMAGE TO YOUR BRAKE SYSTEM IS VERY COSTLY AND COULD CAUSE SERIOUS INJURY.
***Note: It's easiest to start with the back right tire first if you don't have a pressure bleeder so you can bleed the line when the tire is already off.
Step 1: Loosen lug nuts on the wheel you are working on
Step 2: Lift vehicle and place on jack stands. You can do this whatever way you feel comfortable (front first, back first, one tire up.....doesn't matter). Just make sure you use jack stands for safety.
Step 3: Remove tire and place aside
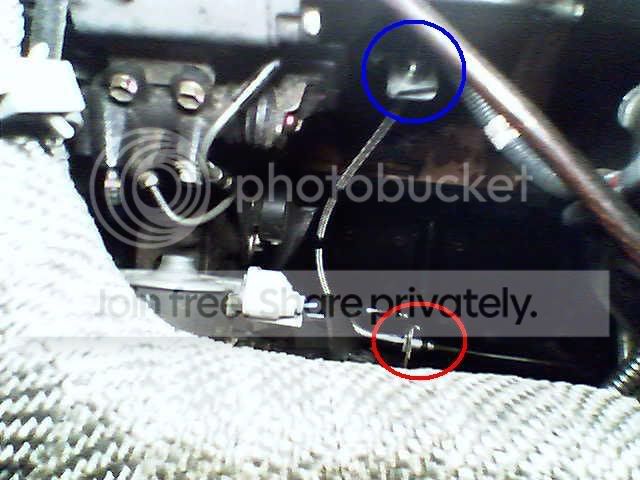
Step 4: Locate feed line for brake hose. You will see a little threaded piece that requires the 8mm open ended wrench to loosen. Break it free a few twists. **Feed line is Red circle...picture is of rear line
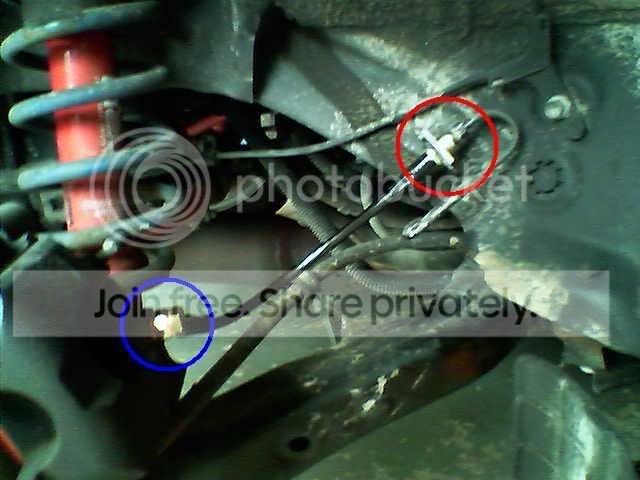
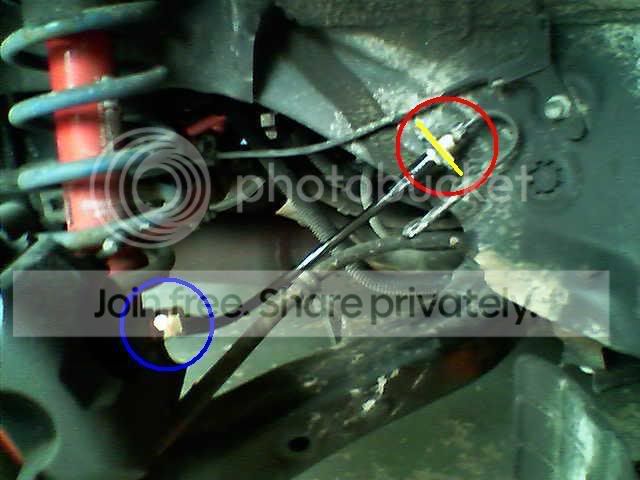
Step 5: There will be a flat wedge clip holding the head of the brake hose in place. This wedge piece needs to be taken off and this is where I used a flat head screw driver. Just slowly pry it away from the hose and it'll come off. **Wedge clip is in Red circle colored in Yellow
Step 6: Position your bucket under the brake assembly. Using your 14mm socket and ratchet, locate the other end of the brake hose (rubber hose to caliper) and you will find the bolt holding it onto the caliper. Loosen that bolt and you will have some fluid pour out.
**14mm bolt is in blue circle in above pictures located against caliper backing
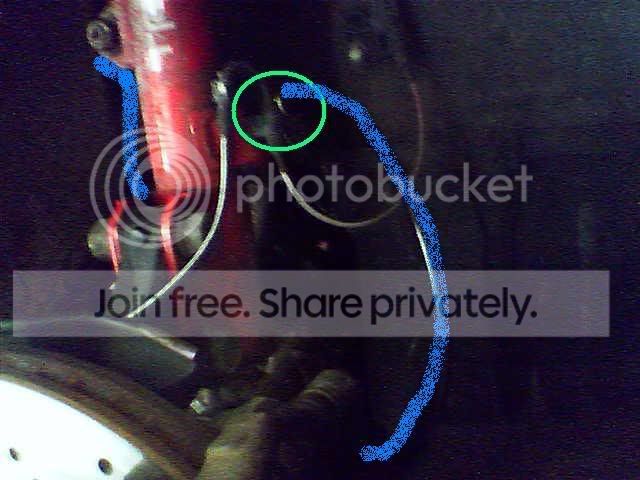
Step 6a: This is for the front brake...On the strut tower you will not there is a clip holding the brake line up. This requires a 12mm socket to simply remove the bolt. When new line is installed, reinstall 12mm bolt to support line against strut tower.
**Bolt will be in area highlighted with Green circle and stainless steel line is Blue
Step 7: Thread feed line end first to new line with only a few twists to make sure the threads catch.
**Red circle in above pics highlights feed line.
Step 8: Wedge the metal flat wedge back into place to support the brake line head.
Step 9: Tighten 8mm thread from feed line hand tight and then about another 1/4-1/2 turn....just be careful b/c it's fine thread. Once you think it's pretty tight, you're ok to move on.
Step 10: New lines will come with new banjo bolt and copper washers. Place one washer on the bolt, feed bolt through brake hose head, place 2nd washer on bottom of bolt and attach to caliper. The copper washers are meant to be crush washers b/c of the soft metal so when you tighten that 14mm bolt, make sure that after it seats you give it a little more twist to feel the washer compress.
**Blue circle highlights banjo bolt location
Step 11: Clean up all brake fluid that may have pour out using rags.
Step 12: Bleed brake line. ---> Conventional method: http://clubsciontc.com/forum_thread_...-bleeding.html
Step 13: Put the wheel back on and tighten lug nuts to spec...usually 93-95 ft/lbs each.
That's it for the brake lines.
Clutch line install
Tools needed:
-flat head screw driver
-8mm open ended wrench
-bucket
-brake fluid
Step 1: Locate feed line for clutch line and loosen 8mm thread a few twists. **Red circle
Step 2: Using screw driver, remove flat wedge as performed in Step 5 of brake line install.
Step 3: Locate other end of rubber clutch line and repeat Step 1. **Blue circle
Step 4: Thread feed line end into new line until threads catch and replace wedge clip.
Step 5: Repeat Step 4 for other end of hose.
Step 6: Tighten threads until the seat and another 1/4 turn.
Step 7: Bleed clutch line via the slave cylinder bleeder screw (this is tricky though b/c I only have done it with my pressure bleeder). Extra information may be needed for this step if performing bleed without pressure bleeder
Ta da
But, the one thing I can say is that SS brake lines give you a more firm pedal feel as well as a little less effort upon stopping. The clutch line takes away any sponginess that you may have had and make the pedal feel very precise.
My little cheat was my brake pressure bleeder but this can be done without one as well. Whatever way you bleed your brakes normally, you can do that instead.
Things you need:
-Sockets (12mm, 14mm, wheel lug socket..too many different sizes to name for different setups so whatever your lug nut size is)
-ratchet
-Flat head screw driver...doesn't matter size but long shank is easier for leverage
-8mm open ended wrench
-brake fluid (your choice)
-jack and jack stands
-bucket
WARNING: DO NOT ATTEMPT DOING THIS IF YOU HAVE NO AUTOMOTIVE KNOWLEDGE OR DO NOT HAVE SOMEONE AROUND WITH THE KNOWLEDGE. ANY DAMAGE TO YOUR BRAKE SYSTEM IS VERY COSTLY AND COULD CAUSE SERIOUS INJURY.
***Note: It's easiest to start with the back right tire first if you don't have a pressure bleeder so you can bleed the line when the tire is already off.
Step 1: Loosen lug nuts on the wheel you are working on
Step 2: Lift vehicle and place on jack stands. You can do this whatever way you feel comfortable (front first, back first, one tire up.....doesn't matter). Just make sure you use jack stands for safety.
Step 3: Remove tire and place aside
Step 4: Locate feed line for brake hose. You will see a little threaded piece that requires the 8mm open ended wrench to loosen. Break it free a few twists. **Feed line is Red circle...picture is of rear line
Step 5: There will be a flat wedge clip holding the head of the brake hose in place. This wedge piece needs to be taken off and this is where I used a flat head screw driver. Just slowly pry it away from the hose and it'll come off. **Wedge clip is in Red circle colored in Yellow
Step 6: Position your bucket under the brake assembly. Using your 14mm socket and ratchet, locate the other end of the brake hose (rubber hose to caliper) and you will find the bolt holding it onto the caliper. Loosen that bolt and you will have some fluid pour out.
**14mm bolt is in blue circle in above pictures located against caliper backing
Step 6a: This is for the front brake...On the strut tower you will not there is a clip holding the brake line up. This requires a 12mm socket to simply remove the bolt. When new line is installed, reinstall 12mm bolt to support line against strut tower.
**Bolt will be in area highlighted with Green circle and stainless steel line is Blue
Step 7: Thread feed line end first to new line with only a few twists to make sure the threads catch.
**Red circle in above pics highlights feed line.
Step 8: Wedge the metal flat wedge back into place to support the brake line head.
Step 9: Tighten 8mm thread from feed line hand tight and then about another 1/4-1/2 turn....just be careful b/c it's fine thread. Once you think it's pretty tight, you're ok to move on.
Step 10: New lines will come with new banjo bolt and copper washers. Place one washer on the bolt, feed bolt through brake hose head, place 2nd washer on bottom of bolt and attach to caliper. The copper washers are meant to be crush washers b/c of the soft metal so when you tighten that 14mm bolt, make sure that after it seats you give it a little more twist to feel the washer compress.
**Blue circle highlights banjo bolt location
Step 11: Clean up all brake fluid that may have pour out using rags.
Step 12: Bleed brake line. ---> Conventional method: http://clubsciontc.com/forum_thread_...-bleeding.html
Step 13: Put the wheel back on and tighten lug nuts to spec...usually 93-95 ft/lbs each.
That's it for the brake lines.
Clutch line install
Tools needed:
-flat head screw driver
-8mm open ended wrench
-bucket
-brake fluid
Step 1: Locate feed line for clutch line and loosen 8mm thread a few twists. **Red circle
Step 2: Using screw driver, remove flat wedge as performed in Step 5 of brake line install.
Step 3: Locate other end of rubber clutch line and repeat Step 1. **Blue circle
Step 4: Thread feed line end into new line until threads catch and replace wedge clip.
Step 5: Repeat Step 4 for other end of hose.
Step 6: Tighten threads until the seat and another 1/4 turn.
Step 7: Bleed clutch line via the slave cylinder bleeder screw (this is tricky though b/c I only have done it with my pressure bleeder). Extra information may be needed for this step if performing bleed without pressure bleeder
Ta da


so tried changing my brake line today, the 8mm doesnt fit the nut on the brake feed line (step 5). I used an open ended 10mm wrench and it fits a bit loose as i turn it got strip, that nut is kinda soft.. anyone had problem removing that part? should i use a 12pt open wrench?
I looked up the SST 09023–00101 tool on the repair manual and it is actually 10mm,
http://toyota.spx.com/detail.aspx?id=645&g=7
I looked up the SST 09023–00101 tool on the repair manual and it is actually 10mm,
http://toyota.spx.com/detail.aspx?id=645&g=7

Thread
Thread Starter
Forum
Replies
Last Post
NonStopTuning
Exclusive Sponsored Sales
3
Jun 29, 2015 07:42 PM
ERZperformance
Exclusive Sponsored Sales
16
May 13, 2015 11:36 PM