
Interior LED / Cathode Install


Thread Starter
Senior Member
SL Member
Team ScioNRG
Joined: Feb 2004
Posts: 2,140
From: Elmira, NY
Here's my try at a how to.
Thanks to CorollasBest for hosting the pics. (Images moved to scionlife.com)
This worked for me, it may not work for you. If you use my story as a how-to do so at your own risk. Consult your local laws before adding any lights to your car, as almost any mod is illegal if it can be seen outside of the car. This was done in an xB, so it has some specifics to that model. They are in dark blue.
Please reply with anything you find unclear and I'll update it.
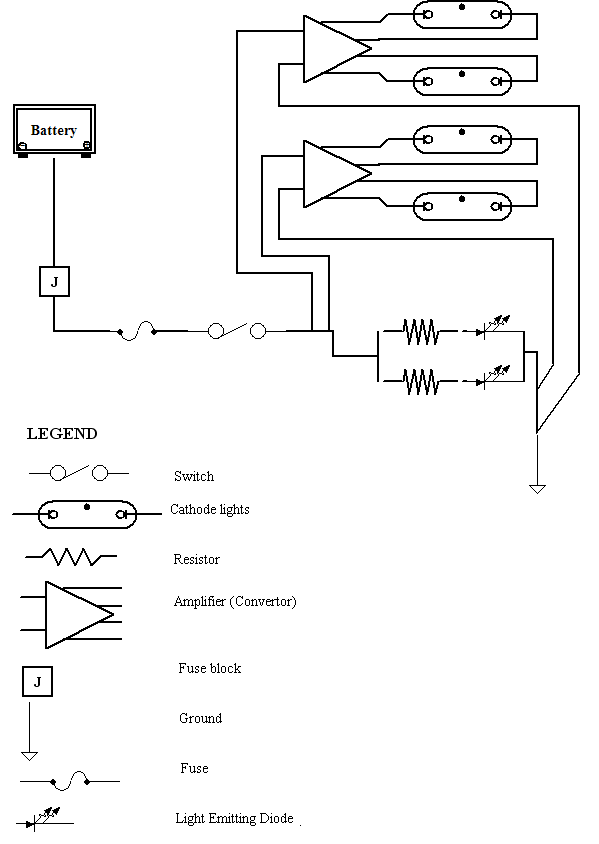
Here's a pic of most of what's on the lists of what you need and a schematic of the end results.


Parts List
LEDs
Wire: 14 gauge or higher is fine. Picked mine up from Lowes.
Connectors: You can use what I have pictured, wire nuts or solder.
Switch: I used an illuminated switch from Radio Shack. Any 12v switch rated at 15amps or higher is fine. P/N 275-712.
Fuse holder: Radio Shack again. P/N 270-1213.
Fuse: Normal sized automotive fuse. I used 15 amp.
LEDs: Get yours online. I picked mine up from Radio Shack and am not happy with them. P/N 276-085 (x2).
Zip ties.
Note: If you get your LED's online, they might not be rated at 12volts. Which means you'll need to put a resistor on the power side right before the LED. You might also need an LED holder if the LED doesn't come with one. The Radio Shack LEDs had a 1/4 watt 680 ohm resistor built in. Consult someone with what resistor your LED might need or try these sites: http://www.bit-tech.net/article/68 http://ledsupply.com/reca.html
Keep in mind that your 12V car is pushing almost 14 volts. I use 13.5 for my calculations. Almost all sites you buy LEDs from will have the numbers needed for the calculator.
Cathodes
If you decide to do the cathodes too, you'll need the following.
I bought three kits which contained a convertor and a 12" (300mm) tube. And added three more tubes. It's good to have extras, esp considering how cheap they are relative to the shipping.
I will mark the steps for cathodes with green text
Cold cathode kit: I bought mine from Xoxide.com. P/N CLK12BL (x2).
Extra bulbs: Again, from Xoxide.com. P/N CL12BL (x2).
Cable holders. These are the things you use to hold up your outdoor Christmas lights.
Tools
Note: If you want to solder your connections you'll need an iron, flux and solder. If you like wire nuts, you'll need wire nuts.
Drill and drill bits (sizes depend on the size of your LED holders and screws.)
Wire coat hanger.
Wire cutters.
Philips head screw driver.
Pliers.
Scissors.
Tester. I like the kind pictured above. Bright light is good.
Electrical tape.
Something to measure with. I used the package that the LEDs came in to ensure symmetry. You might want something more traditional.
Remove the center console: xB's have one screw under the carpet in the rear cup holder and the front pops out, pull straight up. I have a 5-spd, so I was able to reach under the console and gently push the tabs up and in to disengage them from the console in order to remove the boot from the console. Be careful, I've broken two of these tabs in my exploits.


Remove the bottom skirt under the radio: Pull the left side straight back and the right side straight out. Gently. Again, tabs WILL break here if you're not careful and lucky.
Remove the cover for the fuse box: This is the little cubby left of the steering wheel near the bottom of the dash. To avoid damage to the cubby and yourself (see bottom picture), push straight up from the backside on the rear of the cubby. If you push it straight out it'll fly and poke an eye out, plus might break a tab.
Note: All these type terminators use a crimp connection to hold them. Strip the wire about 3/16ths of an inch from the end, put the terminator on the end and crimp it using the proper crimp setting. The wire cutters I use have color codes, just like the terminator. So if you're using 14gadge wire and blue terminators, use the blue crimp setting. (The crimpers are in the front end, right behind the cutter).
Find the tap you want to use. I used one that's powered all the time. By using the tester and playing around with the key position, you should be able to find one that turns on with the accessories, or whatever you want.
Route power wire. Run a wire from the consol, up through the dash to the area of the fuse block.

Terminate with a tap prong. I made up that word. What I did was use a horseshoe terminator and cut off one side (see pic). If you do this you need to make sure it's not going to touch the other side of the fuse holder. Otherwise you might wake up to a dead battery, or worse.

Don't plug it in yet. We'll get to that later. You don't want to fry a harness.
Note: In the next section you'll see I put an inline fuse on the power. It would be better to have that right at the fuse block. The closer to the source the better, as it will catch more potential shorts.
Fuse it up. Put a fuse holder inline with the power (see pic).
Find a ground. I used the front screw that holds the e-brake down. Run a length of wire and put a horseshoe or a full circle terminator on it. Loosen (or remove) the screw, put the connector in it's place and tighten down the screw. I used this ground for the switch, the LED's and the cathodes so you can see in the pics later I have lots o' splices.
Make a load lead. So far we have the power to the switch and the ground. We need a run of wire that will power the LEDs after the switch.
Prepare three wires for switch. The switch I used had male connectors on it, so I terminated the power, the lead and the ground with female connectors (see pic).

Time to drill. Layout where you want your LEDs. Factory puts them on the back side facing forward, so that's what I did too. I had to pull back the padding. Take care not to rip it and it will go back on. Drill the holes using the size the LED holder says to.
Insert LEDs. Slip the LEDs in the holders through the holes and put the nut on from the backside. Tighten them down so they won't rattle. Cut the carpet so it will fit around the LEDs and reapply it.

Wire them up! You can see how I did mine in the pics. I spliced my power leads and grounds together, then attached quick connects at the end of a short run of wire. This is so I can easily remove the center console later. Put the opposite sex connectors on the power lead from the switch and one of the ground wires we made above.


Install the switch. Locate and drill a hole in the console that will fit the switch. Insert the switch, put the nut on and tighten it down. Make sure you know which connectors are for what. Attach the power, lead, and ground.

Test it. Make sure all connections are plugged in, make sure a fuse is in the fuse holder, and push the tap prong into the fuse block. Test the LEDs (you may need to turn your key on). Take a lunch break and try again if it doesn't work. If it did work, disconnect the prong and move to the next step.
Note: Skip ahead to the "button it up" section if you're not installing cathodes (wimp).
Cathodes - Front
Run more wire. You'll need power and ground to the convertor in front and power and ground to the convertor in the rear. I put my front convertor in the center piece, behind where the heating ducks are (see pic).. This was nice because I was able to attach both cathodes to one convertor without having to mess around with their wires. Splice into the lead (post switch) and the ground used for the LEDs and route them back to the front.
Attach the convertor. Cut the input wires on the convertor and attach them to the power and ground you just ran.

Mount the cathodes. Check out the pics to your left. This is how I mounted my front cathodes. In the close up, the clear piece of plastic represents your dash.
Measure and mock up the cathodes to figure our where you want to drill your holes. Take your time and do this right because you can see these holes and screws (this is how the factory did them too, I checked the LAVA).


The passenger side is tricky because the dash has ribbed reinforcements for her driving pleasure. This makes where you drill important because you need to be able to attach the cable holders.
Once you have located your holes, use a drill bit big enough so the screw strips easily, you want the cable holder to be your nut. This makes it easier to get the cable holder all the way tight to the backside of the dash.

So, you want the screw head on the outside and the cable holder on the inside of the dash.
Once they are in and tight, put the cathodes in place and zip tie them up, as illustrated in the pics to the left.


Plug everything in and test. See testing loop in above section.
Cathodes - Rear
Note: With cathodes, the shorter the wires from the converter to the cathodes the better. The way I wired mine up only allows about 1/3 brightness. I think I'm going to rewire for a convertor per seat, and put two cathodes under each seat since I bought extra. Still, the basics of these steps remain the same. Another thing is, these things put out many, many volts and near 0 amperage. But, it's still enough to let you know what the smell of napalm in the morning is if it's live and touches your skin.
Remove the jack cover and jack. Pull straight back on the cover and compress the jack.
Cut the seat. That's right. Feel around under the front seats from the back. Near the back you should feel some holes in the steel. These holes have rings through them that help keep the fabric on the seats. I found these rings, pinched the fabric and pulled it away from them, then slit the fabric slightly.
Mount the cathodes. Use the slits you just made to run a zip tie through the ring and zip tie the cathodes up. I ran my wires with the factory wires already there, so that determined the direction of my cathodes (see pics).

Run wires. This was a pain in the rear until I got my clothes hanger. Straighten one out and put a loop at one end. Tape the loop so it won't get hung up and fish the hanger through the factory holes, as shown in the pics to the left. Once you have it through, double your wires up - since you need a power and a ground, or tape them, and pull it back through. Now you have your wires run. Make sure you leave enough play so that the wires don't bind when you move the seat back and forth. Zip tie away.


Wire it up. Just like for the front cathodes you need to splice into the power lead (post switch) and the ground. Wire up the converters and the cathodes. Plug them in and have at it. I put the converter in the center console. It fit nicely next to the parking brake.


Mistake: I cut the cathode leads and spliced my wire into it so I could run one converter and run the wires back through the factory locations. This made my lights too dim.


Test. See test instructions in first section.
Button Up.
Make sure all your connections are taped off.
Double up and zip tie any loose wires.
Put every thing back together, making sure there are no wires sticking out.
Plug in the prong. Congrats on you new ticket magnet!


Thanks to CorollasBest for hosting the pics. (Images moved to scionlife.com)
This worked for me, it may not work for you. If you use my story as a how-to do so at your own risk. Consult your local laws before adding any lights to your car, as almost any mod is illegal if it can be seen outside of the car. This was done in an xB, so it has some specifics to that model. They are in dark blue.
Please reply with anything you find unclear and I'll update it.
Here's a pic of most of what's on the lists of what you need and a schematic of the end results.

Parts List
LEDs
Wire: 14 gauge or higher is fine. Picked mine up from Lowes.
Connectors: You can use what I have pictured, wire nuts or solder.
Switch: I used an illuminated switch from Radio Shack. Any 12v switch rated at 15amps or higher is fine. P/N 275-712.
Fuse holder: Radio Shack again. P/N 270-1213.
Fuse: Normal sized automotive fuse. I used 15 amp.
LEDs: Get yours online. I picked mine up from Radio Shack and am not happy with them. P/N 276-085 (x2).
Zip ties.
Note: If you get your LED's online, they might not be rated at 12volts. Which means you'll need to put a resistor on the power side right before the LED. You might also need an LED holder if the LED doesn't come with one. The Radio Shack LEDs had a 1/4 watt 680 ohm resistor built in. Consult someone with what resistor your LED might need or try these sites: http://www.bit-tech.net/article/68 http://ledsupply.com/reca.html
Keep in mind that your 12V car is pushing almost 14 volts. I use 13.5 for my calculations. Almost all sites you buy LEDs from will have the numbers needed for the calculator.
Cathodes
If you decide to do the cathodes too, you'll need the following.
I bought three kits which contained a convertor and a 12" (300mm) tube. And added three more tubes. It's good to have extras, esp considering how cheap they are relative to the shipping.
I will mark the steps for cathodes with green text
Cold cathode kit: I bought mine from Xoxide.com. P/N CLK12BL (x2).
Extra bulbs: Again, from Xoxide.com. P/N CL12BL (x2).
Cable holders. These are the things you use to hold up your outdoor Christmas lights.
Tools
Note: If you want to solder your connections you'll need an iron, flux and solder. If you like wire nuts, you'll need wire nuts.
Drill and drill bits (sizes depend on the size of your LED holders and screws.)
Wire coat hanger.
Wire cutters.
Philips head screw driver.
Pliers.
Scissors.
Tester. I like the kind pictured above. Bright light is good.
Electrical tape.
Something to measure with. I used the package that the LEDs came in to ensure symmetry. You might want something more traditional.
Remove the center console: xB's have one screw under the carpet in the rear cup holder and the front pops out, pull straight up. I have a 5-spd, so I was able to reach under the console and gently push the tabs up and in to disengage them from the console in order to remove the boot from the console. Be careful, I've broken two of these tabs in my exploits.


Remove the bottom skirt under the radio: Pull the left side straight back and the right side straight out. Gently. Again, tabs WILL break here if you're not careful and lucky.
Remove the cover for the fuse box: This is the little cubby left of the steering wheel near the bottom of the dash. To avoid damage to the cubby and yourself (see bottom picture), push straight up from the backside on the rear of the cubby. If you push it straight out it'll fly and poke an eye out, plus might break a tab.
Note: All these type terminators use a crimp connection to hold them. Strip the wire about 3/16ths of an inch from the end, put the terminator on the end and crimp it using the proper crimp setting. The wire cutters I use have color codes, just like the terminator. So if you're using 14gadge wire and blue terminators, use the blue crimp setting. (The crimpers are in the front end, right behind the cutter).
Find the tap you want to use. I used one that's powered all the time. By using the tester and playing around with the key position, you should be able to find one that turns on with the accessories, or whatever you want.
Route power wire. Run a wire from the consol, up through the dash to the area of the fuse block.

Terminate with a tap prong. I made up that word. What I did was use a horseshoe terminator and cut off one side (see pic). If you do this you need to make sure it's not going to touch the other side of the fuse holder. Otherwise you might wake up to a dead battery, or worse.

Don't plug it in yet. We'll get to that later. You don't want to fry a harness.
Note: In the next section you'll see I put an inline fuse on the power. It would be better to have that right at the fuse block. The closer to the source the better, as it will catch more potential shorts.
Fuse it up. Put a fuse holder inline with the power (see pic).
Find a ground. I used the front screw that holds the e-brake down. Run a length of wire and put a horseshoe or a full circle terminator on it. Loosen (or remove) the screw, put the connector in it's place and tighten down the screw. I used this ground for the switch, the LED's and the cathodes so you can see in the pics later I have lots o' splices.
Make a load lead. So far we have the power to the switch and the ground. We need a run of wire that will power the LEDs after the switch.
Prepare three wires for switch. The switch I used had male connectors on it, so I terminated the power, the lead and the ground with female connectors (see pic).

Time to drill. Layout where you want your LEDs. Factory puts them on the back side facing forward, so that's what I did too. I had to pull back the padding. Take care not to rip it and it will go back on. Drill the holes using the size the LED holder says to.
Insert LEDs. Slip the LEDs in the holders through the holes and put the nut on from the backside. Tighten them down so they won't rattle. Cut the carpet so it will fit around the LEDs and reapply it.

Wire them up! You can see how I did mine in the pics. I spliced my power leads and grounds together, then attached quick connects at the end of a short run of wire. This is so I can easily remove the center console later. Put the opposite sex connectors on the power lead from the switch and one of the ground wires we made above.


Install the switch. Locate and drill a hole in the console that will fit the switch. Insert the switch, put the nut on and tighten it down. Make sure you know which connectors are for what. Attach the power, lead, and ground.

Test it. Make sure all connections are plugged in, make sure a fuse is in the fuse holder, and push the tap prong into the fuse block. Test the LEDs (you may need to turn your key on). Take a lunch break and try again if it doesn't work. If it did work, disconnect the prong and move to the next step.
Note: Skip ahead to the "button it up" section if you're not installing cathodes (wimp).
Cathodes - Front
Run more wire. You'll need power and ground to the convertor in front and power and ground to the convertor in the rear. I put my front convertor in the center piece, behind where the heating ducks are (see pic).. This was nice because I was able to attach both cathodes to one convertor without having to mess around with their wires. Splice into the lead (post switch) and the ground used for the LEDs and route them back to the front.
Attach the convertor. Cut the input wires on the convertor and attach them to the power and ground you just ran.

Mount the cathodes. Check out the pics to your left. This is how I mounted my front cathodes. In the close up, the clear piece of plastic represents your dash.
Measure and mock up the cathodes to figure our where you want to drill your holes. Take your time and do this right because you can see these holes and screws (this is how the factory did them too, I checked the LAVA).


The passenger side is tricky because the dash has ribbed reinforcements for her driving pleasure. This makes where you drill important because you need to be able to attach the cable holders.
Once you have located your holes, use a drill bit big enough so the screw strips easily, you want the cable holder to be your nut. This makes it easier to get the cable holder all the way tight to the backside of the dash.

So, you want the screw head on the outside and the cable holder on the inside of the dash.
Once they are in and tight, put the cathodes in place and zip tie them up, as illustrated in the pics to the left.


Plug everything in and test. See testing loop in above section.
Cathodes - Rear
Note: With cathodes, the shorter the wires from the converter to the cathodes the better. The way I wired mine up only allows about 1/3 brightness. I think I'm going to rewire for a convertor per seat, and put two cathodes under each seat since I bought extra. Still, the basics of these steps remain the same. Another thing is, these things put out many, many volts and near 0 amperage. But, it's still enough to let you know what the smell of napalm in the morning is if it's live and touches your skin.
Remove the jack cover and jack. Pull straight back on the cover and compress the jack.
Cut the seat. That's right. Feel around under the front seats from the back. Near the back you should feel some holes in the steel. These holes have rings through them that help keep the fabric on the seats. I found these rings, pinched the fabric and pulled it away from them, then slit the fabric slightly.
Mount the cathodes. Use the slits you just made to run a zip tie through the ring and zip tie the cathodes up. I ran my wires with the factory wires already there, so that determined the direction of my cathodes (see pics).

Run wires. This was a pain in the rear until I got my clothes hanger. Straighten one out and put a loop at one end. Tape the loop so it won't get hung up and fish the hanger through the factory holes, as shown in the pics to the left. Once you have it through, double your wires up - since you need a power and a ground, or tape them, and pull it back through. Now you have your wires run. Make sure you leave enough play so that the wires don't bind when you move the seat back and forth. Zip tie away.


Wire it up. Just like for the front cathodes you need to splice into the power lead (post switch) and the ground. Wire up the converters and the cathodes. Plug them in and have at it. I put the converter in the center console. It fit nicely next to the parking brake.


Mistake: I cut the cathode leads and spliced my wire into it so I could run one converter and run the wires back through the factory locations. This made my lights too dim.


Test. See test instructions in first section.
Button Up.
Make sure all your connections are taped off.
Double up and zip tie any loose wires.
Put every thing back together, making sure there are no wires sticking out.
Plug in the prong. Congrats on you new ticket magnet!


Senior Member
SL Member
Joined: Jun 2004
Posts: 104
From: Binghamton, NY
great write up there jere !!
when im ready to do some led's in my 05 i might hit ya up for some advice.
think the led's BENCHMARK sells would work ok for the cupholders ?
i'm in binghamton btw.
when im ready to do some led's in my 05 i might hit ya up for some advice.
think the led's BENCHMARK sells would work ok for the cupholders ?
i'm in binghamton btw.
Thread Starter
Senior Member
SL Member
Team ScioNRG
Joined: Feb 2004
Posts: 2,140
From: Elmira, NY
Sure. You're welcome to come up and I'll help put them in. Is there a Benchmark in Bing.? I've not been into ours in a while now. I'd bet they have LEDs that'll work. But, almost any will work so long as you get the right resistor.
I like your pic in the profile. Check out my WWW page, I've got a pic like that on there
I like your pic in the profile. Check out my WWW page, I've got a pic like that on there

Senior Member
SL Member

Joined: Nov 2003
Posts: 3,525
From: Orlando, Florida
Great job, superjeer! I moved it to the FAQ forum, as well as added it to the Tech section.
*deletes his own LED cupholder tutorial*
There are apparently markings to show where to drill the holes for the cupholders under the padding. They are used for the OEM LED cupholder install. Just FYI...
Also, I mounted my LED cupholder switch under the emergency brake, on the little panel. It is a little bit more discrete, in my opinion...

*stolen from the short shifter install*
*deletes his own LED cupholder tutorial*
There are apparently markings to show where to drill the holes for the cupholders under the padding. They are used for the OEM LED cupholder install. Just FYI...
Also, I mounted my LED cupholder switch under the emergency brake, on the little panel. It is a little bit more discrete, in my opinion...
*stolen from the short shifter install*


Junior Member
Joined: Oct 2004
Posts: 7
just did mine front only in red.
nice job, but I still broke off the right (pss dr) tab,but it's ok , looks like anther thing I can anchor to.
I will post photos in the future.
Thanx for your help. BTW I used cathodes.
The best deal is at coolerguys.com check it out I bought 2 dual red 12 " tubes for $6 or so. They come with all kinds of velcro and nylon ties, etc.
I'ma computer tweaker turned scion tweaker.

Senior Member
SL Member
Scinergy
Joined: Sep 2004
Posts: 123
From: Los Angeles, CA
Dino,
Look and ye shall find...
Told you I'd be on the lookout and looky what I found....
http://www.xoxide.com/cooler-master-aurora-purple.html
Only place I've found them so far....
...Jessica~
Look and ye shall find...
Told you I'd be on the lookout and looky what I found....
http://www.xoxide.com/cooler-master-aurora-purple.html
Only place I've found them so far....
...Jessica~

Senior Member
SL Member
Scion Evolution
Joined: Jun 2004
Posts: 301
From: ~~SEGL~~
Originally Posted by xA RS ChickLA
Told you I'd be on the lookout and looky what I found....
http://www.xoxide.com/cooler-master-aurora-purple.html
Only place I've found them so far.
http://www.xoxide.com/cooler-master-aurora-purple.html
Only place I've found them so far.

Member
Joined: Feb 2005
Posts: 37
From: Torrance, CA
i have been slowly adding cathodes all around my car, first learned how they worked and whatnot from here. I love Scionlife! Xoxide.com is by far the easiest plae i have found, $12.99 for a pair in the color of your choice. They also have all kinds of 12v DC stuff that you can hook up like LEDs and all kinds of fun stuff.
Thread Starter
Senior Member
SL Member
Team ScioNRG
Joined: Feb 2004
Posts: 2,140
From: Elmira, NY
Originally Posted by superjeer
Thanks for pointing out the broken image link. I've fixed the schematic picture link.


Senior Member
SL Member
Scion Evolution
Joined: Oct 2004
Posts: 286
From: Miami, FL
update: now i discovered that when i start the car with the switch OFF it blows the fuse. When i start the car with the switch ON everything is OK. I dont know whats going on?!?