
Another Dezod Kit! **UPDATES**


Thread Starter
Senior Member

SL Member
Team ScioNRG
Joined: Apr 2005
Posts: 4,113
From: Goldsboro, NC
**UPDATE 12/8/06**
Intercooler is mounted!!! Alot easier than i projected which is GREAT! I was stressing this part the most due to having to drill the crash bar. That's some pretty tough metal i must say but even so, the install was perfect and it was dead center and even every which way the very first time! Props to Paul and the gang!
Pics:


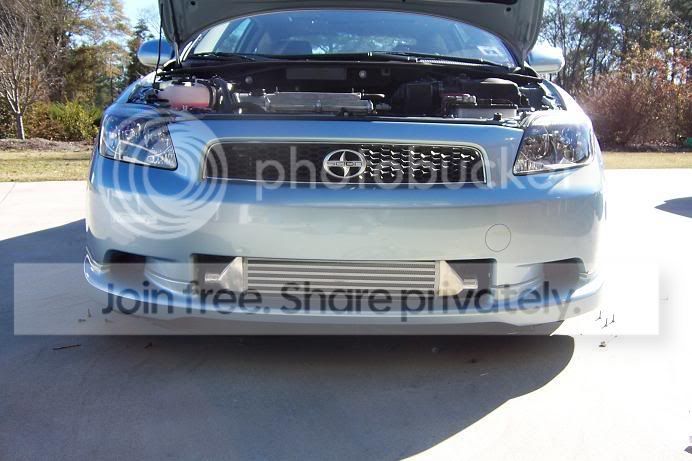


I even trimmed up the plastic crash absorber just so i wouldn't have to compromise my saftey

The only thing you must get rid of when the intercooler goes in is the 2 plastic shrouds under the front bumper. Wouldn't fit around the intercooler and they come off with 3-4 bolts bolts and a few clips. Again, simple.

Got an extra bung welded into the s-pipe for wideband but i think there may be a problem with clearance from feedback from other people running the kit. I eyed the position of the bung in relation to the stock secondary bung on the stock s-pipe but i'm not all too sure that the're in the exact same location. My hopes are high however.

Even mounted the emanage in the glove box. you see the PnP harness in there with it but only because i have no need to plug it in yet.

Well, now i've basically done everything i think i can do for now. Just waiting.........

Intercooler is mounted!!! Alot easier than i projected which is GREAT! I was stressing this part the most due to having to drill the crash bar. That's some pretty tough metal i must say but even so, the install was perfect and it was dead center and even every which way the very first time! Props to Paul and the gang!
Pics:
I even trimmed up the plastic crash absorber just so i wouldn't have to compromise my saftey
The only thing you must get rid of when the intercooler goes in is the 2 plastic shrouds under the front bumper. Wouldn't fit around the intercooler and they come off with 3-4 bolts bolts and a few clips. Again, simple.
Got an extra bung welded into the s-pipe for wideband but i think there may be a problem with clearance from feedback from other people running the kit. I eyed the position of the bung in relation to the stock secondary bung on the stock s-pipe but i'm not all too sure that the're in the exact same location. My hopes are high however.
Even mounted the emanage in the glove box. you see the PnP harness in there with it but only because i have no need to plug it in yet.
Well, now i've basically done everything i think i can do for now. Just waiting.........
Thread Starter
Senior Member
SL Member
Team ScioNRG
Joined: Apr 2005
Posts: 4,113
From: Goldsboro, NC
Originally Posted by Neversat
it'd be great if somone could post how they routed their vac lines, I didn't have that digram you are working off of with my wastegate, well at least I never saw it, so I've been trying out some of the different routings in my BC manual and I really don't think I have it right yet, I've gone from hitting close to 15 psi, to about 2 psi, on what is supposed to be an 8.7psi spring, this is with the BC off,
to me "vent to atmosphere" just means to leave it open,
I'm gonna try routing it the way you described and see what happens
to me "vent to atmosphere" just means to leave it open,
I'm gonna try routing it the way you described and see what happens
Thread Starter
Senior Member
SL Member
Team ScioNRG
Joined: Apr 2005
Posts: 4,113
From: Goldsboro, NC
/\/\
Here it is:
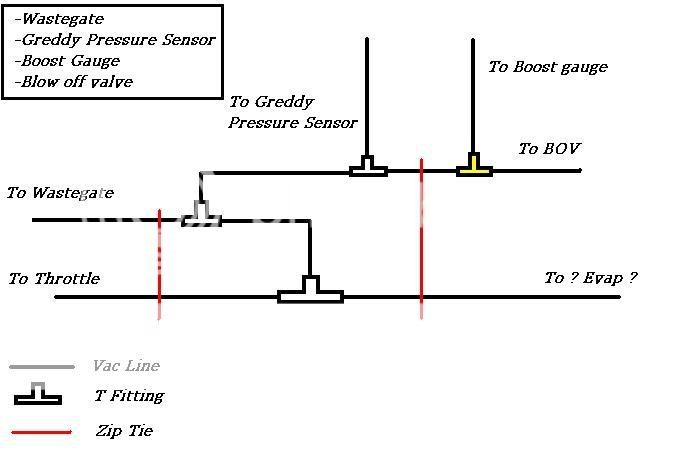
I have 4 things that need vac:
-Wastegate
-Greddy Pressure Sensor
-Boost Gauge
-BOV
I tried to prioritize these by importance. The more important ones recieving the clossed vac sources down the line. Most important of course being the wastegate followed by the GPS which will control fuel, then to my last T fitting that is a little special. My boost guage came with a special T-Fitting that has a check valve of sort that keeps the needle on the gauge very smooth and that portion has to coming out of the top of the fitting. The BOV is at the very bottom of my priority list because, well, face it, it's not something that's NEEDED. My focus here was to supply the wastegate and GPS with the best vac sources.
Here it is:
I have 4 things that need vac:
-Wastegate
-Greddy Pressure Sensor
-Boost Gauge
-BOV
I tried to prioritize these by importance. The more important ones recieving the clossed vac sources down the line. Most important of course being the wastegate followed by the GPS which will control fuel, then to my last T fitting that is a little special. My boost guage came with a special T-Fitting that has a check valve of sort that keeps the needle on the gauge very smooth and that portion has to coming out of the top of the fitting. The BOV is at the very bottom of my priority list because, well, face it, it's not something that's NEEDED. My focus here was to supply the wastegate and GPS with the best vac sources.

Senior Member
SL Member
Joined: Nov 2004
Posts: 1,305
Looking good!! You just finished the hardest thing to installing the kit, that was drilling holes!!! Everything from here on out is a breeze. I have a real easy tip to getting the oil pan off.
The brackets that are now being sent were updated to allow for a number of mounting options. Since I have the Kaminiari Kit the inlet are deeper, I only needed to do very minor trimming to the Kami kit to not hit the cooler.
The really great point to make here, this intercooler is good to 500 hp. The steel cross member of the car does not have to be cut, saving structual integrity and install time along with cost associated with removing it.
Props to Dezod and Kaminari designs, I am able to keep all the factory foam and mounts, not having to butcher the car to get your mods on.
Thread Starter
Senior Member
SL Member
Team ScioNRG
Joined: Apr 2005
Posts: 4,113
From: Goldsboro, NC
Originally Posted by ScottsdaleTC
Looking good!! You just finished the hardest thing to installing the kit, that was drilling holes!!! Everything from here on out is a breeze. I have a real easy tip to getting the oil pan off.
Only tip i've been given is razor blades
Senior Member
SL Member
Joined: Nov 2004
Posts: 1,305
Dont waste your time with the blades. The first tool you need to file the edges down to a narrower edge or sharper. This is the one you will use to wiggle your way in along the length of the oil pan.
The second tool you sharpen one side, this is the side that will go between the pan and the block. The other side needs to remain normal as this is the side your tapping with the hammer.
You want to use the second tool on the corner nearest the radiator. The reson for going for the corner as the pan is curved here, the pans ridged corners and bends will distibute pressure evenly across this side of the pan. If you go for the pan along a straight edge it is weaker and easily bent.
Take tool two and start to hammer it in between the pan and the block. Then use tool one to go along the straight edges cutting through the glue. Then go back two tool two and hit it a few more times gently easing it in more. (man did that sound so wrong ) then go back to tool one. Keep switching back and forth with each tool and the pan will come off. Mine was off in less than minutes. No bends or warping either.


The second tool you sharpen one side, this is the side that will go between the pan and the block. The other side needs to remain normal as this is the side your tapping with the hammer.
You want to use the second tool on the corner nearest the radiator. The reson for going for the corner as the pan is curved here, the pans ridged corners and bends will distibute pressure evenly across this side of the pan. If you go for the pan along a straight edge it is weaker and easily bent.
Take tool two and start to hammer it in between the pan and the block. Then use tool one to go along the straight edges cutting through the glue. Then go back two tool two and hit it a few more times gently easing it in more. (man did that sound so wrong

Senior Member
SL Member
Joined: Jan 2006
Posts: 584
Is removing the bottom plastic engine covers a specific thing that needs to be done to fit the Dezod FMIC? Does everyone that runs a FMIC in the tC have to ditch the plastic bottom engine covers? I've seen pictures of folks cutting/removing the crash-bar and cutting the bottom bumper vents (Treadstone's kit) -but this is the first time I've heard about the bottom engine-bay covers going away.
Thread Starter
Senior Member
SL Member
Team ScioNRG
Joined: Apr 2005
Posts: 4,113
From: Goldsboro, NC
Originally Posted by ERIC-TC
Is removing the bottom plastic engine covers a specific thing that needs to be done to fit the Dezod FMIC? Does everyone that runs a FMIC in the tC have to ditch the plastic bottom engine covers? I've seen pictures of folks cutting/removing the crash-bar and cutting the bottom bumper vents (Treadstone's kit) -but this is the first time I've heard about the bottom engine-bay covers going away.


Senior Member
SL Member
Joined: Jun 2006
Posts: 302
dude i dont wanna steal ur thread but dezod rocks man once u get it all done ur gonna love it, i wish i had videos because nobody believes u if u dont have videos, im in school and cannot afford a camera im struggling as it is, but i will just tell u that tn i beat a Bullit mustang with work was very close but i pulled on him, then a turbo honda hatchback, then a acura type s, a g35, 350z, still did not find a srt or sti or evo usually when u find one of those they are modded like crazy, im debating if i should buy a boost controlller and jack it up to 10 psi with a meth injection kit i wonder what that would yield if i made 261whp without all of it. i think ur gonna be very pleased i turned alot of heads tn they couldnt believe that i was a scion hahaha the bullit said u wanna race me??? i was like yeah i just got my injen intake and it feels really quick.

Senior Member
SL Member
Joined: Mar 2006
Posts: 214
ha its alll tru i was in bytas car, the kid with the mustang was like a scion wants to race me? then after we beat him he pulls into the lot and goes "oo man you got a monster turbo on that" it was pretty sweet i must say dezod owns the turbo world for scions at least
Senior Member
SL Member
Joined: Dec 2004
Posts: 2,912
From: Gilbert, AZ
Thanks to all for your support fellas!
I think there's going to be a LOT of dezod turbo tCs in the spring at the rate things are going. And I am still working on a full Dezod race weekend so I'll let everone know.
Boost is your friend. Lag is only a head start for the poor guy you're about to tool on.
I think there's going to be a LOT of dezod turbo tCs in the spring at the rate things are going. And I am still working on a full Dezod race weekend so I'll let everone know.
Boost is your friend. Lag is only a head start for the poor guy you're about to tool on.

Thread Starter
Senior Member
SL Member
Team ScioNRG
Joined: Apr 2005
Posts: 4,113
From: Goldsboro, NC
Originally Posted by freestyle789
the kid with the mustang was like a scion wants to race me? then after we beat him he pulls into the lot and goes "oo man you got a monster turbo on that" it was pretty sweet i must say dezod owns the turbo world for scions at least