
Ebay: a review.


With a header, you can use one of the manifold bolt holes to hang it with a metal hanger so you can paint it. Definitely wait the full 7 days...like I said...I didn't and had to go back and to it again(AND sand off the old paint that hadn't cured, but had melted/turned to goo). The heat is so much more intense on the header than the exhaust itself, 7 days seems about right if you do a fair amount of coats.
The can says to:
1) Run at idle for ten minutes, then cool for twenty
2) Run at idle for twenty minutes, and then cool for twenty
3) Run at normal operating conditions for thirty minutes, then let cool
Are you sure you guys actually followed that procedure? My observation is that most people are in a hurry and cut corners on that kind of thing.
Am I right in thinking the CEL eliminator attaches to the S-Pipe, not the header? Also, being an "L" shape, is there any instruction on how it should be oriented?

 !
! Thanks, I was guessing it would be in the S-Pipe and angled in the direction of the sensor harness.
Cool thread dude
!
Yeah, us I-4 cylinder bikers and car nuts only get one header. Except for those crazy boxer engine'd subies!
Thanks! Just trying to spread a little knowledge and bust a few myths :D
Oh, and if you don't have an intake....get the one I reviewed....it seriously sounds like a different car when you get on it. :D
Thanks! Just trying to spread a little knowledge and bust a few myths :D
Oh, and if you don't have an intake....get the one I reviewed....it seriously sounds like a different car when you get on it. :D

Member
Joined: Sep 2010
Posts: 20
well i have a 2010 corolla xrs so both of these mods will fit my car, i was looking for a review for ebay headers and intakes and finally found your thread. i also have the NST pulley kit ordered and i plan to install everything soon. how did the mpg's change afer the install?? do you have to remove the bumper to install this intake?? i also noticed that my car has like some kind of "intake silencer" and it has a black box kinda like where the new filter sits....i see that the intake has some brackets on it, can you take a pic of where those brackets are tied down to the body itself?? many thanks bro!! now im very anxious!!
it must be nice to throw an APEXi and get some more ponies out of it!
it must be nice to throw an APEXi and get some more ponies out of it!

FWIW the Strup and W-R CEL eliminators both work very well when installed correctly on the s-pipe with the secondary O2 sensor. So do the much cheaper 90 degree angled versions from ebay. Just do yourself a favor and get one made from 304 or 409 SS. Two stacked spark plug anti-foulers will also work but they're typically made from mild steel and rust very quickly, making 02 or CEL pipe removal impossible after a short time. One anti-fouler is usually not enough. IME the best orientation for angled CEL pipes is facing opposite from the exhaust flow direction.
As for hi-temp paint, you can cure it in an oven before installation but it's always chalky and never lasts very long. Header wrap is an aestically pleasing option but traps moisture and causes oxidation damage even to 304 SS pipes much faster than un-wrapped pipes. I prefer to live with discolored SS than replacing pipes twice as often. Ceramic coating is best, paint is okay and wrap is great for thermal performance but lousy for wrapped metal longevity.
Also, the 2-layer SS oem header gasket is the best available. If you're replacing it with some graphite impregnated paper ____ that came with your otherwise sweet ebay header, good luck...
I found a link to the ebay CEL pipe that's been 100% effective for me for over 30k miles now:
http://www.bigdaddiesgarage.com/angled-cel-fix.html
Put some anti-seize on the threads and you'll be able to remove it several years from now.
Last edited by ScionFred; Mar 28, 2011 at 06:34 AM.
Fantastic -- you the man, Fred ! I see my $30 eBay bid for a W-R Eliminator didn't cut it, so I just now ordered from Big Daddy instead !
Thanks man, but I did a home brew CAI shortly after bringing the car home and it works just fine for me !
! I see my $30 eBay bid for a W-R Eliminator didn't cut it, so I just now ordered from Big Daddy instead !!
Last edited by TrevorS; Mar 31, 2011 at 09:37 PM. Reason: added second response
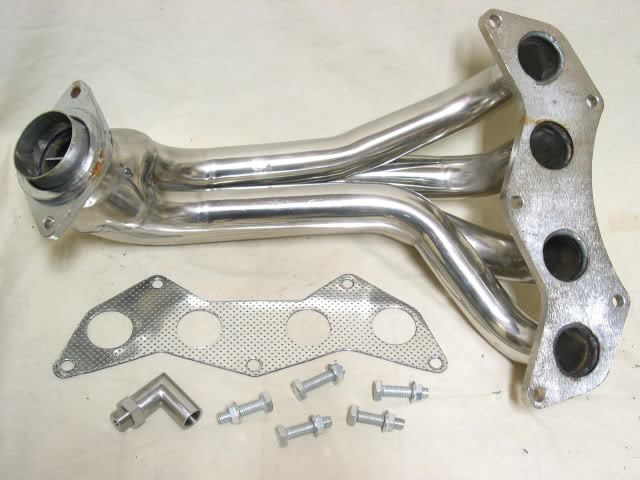
Same one Roller_Toaster got and you suggested. I was tempted to get the other ($10 more) and see if the dip stick fitment was better, but I chickened out  . Everything arrived today, so here's a photo of the new toys ! I'll be following it up with shots of the inside welds.
Hey Roller_Toaster, shall I put my header photos here, or start another thread? Whatever you prefer, dude!
======================LATER=========================
Starting another thread for my own header project, but I'm referencing this one -- thanks Roller_Toaster!
! I'll be following it up with shots of the inside welds.Hey Roller_Toaster, shall I put my header photos here, or start another thread? Whatever you prefer, dude!
======================LATER=========================
Starting another thread for my own header project, but I'm referencing this one -- thanks Roller_Toaster
!
Last edited by TrevorS; Apr 2, 2011 at 02:50 AM.
Same one Roller_Toaster got and you suggested. I was tempted to get the other ($10 more) and see if the dip stick fitment was better, but I chickened out . Everything arrived today, so here's a photo of the new toys ! I'll be following it up with shots of the inside welds.
! I'll be following it up with shots of the inside welds.I highly recommend that you check the flange flatness with a straight edge before installing it. Header flanges often warp and distort during the welding process and cheap ones are not re-surfaced afterward. My CXR header was bowed outward a little at the ends but pulled flat when torqued to the head. Knowing this beforehand I torqued from the outside in.
To minimize void size that can cause leaks and/or gasket failure I spent some time flattening the flange face with a 14" mill-bastard file and concentrated on the middle to reduce the curvature and resulting strain on the studs/head. A belt sander would also work if used carefully. Of course a machine shop could provide a perfectly flat flange surface for you. Don't worry about removing the zinc plating from the mild steel flange face. Better to have a leak-free seal than pretty silver plating.
The gasket pictured is a lot better than the graphite/paper gasket I mentioned before. It should seal larger voids than the oem 2-layer SS gasket but ultimately I still prefer the oem gasket. If your flange is very flat and smooth, I'd re-use the oem gasket and if it's fairly warped even after filing/sanding, try the supplied gasket. You shouldn't need those bolts but if you do, you'd be better off to get longer studs instead. Good luck to both of you.
Thanks Fred! I've checked the flange with a straight edge and the center is very slightly bowed out towards the cylinder head (flange thickness seems pretty healthy -- 7/16"). Can't say I'm excited about the smoothness of the flange face and I could see having it shaved. However, when I had my used iron 4G63 Turbo manifold shaved, it cost me $45 per surface (the turbo mounting face wasn't flat either), so I'll have to ponder that one -- it is tempting though. My immediate problem is how to remove the black stuff (slag?) from around the welds.
PS. I could try the belt sander approach, but the header weight is so far off to one side of the flange, I'm afraid I could end up making it worse.
PS. I could try the belt sander approach, but the header weight is so far off to one side of the flange, I'm afraid I could end up making it worse.
Last edited by TrevorS; Apr 2, 2011 at 06:41 PM. Reason: added PS
Feel free to put any pictures/videos in here man!(Edit, just noticed your edit, lol)
^for the slag, a good, fine toothed round file will allow you to get into the small grooves and do a little gentle work, just be careful not to scratch anything!
^for the slag, a good, fine toothed round file will allow you to get into the small grooves and do a little gentle work, just be careful not to scratch anything!
Last edited by Roller_Toaster; Apr 2, 2011 at 06:51 PM.
Thanks for the inputs Fred! I've checked the flange with a straight edge and the center is very slightly bowed out towards the cylinder head (flange thickness seems pretty healthy -- 7/16"). Can't say I'm excited about the smoothness of the flange face and I could see having it shaved. However, when I had my used iron 4G63 Turbo manifold shaved, it cost me $45 per surface (the turbo mounting face wasn't flat either), so I'll have to ponder that one -- it is tempting though. My immediate problem is how to remove the black stuff (slag?) from around the welds.
Careful filing of my flange face produced a very smooth mating surface. Cut down some high spots as well. To remove weld slag I used a rotary tool and carbide cutting bit, followed by stones and sanding drums. Can you clamp the header in a vise, (flange face up) and use a hand-held belt-sander? That's how I secured mine for filing. Obviously the header has to be very rigidly mounted.

Looks like a major makeover courtesy of eBay -- pretty impressive and especially the parts cost ! Good work dude  !
!
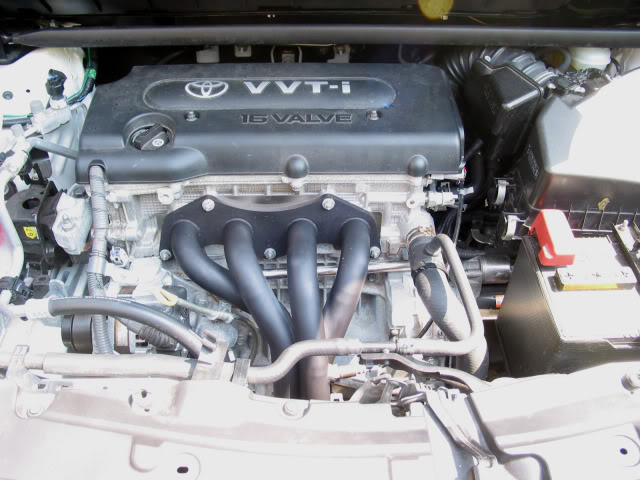
By the way, is your coolant tank really as low as it appears? If so, better get it topped up before it causes trouble.
! Good work dude By the way, is your coolant tank really as low as it appears? If so, better get it topped up before it causes trouble.
Just an update on my own header install. There may be some variation between examples of the header since Roller_Toaster's dipstick solution didn't work for me, it left insufficient clearance to install and remove the header. My solution was to make a short aluminum bracket to move the dipstick mounting point forward towards the radiator 3/4", and then rotate the dipstick 45 degrees left. The resulting clearance is still close for header install and removal, but it's reasonable if you're careful (I drape a towel over the header to protect the finish). I used a 6MMx1.00x20 bolt and matching nut and split ring washer to attach the dip stick to the underside of the 1/8" thick aluminum bracket (1/4" drill holes -- no dipstick modification needed). The original 6MMx1.00x16 bolt is used to secure the back end of the bracket to the OE mount.
Also, the OE exhaust manifold to 'S'-pipe connection uses two long bolts with springs to allow some flex between the engine and 'S'-pipe. Fastening them together with bolts alone creates a rigid structure from the engine back through the scuba (the scuba exit coupling also has springs), that creates a lot of stress with the engine running and isn't really a good idea. Since the original bolts fit the header flange holes, my solution was to keep the springs and secure the bolts with 10MMx1.25 nuts (photo also shows split ring washers, but there isn't room on the installed bolt).
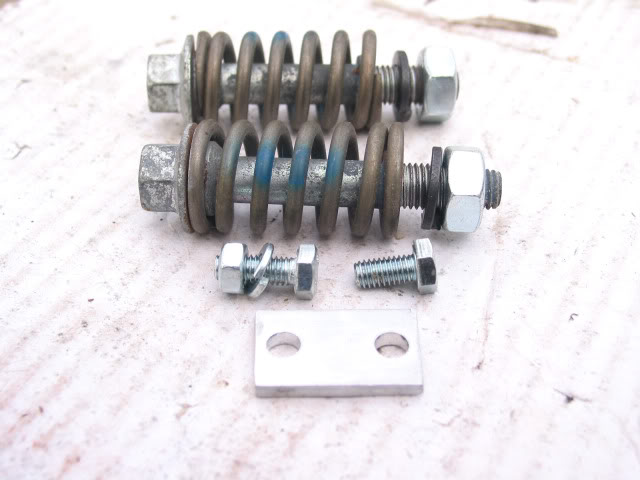
Also, the OE exhaust manifold to 'S'-pipe connection uses two long bolts with springs to allow some flex between the engine and 'S'-pipe. Fastening them together with bolts alone creates a rigid structure from the engine back through the scuba (the scuba exit coupling also has springs), that creates a lot of stress with the engine running and isn't really a good idea. Since the original bolts fit the header flange holes, my solution was to keep the springs and secure the bolts with 10MMx1.25 nuts (photo also shows split ring washers, but there isn't room on the installed bolt).
Last edited by TrevorS; Apr 14, 2011 at 08:02 PM. Reason: added more detail; added a correction
OK, header installed, car off the jack stands, and paint curing in progress! Everything seems fine so far and I'm looking forward to actually driving it in a little while !
========================LATER=========================
Runs great, I like it ! Thanks again Roller_Toaster and ScionFred .
!========================LATER=========================
Runs great, I like it
Last edited by TrevorS; Apr 15, 2011 at 05:00 PM.