
Official Interior Dash Thread...


Senior Member
AlphaSquad
SL Member
Joined: Feb 2008
Posts: 923
From: Los Angeles 323/626
I have a FM tC And I want to paint some of my interior trims but I can't decide on a color. My gauges/hvac/dome+map lights are all blue and white themed. Any suggestions on color?


Junior Member
Joined: Apr 2008
Posts: 8
From: Fairfield, CA
Originally Posted by yeldak
Heres how I do it
First things first, make sure first to get all the armor all or any type of dressing type protectant off of the pieces you will be working with. I usually do it with some simple green, and then isopropyl alcohol.
Prep
Smooth Pieces
Wet Sand all smooth pieces (waterfall/radio door/etc) with 1000 Grit sandpaper (try to remove all the factory color, if you get it all off, you can get away without priming these pieces). If you do have to prime, or just want to prime, I usually start with 2-3 coats of duplicolor adhesion promoter
 . After adhesion promoter is tacky, I would say 2-3 coats of a regular duplicolor primer. with 10-20 minutes between (it all depends on temp, humidity etc). You want the paint to be tacky between coats.
Textured Pieces
Dry sand all textured pieces (cluster surround/vent surrounds/etc) with 400 grit sandpaper. These pieces will have to be primed. I usually start with 2-3 coats of duplicolor adhesion promoter
. After adhesion promoter is tacky, First I usually use Duplicolor filler primer
 . I do 2-3 coats with about 10-20 minutes in between (it all depends on temp, humidity etc). You want the paint to be tacky between coats.
Let that dry overnight
After fully dried, get a bucket/sink etc with a good soapy water solution, you want to be able to feel the soapiness of the water. Using 1000 grit sandpaper I sand until smooth, being careful around edges and corners, if you sand through, repeat steps above by doing the spot that was sanded through. Keep your sandpaper clean, rinse it around in the water every so often to get rid of any dirt or whatnot. the best way to tell when its done... on day 1, if you are using a light colored primer, take some dark colored spray paint, and spray a light guide coat onto the panel. This will give you a guide when you start sanding on when to stop, when all the guide coat is gone, your panel should be smooth.
Thoroughly rinse everything you just sanded, you want all that sanding residue off. Set them on a towel or whatnot to dry completely. Make sure everything is dry before moving on. This includes the foam that is on some of the pieces.
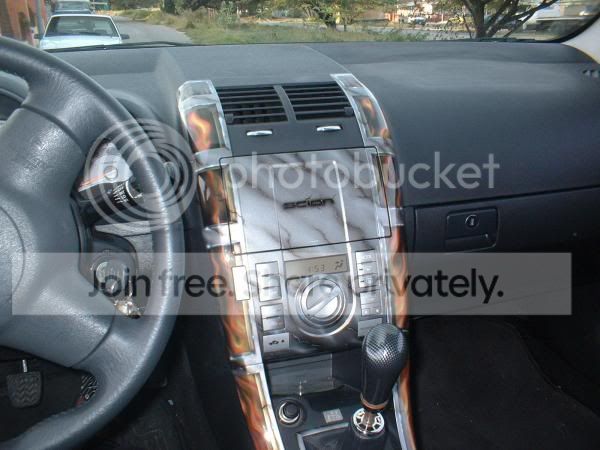
Now should be ready to paint. For the most part, I use duplicolor , normally the lacquer version, for certain colors, you have to move to krylon/rustoleum/etc. If you have a certain pattern, such as the 2 tone above, I usually spray the lighter color first. Position the piece you are going to paint in a way it will be easy for you to get the whole panel. I sometimes have to string things from the ceiling to be able to get into all the little spaces. I start by spraying 2 coats of Adhesion Promoter mentioned above. When spraying, you want to hold the can 8-10 inches from the panel, make an even stroke across the panel while spraying, you want about a 50% overlap on passes to get good coverage. I normally spray 3-5 coats of color, it all depends on the color/conditions and how good the coverage is. Keep your coats light, you can always add more coats, its not as easy to get a run from too thick a coat out. About 10-20 minutes between. Again, it all depends on your painting enviroment. Just check to make sure the paint is tacked up (sticky) between coats. If you happen to be doing a 2 tone, or just multiple colors, you want to let your first color sit for about 2-3 hours before laying down tape. I always use the blue painters tape, it peels off pretty clean, and if for some reason your first color wasn't so dry, it won't tear the paint up so bad you'll have to wetsand, I've cleared right over the tape marks and you would never know it. Anyway, when you are satisfied with your taping, repeat above for your second color.
Once color is on I let it dry for about an hour or 2. If for some reason I got a little too thick with the color, I'll wetsand out any imperfections and recoat. Some people sand between color and clear, I'm not a fan, and this is my write up!.... So, as stated above, get your pieces into a position where you can get good coverage. Spraying clear is a little tricky. I would suggest getting some practice on what works for you. I normally to 3-5 light coats, 1 medium coat, and 1 medium-heavy coat of clear. I know thats alot of clear, but alot of it comes off in the wetsanding phase. As stated above you want about a 50% overlap to get good coverage. leaving about 10-20 minutes between coats depending on conditions. Once you spray your final coat... make sure you have your pieces somewhere they won't be disturbed. Try to keep them out of a spot with alot of dust blowing around as well. I will let the clear sit overnight, sometimes 2 days, depending on how dry it is. When it is dry, you are ready for wetsanding to smooth that bad boy out.
Remember in the sanding step above that soapy water solution... do that again, this time you will be using 2000 grit sandpaper though. Make sure to keep your sandpaper rinsed out, keep the panel wet, and don't let any dirt sit on the panel... trust me, you will notice the scratches a spec of dirt will leave. Be careful around edges and corners, as you will sand through before you know it. Once the panel is smooth enough to your liking, Rinse clean of all the sanding residue and I usually use a microfiber towel to dry. I do 3 buffings, all by hand..... and then a wax.
For the first buffing, I use a microfiber towel along with turtle wax rubbing compound getting the rag damp, dip into the compound and rubb away. I usually use a 1 finger circular motion. Use a clean rag to wipe off. This will bring out a shine, but it will be a dull shine... settle down, it gets better I promise.
2nd buffing is done using a DRY microfiber towel and mequirs deep crystal polish using the one finger circular as mentioned above. Again using a clean towel to remove.
3rd buffing is using the same product above (meguiars deep crystal polish), on this time you'll use a wet microfiber cloth, one finger circular motion bringing out the shine. again using a clean towel to remove. If its not shiny to your liking, repeat the above steps until you get your desired result.
And for the final, I throw a coat of my favorite wax (which happens to be meguiars deep crystal wax) before reinstalling in the car. In between waxings I just use a simple quick detailer, the same stuff I use on the outside to keep up the shine....
Hope this helps anyone who wishes to DIY
First things first, make sure first to get all the armor all or any type of dressing type protectant off of the pieces you will be working with. I usually do it with some simple green, and then isopropyl alcohol.
Prep
Smooth Pieces
Wet Sand all smooth pieces (waterfall/radio door/etc) with 1000 Grit sandpaper (try to remove all the factory color, if you get it all off, you can get away without priming these pieces). If you do have to prime, or just want to prime, I usually start with 2-3 coats of duplicolor adhesion promoter
. After adhesion promoter is tacky, I would say 2-3 coats of a regular duplicolor primer. with 10-20 minutes between (it all depends on temp, humidity etc). You want the paint to be tacky between coats.Textured Pieces
Dry sand all textured pieces (cluster surround/vent surrounds/etc) with 400 grit sandpaper. These pieces will have to be primed. I usually start with 2-3 coats of duplicolor adhesion promoter
. After adhesion promoter is tacky, First I usually use Duplicolor filler primer. I do 2-3 coats with about 10-20 minutes in between (it all depends on temp, humidity etc). You want the paint to be tacky between coats.Let that dry overnight
After fully dried, get a bucket/sink etc with a good soapy water solution, you want to be able to feel the soapiness of the water. Using 1000 grit sandpaper I sand until smooth, being careful around edges and corners, if you sand through, repeat steps above by doing the spot that was sanded through. Keep your sandpaper clean, rinse it around in the water every so often to get rid of any dirt or whatnot. the best way to tell when its done... on day 1, if you are using a light colored primer, take some dark colored spray paint, and spray a light guide coat onto the panel. This will give you a guide when you start sanding on when to stop, when all the guide coat is gone, your panel should be smooth.
Thoroughly rinse everything you just sanded, you want all that sanding residue off. Set them on a towel or whatnot to dry completely. Make sure everything is dry before moving on. This includes the foam that is on some of the pieces.
Now should be ready to paint. For the most part, I use duplicolor
, normally the lacquer version, for certain colors, you have to move to krylon/rustoleum/etc. If you have a certain pattern, such as the 2 tone above, I usually spray the lighter color first. Position the piece you are going to paint in a way it will be easy for you to get the whole panel. I sometimes have to string things from the ceiling to be able to get into all the little spaces. I start by spraying 2 coats of Adhesion Promoter mentioned above. When spraying, you want to hold the can 8-10 inches from the panel, make an even stroke across the panel while spraying, you want about a 50% overlap on passes to get good coverage. I normally spray 3-5 coats of color, it all depends on the color/conditions and how good the coverage is. Keep your coats light, you can always add more coats, its not as easy to get a run from too thick a coat out. About 10-20 minutes between. Again, it all depends on your painting enviroment. Just check to make sure the paint is tacked up (sticky) between coats. If you happen to be doing a 2 tone, or just multiple colors, you want to let your first color sit for about 2-3 hours before laying down tape. I always use the blue painters tape, it peels off pretty clean, and if for some reason your first color wasn't so dry, it won't tear the paint up so bad you'll have to wetsand, I've cleared right over the tape marks and you would never know it. Anyway, when you are satisfied with your taping, repeat above for your second color.Once color is on I let it dry for about an hour or 2. If for some reason I got a little too thick with the color, I'll wetsand out any imperfections and recoat. Some people sand between color and clear, I'm not a fan, and this is my write up!.... So, as stated above, get your pieces into a position where you can get good coverage. Spraying clear is a little tricky. I would suggest getting some practice on what works for you. I normally to 3-5 light coats, 1 medium coat, and 1 medium-heavy coat of clear. I know thats alot of clear, but alot of it comes off in the wetsanding phase. As stated above you want about a 50% overlap to get good coverage. leaving about 10-20 minutes between coats depending on conditions. Once you spray your final coat... make sure you have your pieces somewhere they won't be disturbed. Try to keep them out of a spot with alot of dust blowing around as well. I will let the clear sit overnight, sometimes 2 days, depending on how dry it is. When it is dry, you are ready for wetsanding to smooth that bad boy out.
Remember in the sanding step above that soapy water solution... do that again, this time you will be using 2000 grit sandpaper though. Make sure to keep your sandpaper rinsed out, keep the panel wet, and don't let any dirt sit on the panel... trust me, you will notice the scratches a spec of dirt will leave. Be careful around edges and corners, as you will sand through before you know it. Once the panel is smooth enough to your liking, Rinse clean of all the sanding residue and I usually use a microfiber towel to dry. I do 3 buffings, all by hand..... and then a wax.
For the first buffing, I use a microfiber towel along with turtle wax rubbing compound
getting the rag damp, dip into the compound and rubb away. I usually use a 1 finger circular motion. Use a clean rag to wipe off. This will bring out a shine, but it will be a dull shine... settle down, it gets better I promise.2nd buffing is done using a DRY microfiber towel and mequirs deep crystal polish
using the one finger circular as mentioned above. Again using a clean towel to remove.3rd buffing is using the same product above (meguiars deep crystal polish), on this time you'll use a wet microfiber cloth, one finger circular motion bringing out the shine. again using a clean towel to remove. If its not shiny to your liking, repeat the above steps until you get your desired result.
And for the final, I throw a coat of my favorite wax (which happens to be meguiars deep crystal wax) before reinstalling in the car. In between waxings I just use a simple quick detailer, the same stuff I use on the outside to keep up the shine....
Hope this helps anyone who wishes to DIY


Joined: Nov 2007
Posts: 7,369
From: Jacksonville, FL
Originally Posted by tC_Princess82
So is there a DIY thread on how to take the parts of the dash off to paint them? I know people talk about how they snap on and off so easy, but I have never done it and afraid to break it.
try searching a bit bro..
I'm sure there is more just gotta look..


Senior Member
SL Member
Joined: Oct 2007
Posts: 584
From: Peoria
Originally Posted by etsnet
Originally Posted by kylelewis32
ok so heres a little pic. just a taste of the beginning

LOL WTF!
Different for sure and I wouldn't want to be a hitch hiker getting into that car.lol