
My install... too much to list in a header (56k beware)


Thread Starter
Senior Member
SL Member
Joined: May 2006
Posts: 208
From: South Carolina
So, I'm off to get some new t-fittings for the vaccum lines. The ones supplied were 4mm and most of my hoses are 6mm.
Does anyone think it's bad to pull the vaccum for the BOV, the wastegate and the boost gauge from the same line? To me it shouldn't make a difference. They would still make it a closed system and not affect anything. But... that's just my opinion. I'm open to others. Be back soon.
Does anyone think it's bad to pull the vaccum for the BOV, the wastegate and the boost gauge from the same line? To me it shouldn't make a difference. They would still make it a closed system and not affect anything. But... that's just my opinion. I'm open to others. Be back soon.

Senior Member
SL Member
Joined: May 2006
Posts: 933
From: Ellicott City, MD
BOV and WG are supposed to be tied into the same line. They should be tied in to the crank case/intake plenum hose to release excess crank case pressure. (green nipple)
Your PSI gauge should be tied in to the hose that comes off right after the intake butterfly plate. (throttle body)
Do you need me to drive south and do this install for you? ;-)
Your PSI gauge should be tied in to the hose that comes off right after the intake butterfly plate. (throttle body)
Do you need me to drive south and do this install for you? ;-)
Thread Starter
Senior Member
SL Member
Joined: May 2006
Posts: 208
From: South Carolina
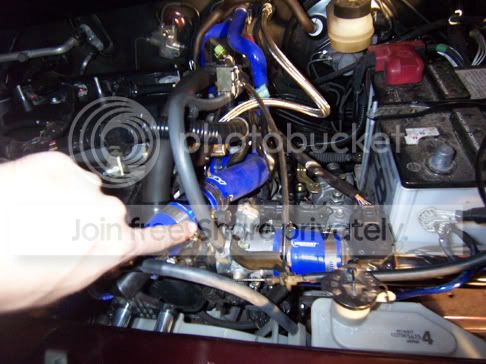
Alright Pat... drive on down.  I'm almost there... I just don't know what you mean by "green nipple". I understand pulling from the intake plenum. But the only green thing I can find is on the same hose. (Just the other end.) Here's what I got...
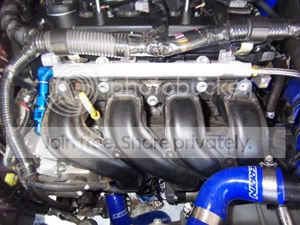
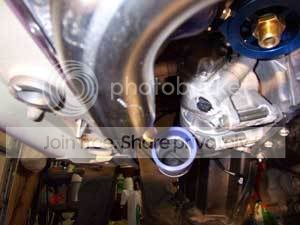
The hose comes off the intake here:
I plan on t-ing off of this for the boost gauge here:
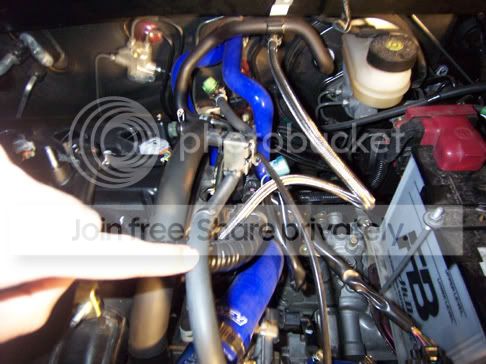
It then connects to this sensor:
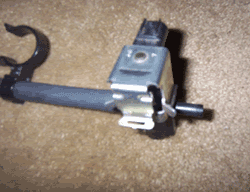
And goes on back to this green thing: (being the only 'green nipple' type of thing I can find)
So, if I have to tie into two different hoses, one being the intake and one being the green nipple one I'm confused because I only seem to have one line running with both of those things. Unless of course you're counting it as two since the sensor splits it.
_______________
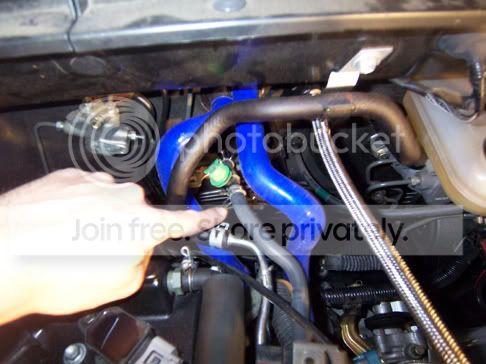
Well, while I'm here, here's some more pics of what's going on... Thanks for the help guys!
I'm almost there... I just don't know what you mean by "green nipple". I understand pulling from the intake plenum. But the only green thing I can find is on the same hose. (Just the other end.) Here's what I got...The hose comes off the intake here:
I plan on t-ing off of this for the boost gauge here:
It then connects to this sensor:
And goes on back to this green thing: (being the only 'green nipple' type of thing I can find)
So, if I have to tie into two different hoses, one being the intake and one being the green nipple one I'm confused because I only seem to have one line running with both of those things. Unless of course you're counting it as two since the sensor splits it.
_______________
Well, while I'm here, here's some more pics of what's going on... Thanks for the help guys!
Thread Starter
Senior Member
SL Member
Joined: May 2006
Posts: 208
From: South Carolina
Ok. Scratch that... I focused too much on "green nipple" than on what you actually said about the crank case ventilation. So, I should pull BOV and Wastegate off my PCV valve. Good deal... I see where you're getting 'green nipple' from now. I'm off to buy some t's. More updates soon.
The next issue is going to be where to put the sending unit for my fuel pressure gauge.
The next issue is going to be where to put the sending unit for my fuel pressure gauge.

Senior Member

SL Member
Joined: Sep 2005
Posts: 1,125
wow, you have been working on this car for almost a year... I hope that ZPI kit works because after all that worked and time, to have a $hitty kit is really going to hurt.
Have you dealt with the oil problem on the turbo?
Have you dealt with the oil problem on the turbo?
Senior Member
SL Member
Joined: May 2006
Posts: 933
From: Ellicott City, MD
Originally Posted by JSosa
wow, you have been working on this car for almost a year... I hope that ZPI kit works because after all that worked and time, to have a $hitty kit is really going to hurt.
Have you dealt with the oil problem on the turbo?
Have you dealt with the oil problem on the turbo?
Now you are getting it Jason
Oh and you need to change your brake fluid., check your blinker fluid while you are at it.
Thread Starter
Senior Member
SL Member
Joined: May 2006
Posts: 208
From: South Carolina
I got my vaccum lines run. Moving on...
I'm with you JSosa, it would suck to have it not work after all this. It's not taking a long time because of the kit though. It's taking a long time because of the installer. I spent time going to the parts store three times yesterday and all I accomplished was physically working on the car about 45 minutes. lol. I gotta buckle down on this project and get it done.
I'll try to find another 10 minutes today to work and I'll post pics later.
Thread Starter
Senior Member
SL Member
Joined: May 2006
Posts: 208
From: South Carolina
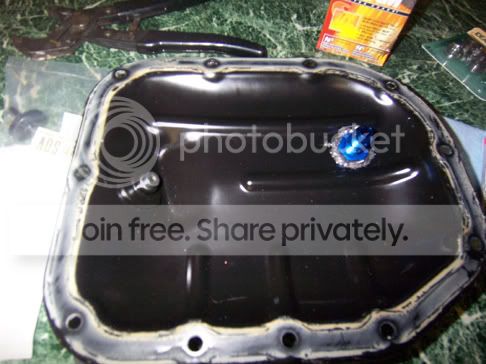
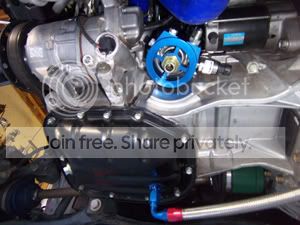
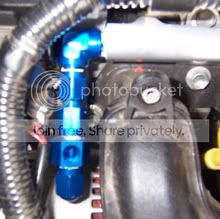
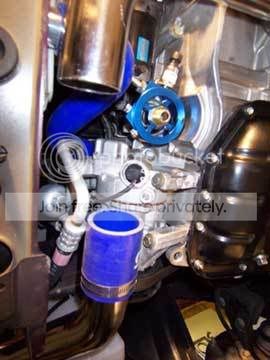
Alright, so I had a chance to work on the project again this weekend. I've got the oil sandwich filter adapter on and the AN coming off will feed oil to the turbo. You can also see the oil pressure sensor here and the oil return line from the turbo oil pump to the oil pan. I know it's feeding "under" the oil, but it's a pressurized system and the pump will handle this.
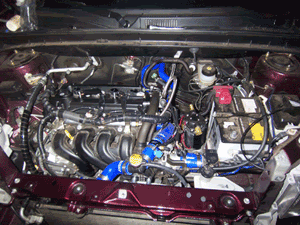
I had to remove the fuel rail and combine some fittings to allow a place for the fuel pressure sensor to go. I don't really need this due to our fuel system, but I've already got the gauge and hole in the dash for it, so this was my solution for running this. It's coming off of a Perrin fuel rail.
I also mounted the boost gauge sensor under the lip of the fender next to the battery. (no pic)
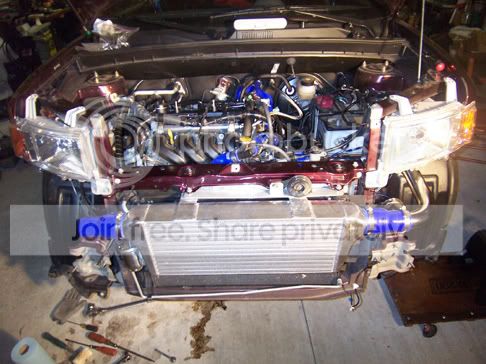
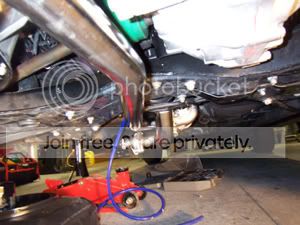
I got the turbo mounted to the downpipe (and you can see the boot from my new halfshafts the driveshaft shop made):
I had to reclock the turbo to get the charge pipe to clear the downpipe. No big deal right?
And that's where the new problems showed up.
The charge pipe coming back from the turbo is to mount up to a pipe that enters the FMIC. They don't come anywhere close!
Here's a few pics of how far off I am:
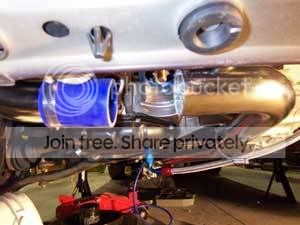
I'm about 5 1/4 inches away and one full pipe front-to-rear off of meeting up. I tried assesing this from every angle I could think of.
- Adding a block spacer between the header and block
- Rebending the charge pipe (No one within 2 hours can bend stainless here)
- Using a silicon "S bend" coupling that's longer
- Mailing the charge pipe off to be rebent on "my specs" and praying it works
Until I finally came up with this: I'm going to just get a piece of exhaust pipe made for the difference and add an extra silicon coupling. Sure it won't be stainless and look pretty (especially if it rusts later), but I'm going to be fabricating a skid plate for this anyway (did you see the oil line in pic 1??) so it won't ever be seen. If anyone has a better suggestion or another idea, I'm open to suggestions.
So, at this stage I've got to ziptie some vaccum and oil lines, remount the pass. wheel, secure the washer fluid res., and fenderwells. Then I'm putting it on a dolly and towing it to the exhaust shop to have that piece and the rest of the exhasut to the axle-back fabricated. That should be one day next week.
At that point I'll be running electrical for all guages and mounting the remaining sensors/factory sensors. I'll send another update after that.
... if anybody is still interested. Oh, and if anyone wants to make any ZPI sucks comments or you're a boob and should be placed in a padded room far from any other living thing comments, please do. Any acknowledgement at this point will help me know if you're still out there.
I had to remove the fuel rail and combine some fittings to allow a place for the fuel pressure sensor to go. I don't really need this due to our fuel system, but I've already got the gauge and hole in the dash for it, so this was my solution for running this. It's coming off of a Perrin fuel rail.
I also mounted the boost gauge sensor under the lip of the fender next to the battery. (no pic)
I got the turbo mounted to the downpipe (and you can see the boot from my new halfshafts the driveshaft shop made):
I had to reclock the turbo to get the charge pipe to clear the downpipe. No big deal right?
And that's where the new problems showed up.
The charge pipe coming back from the turbo is to mount up to a pipe that enters the FMIC. They don't come anywhere close!
Here's a few pics of how far off I am:
I'm about 5 1/4 inches away and one full pipe front-to-rear off of meeting up. I tried assesing this from every angle I could think of.
- Adding a block spacer between the header and block
- Rebending the charge pipe (No one within 2 hours can bend stainless here)
- Using a silicon "S bend" coupling that's longer
- Mailing the charge pipe off to be rebent on "my specs" and praying it works
Until I finally came up with this: I'm going to just get a piece of exhaust pipe made for the difference and add an extra silicon coupling. Sure it won't be stainless and look pretty (especially if it rusts later), but I'm going to be fabricating a skid plate for this anyway (did you see the oil line in pic 1??) so it won't ever be seen. If anyone has a better suggestion or another idea, I'm open to suggestions.
So, at this stage I've got to ziptie some vaccum and oil lines, remount the pass. wheel, secure the washer fluid res., and fenderwells. Then I'm putting it on a dolly and towing it to the exhaust shop to have that piece and the rest of the exhasut to the axle-back fabricated. That should be one day next week.
At that point I'll be running electrical for all guages and mounting the remaining sensors/factory sensors. I'll send another update after that.
... if anybody is still interested. Oh, and if anyone wants to make any ZPI sucks comments or you're a boob and should be placed in a padded room far from any other living thing comments, please do. Any acknowledgement at this point will help me know if you're still out there.
Thread Starter
Senior Member
SL Member
Joined: May 2006
Posts: 208
From: South Carolina
Tidying up!
I got the washer reservoir mounted, the pass. wheel back on (even the hubcap!), the hood release and everything ziptied. I've got an autotransport on reserve for Sat. morning and she's going to get the plumbing fixed. Then it's back home to rip it all apart again.
So this is the first time I've actually seen how low the assembly sits. riiiiiiiiiiiiiiiiiiight. I'll post a pic, but I don't know what good it will do. I saw Pat's rig in pics, but until I'm lying on the ground next to it, I didn't get a good idea. I will measure with the stock suspension/steelies/tires, what the bottom of the side of the wastegate (lowest part) is from the ground.
I'm not sure what my height will be with susp./tires. I'm going to be running Tein SS+P probably on the highest setting to start with. I hope to get some 18x7.5 G-Games 77W and 215/40-18 Nitto NeoGen and OTG Shims (Rear) and drop the SS+P's down at that time. That may no longer be an option, but I know the turbo won't go any higher.
Also, in regards to this, I had to remove the heatshield from under the car (where the cat was) to get this to fit up in there far enough. My clutch lines (or my ebrake line, not sure about this b/c it got late and I forgot to look) enter the cabin right above the turbo. I'm going to have to put something there (heatshield tape, custom shield, something) to keep the heat down. Any ideas?
Senior Member
SL Member
Joined: May 2006
Posts: 933
From: Ellicott City, MD
Meh, All of my heat shields were removed due to rubbing.. they were driving me nuts. BTW ken must not have included that special part for ya in your kit. Basically it is a piece of IC pipe maybe 6 inches long. If that.
Thread Starter
Senior Member
SL Member
Joined: May 2006
Posts: 208
From: South Carolina
Pat, did you put anything in to protect your shift cables? Also, where did you draw power for your added oil pump?
I fixes the misalignment problem this morning. I cut the stainless IC pipe off back around the oilpan and bent some exhaust pipe to replace that missing section and took it down to one bend like it should be. I will get another silicon coupling to attach it. I also cut the flange an 'upward' pipe off the Greddy Evo 2. Then welded exhaust pipe (custon fabbed) from the turbo to the muffler. Aliigned it with the rear skirt so it won't melt and added some steel bars to better support it all. I'll get some pics when I get back. i'm on my phone at the Mexican rest. after dropping off the trailer.
I measured the clearance and the wastegate is currently 3 and a half inches off the ground. There went speedbumps. lol
I'm going to be installing O2's/AF sensors and running wiring to install the gauges in a little while. Then tighten up and recheck all my bolts. I'll post again later.

Junior Member
Joined: Jun 2007
Posts: 28
Originally Posted by jdlong
Alright Pat... drive on down. I'm almost there... I just don't know what you mean by "green nipple". I understand pulling from the intake plenum. But the only green thing I can find is on the same hose. (Just the other end.) Here's what I got...
The hose comes off the intake here:
I'm almost there... I just don't know what you mean by "green nipple". I understand pulling from the intake plenum. But the only green thing I can find is on the same hose. (Just the other end.) Here's what I got...The hose comes off the intake here:
Hi bro, seems like u have the MAF sensor at the pipe connecting to the intercooler to the TB. I was told the sensor might be burnt off? I have the same setup as this but have problem during idling so Im wondering if its the cause? i have seen setups with the maf sensor right after the air intake before going into the turbine..
Senior Member
SL Member
Joined: May 2006
Posts: 933
From: Ellicott City, MD
Your idle problem is caused by a vacuum leak somewhere. It is kinda hard for the MAF as you call it to have its sensor burned off when the purpose of an IC pipe is to take Air and cool it. With the ZPI remote mount kit, the air filter cone is connected to the turbo housing.
Junior Member
Joined: Jun 2007
Posts: 28
Checked all hoses and still couldnt find any leakage. The problem occurs when i'm off throttle and the car is rolling with gear engaged and I'm turning left (or right or basicaaly under load). The rpm suddenly drops so low the engine dies off.
My MAF location is also there at the intercooler piping but someone advise it to be placed right after the air intake funnel. So i'm kinda lost here.
My MAF location is also there at the intercooler piping but someone advise it to be placed right after the air intake funnel. So i'm kinda lost here.
Senior Member
SL Member
Joined: May 2006
Posts: 933
From: Ellicott City, MD
I was having a problem with my second o2 sensor where when I had it hooked up to a scan gauge I could watch it shut off then come back on and each time the RPMs dropped then Reved. Revs varying have to do with the AF mixture. When I had a Vacuum leak, my revs were majorly high in idle.
yea I checked that thread and some of those guys don't have a clue. None of my info come from hearsay. Everything I speak about come from trial and error experience. I put the ZPI kit on in my driveway with basicly no help.I had some info about location of things, and a few pictures of the kit together. But when it came down to the serious troubleshooting, I was on my own.
Thus why Jason loves me.
Junior Member
Joined: Jun 2007
Posts: 28
I can understand...I did mine thru trial and error as well. The location of the maf after the intake funnel makes it difficult for me to tune as well (maybe turbulence of air coming in?) and relocating the MAF at the intercooler pipe before my TB makes it more stable. But jus my observation and opinion. I guess to each his own.
My sensors are working fine when I use the elmscan tool to diagnose. Hence I still cant find the hiccup. Sigh....troubleshoot...troubleshoot....
My sensors are working fine when I use the elmscan tool to diagnose. Hence I still cant find the hiccup. Sigh....troubleshoot...troubleshoot....
Senior Member
SL Member
Joined: May 2006
Posts: 933
From: Ellicott City, MD
Originally Posted by renton
Oh by the way wat CR are u on now? I'm down to 10.0 on 14.5psi
After watching fusionscion with the identical kit blow his up, i figured I wouldn't take mine above the 7.25psi (spring regulated).